mikebart@Posted: Sun Oct 29, 2006 4:50 am : This tutorial will show you how to build a brick arch and then bake diffuse and normal maps from a high poly model using the projection modifier.
Baking multiple maps using the Projection Modifier in 3dsmax8 by Michael Bartlett
Introduction.
In this tutorial you will learn how to produce diffuse maps and normal maps in 3dsmax using the projection modifier. As an example I’ll show you how to make a simple brick archway.
I hope I can explain this in a simple way, as it’s really quite a simple technique. In fact I wouldn’t call this an advance tutorial at all but it does require some modeling skill as well as a lot of time if you wish to extend this tutorial into your own project and add more detail to the mesh, which I hope you do.
1. Setting up the grid for use with Doom3.
1. Open the Customize/Units Setup tab and set the display unit scale to Metric
2. Open the Customize/Grid and snap settings tab and follow the image below
 2. Making a brick.
READ THIS, this brick is slightly larger than your every day, average brick, I decided early on in this project to make the bricks this size as they fit into e.g. a 512x512 texture much easier than if I was to use a scale brick. Just thought you might like to know incase your fussy about that sort of stuff. If you want to create a different size brick, or a building stone, anything, go ahead. In fact you could build it entirely out of old Cereal boxes if you wanted to, whatever you like. It won’t affect the outcome of this tutorial.
1. Turn on Snaps Toggle

and make a box; length: 8, width: 16 and height: 6
2. With the box selected open the Hierarchy tab,

Select Affect pivot only and then center to object, the pivot should now be in the centre of the box.
3. Scale the brick to 97.0 that’s 97%, this will allow room for mortar so dont do this if you want the bricks sealed, the option’s yours.
4, Turn off Snaps Toggle. Chamfer the external edges slightly, this is necessary for the normal map.
5. To create the nicks and cuts seen in the image below I’ve used the cut tool in edit poly mode and then manipulated vertexes, or if you prefer you can make a few random shapes and subtract them from the brick using the Boolean tool. To get the indent which is always found on the bottom of a brick I’ve used the inset and bevel tool’s found in edit poly mode.

The brick contains about 200 poly’s so that’s 400 tris in Doom3.
6. We don’t want all the bricks to look the same, so copy the original brick and manipulate a few vertexes, cut some more with the Boolean tool if you feel it necessary.
Do this several times, take note that I’ve kept them all in the same mesh and have copied them as elements within the same editable poly.

As you can see in the image above, I’ve made 6 different ones, but they are all made from the same original brick we started with. You can also flip and rotate them to get a bit more variety.
3. Adding Colour
1. You can either use these diffuse maps or you can create your own. I’ve used 3 different ones.


The materials we’re looking at are the top three in the material editor pic below, load the brick_large01.jpg into the diffuse slot, do the same with the next 2 .jpg files.
note: You can also add a bumpmap and specular map to the material, and they will get rendered to texture too, the bumpmap gets added to the normal map and you get a much better result than you would using the nvidia plugin with photoshop and overlaying the diffuse as im pretty sure this method corrupts normalmap (changes direction of normals)
edit: There is a way to overlay the baked normalmap with the nvidia plugin properly by lowering the value of the blue channel on the overlayed map, I personally havent played with this method myself so if someone has some more info on this I can edit it in.

2. Make 2 more copy’s of the bricks, drag and drop the 3 textures onto the bricks as shown below.
 4. Stacking the bricks.
1. Go into editable poly mode and start stacking the bricks into a solid wall by copying them as elements within the editable poly.
2. Then remove the bricks which will be used as a doorway, but once again you can do whatever you want.
3. Turn off snapping and use the move and rotate tools to position the bricks where you need them respective of the grid, to get the general layout do most of the work in the front view, and tweak a few bricks here and there to make it look old and distressed.
4. The doorway fits inside a 128x128x16 cube, you may notice the bricks protruding from the edges are the same as the bricks on its opposite sides, this is so that the texture will tile horizontally. If you need special bricks for a special detail then you can modify one of the original bricks, I’ve made special triangular bricks to fit around the arch and I use the slice plane tool in edit poly mode to make these.
Finally, name the object ‘bricks_01’.
 5. Low poly mesh and Mortar mesh.
1. Create a new box surrounding the shape of the bricks, if you’re following the tutorial it should be 128x128x16, you’ll need to turn on snapping again for this, keep it tight.
Make another box the same shape as the opening and use the Boolean tool to cut the shape of the doorway. Name this object ‘mortar01’

2. Copy ‘mortar01’ and drag it off to the side. This will be our low poly mesh so name it ‘brickdoor01_low. (remember to keep it snapped to the grid!)
3. Select ‘mortar01’ again and ‘convert to editable poly’ then right click in the viewport and ‘Isolate selection’.
Chamfer the inside edges of the arch and divide a few poly’s on the front and back of the arch using the cut tool as shown below, push and pull a few vertexes here and there to give the mortar a bit of shape.

Apply the appropriate material to ‘mortar01’.

4. Exit Isolation mode. Go into vertex mode and start manipulating vertexes so that you expose some, if not all of the brick like in the pic below.
 6. UVW Mapping the Low Poly Model
1. Select the low poly model and add an ‘Unwrap UVW’ modifier to it.
2. I’m not going to try and explain to you how to unwrap a model for a UVW map. Personally, even after reading the tutorials that came with max I found that its just one of those things you learn with experience, by doing.
Another good way to get some good tips on UVW mapping is to open up the skins from games and compare them to their relative models, see how the pros do it.
However, this is a pretty simple model to unwrap though, so you shouldn’t have a problem. If you do have a problem, just refer to the image below.
 7. Projection
1. Place the low poly model over the bricks and mortar. (Remember to keep it snapped to the grid)
2. Add a Projection modifier to the stack, click on ‘Pick list’ and select both the bricks and the mortar and click the ‘add’ button.
3. You’ll notice the blue cage surrounding ‘brickdoor01_low’ has gone a bit crazy now (oops). In the cage menu click the ‘Reset’ button and it should go back to normal.
4. Still focusing on the cage, turn on shaded and push the cage so that it’s surrounding the bricks.
NOTE: any part of the high poly model outside of the cage won’t get projected onto the low poly model therefore; the cage must surround every part of the high poly model.

5. From the Rendering pull down menu, open ‘Render to Texture’, (the low poly model must be selected for this.)
6. In the Projection mapping menu tick the ‘Enable’ box.
In the Output menu add both the ‘DiffuseMap’, 'Specularmap' and the ‘NormalsMap’
Set the size to whatever you want, I’ve chosen 1024 but we can always resize them later on.
7. In the ‘File Name and Type’ slot, type in the path of where you want to save the images and save them as ‘.tga’ files

8. Finally, click the ‘Render’ button at the bottom. Don’t worry about what you see in the render window, the maps will by saved appropriately.
Well that’s pretty much it. I hope you enjoyed this tutorial and benefit from it, if you come across a problem and need some help then feel free to ask.
By the way, this is my first ever tutorial so some feedback and suggestions would by great.
 edit:
edit: added diffuse map .jpg files
mikebart@Posted: Sun Oct 29, 2006 5:06 am :
Jack Rammsdell@Posted: Sun Oct 29, 2006 6:29 am : nice work, this really comes in handy

BJA@Posted: Sun Oct 29, 2006 9:54 am : Awesome tutorial, very easy to read and understand. Have to make some tests as soon as I get on my 3ds max. An offline version like a .pdf file or so would have been great (for users like me who don't have all-time internet access).
At point 3 (Adding Colour) you mentioned a .zip file indluding your materials. I'm just curious beucause I couldn't find it anywhere.
mikebart@Posted: Sun Oct 29, 2006 10:37 am : thanks, Im glad you found it easy to read
, Ill upload the .zip as soon as I get a chance, might be in the next few days. Would it be easy enough to print it?
BJA@Posted: Sun Oct 29, 2006 1:16 pm : A .pdf would also be good for guys who don't have a printer
efx@Posted: Sun Oct 29, 2006 8:58 pm : Fantastic, thanks for doing this!
i_luv_pixels@Posted: Tue Nov 21, 2006 3:13 am : awesome tutorial!!!! its an amazing technique !!! I just learned how to do it yesterday!!! then i found your tutorial!!!!! really opened my mind to another level of this technique!!! thanks a lot!!!!! O i just joined the forum so HELLO!!!
Do you know where i can find a tutorial on floaters..im sure you know what im talking about.
Tron@Posted: Tue Nov 28, 2006 5:46 am : Woo, I'll have to test this out when I get home, but I think you may have just solved a problem I was having through this tutorial.
=NoMercy=@Posted: Wed Mar 14, 2007 1:21 am : Yeah I've been out of the modding scene for a bit. So call me a noob all you like
Do you think you can quickly make a tutorial on how I can implement this into Doom3? I am so lost for not mapping for a few months its not even funny. It doesn't have to be extremely detailed, I tend to catch onto things really quick.
Thanks, awsome tutorial!
mikebart@Posted: Wed Mar 14, 2007 3:29 am : check out Brian Trepanings Video tutorials he taught me everything I know about exporting to .ase for doom3, hes the man.
http://www.trepaning.com/d3Vids/d3Vids.htm
mikebart@Posted: Fri Apr 06, 2007 5:06 am : Just added some diffuse textures for the bricks and mortar, they're a bit rough so you might want to make your own, sorry I took so long getting these up.
parsonsbear@Posted: Sat Apr 07, 2007 11:25 pm : just added where?
mikebart@Posted: Sun Apr 08, 2007 12:26 am : I put some thumbnails in the tutorial itself, they're just jpegs.
Bo$bevok@Posted: Sun Apr 08, 2007 2:58 pm : the textures are great mikebart and my model im working on with your method looks a million times better with them...
now i just need to look more about getting models in doom3 properly.
renderhjs@Posted: Sat May 05, 2007 9:15 pm : very helpfull tutorial,- thx for providing it
SplutteringChubb@Posted: Wed Jun 27, 2007 7:08 pm : definately a great tutorial..
i have finally got working models into the game but im now attempting to create normalmaps as well...
I was a little confused as to a few things on the tutorial, because im not doing it -exactly- but changing it for the objects im making..
for one:
- do you have to uvw-map/unwrap the hi-poly.. - the individual bricks and mortar?
irishlostboy1980@Posted: Wed Jun 27, 2007 8:22 pm : SplutteringChubb wrote:
- do you have to uvw-map/unwrap the hi-poly.. - the individual bricks and mortar?
use UVW map. it should do the trick just fine.
mikebart@Posted: Thu Jun 28, 2007 12:46 am : yep, you can just use a uvw map 'box' for the mortar, and the same can be applied to the bricks as a group, and then scale the uvw box to suit.
The textures on the high poly model are really just base textures, i'd also recommend finishing the diffuse and specular maps off on photoshop and an AO (ambient occlusion) render overlayed onto the diffuse can really finish it off too.
SplutteringChubb@Posted: Thu Jun 28, 2007 3:12 pm : Aah.. ok, so i must uvw map those as well....
..But as im not making 'bricks' and a 'wall' my objects arent perfect rectangles and as such im not sure if i can still just simply apply a box-uvmap over it...
or is the uvwmap over the lo-poly all that's really needed for later texturing of the object? - ill be honest i dont fully understand how this normal mapping works, ive read a fair few articles..
And also, when you export the object... you delete the hi-poly very dont you? because all that's needed is the low... am i correct,
- i have also been using Brian Trepanings video's and between them and this tutorial im sure its a complete guide as to how to get your stuff ingame... But i keep jumping into thnings i dont understand here, trying to make my stuff more complicated
- great tutorial again though, when i do get it to work ill be over the moon
Bo$bevok@Posted: Thu Jun 28, 2007 4:02 pm : when exporting you dont have to delete the hi-poly model. all that needs to happen is you select the low poly model and go to "export selected".
irishlostboy1980@Posted: Thu Jun 28, 2007 4:47 pm : first off; you can use "UVW map" on any shape you want. the "box" setting are really just .... handles i guess you could call them, for the automatic uvw tool. it would help if we knew what you were using it on, but in general, try it and fiddle with it and see if it works. i have used UVW map on trees and stuff like that. works fine.
on the subject of normal maps. "understanding" them, and the reasons behind what you do to create them, is the most important thing to get your head around. once you do that, you can find all kinds of ways to make them, and judge which is the best way for the task at hand.
QPsiren@Posted: Fri Jun 13, 2008 3:28 pm : EDIT: Yikes I bumped a year-old thread. Sorry about that. If this is better posted in a new thread, please let me know.
--------------------------------
I'm having some trouble with this tutorial; on the whole it's great, but Max isn't generating the normalmap properly.
Here's what I do, following the tutorial:
1. Create high-poly and low-poly models. These models are usually in the same XYZ position, but they're moved apart for these images

2. Unwrap the low-poly model. For speed and testing I used a simple Flatten Mapping, although I'd be more precise on an actual model

3. Select the low-poly model and hit "Render To Texture", then "Pick" the high-poly model. All options are set as according to the tutorial images, including a cage Reset

4. When I hit Render, I get this warning (more on this later)

5. The render happens, which shows this in Max

6. Open the generated normalmap in Photoshop to check it out

-----
So there seem to be a few problems:
1. Render To Texture wants me to unwrap the high-poly model. I think this is an assumed step in the original instructions ("3. Adding Colour"), so I try it anyway (the high-poly has a brick texture on it too). The warning (#4 above) goes away, but the normalmap still isn't generated properly
2. The box projection of the Projection Modifier really doesn't want to project more than one side at a time. Sometimes, by luck and random button-pressing, I can generate two sides of the cube. But I've never been able to generate all 6 sides
3. The projection cage: it defaults to around the low-poly model. I've left it on the low-poly, moved it over to the high-poly and stretched it over both models. Nothing seems to change the output I get (except the cage-stretching result looks *really* nasty)
Can anyone help?
6th Venom@Posted: Fri Jun 13, 2008 4:32 pm : Be sure to not use "automatic unwarp", and UVW1 in the render to texture options (check that your object's uvw mapping is on the 1 slot too), and for the cage, you got to reset the cage and manually expand it with one of the "grower" option (don't recall the exact name).
QPsiren@Posted: Fri Jun 13, 2008 4:49 pm : Thanks for the reply.
I make sure to not use Automatic Unwrap since it puts all faces in the same UV space (just like a basic box-unwrap), and point the Render To Texture option to UVW Channel 1 - which is where the manual unwrap is stored.
I've messed with the cage a lot, including expanding it by 0.01 so it sits just outside the high-poly model. This results in either no mapping whatsoever, or a mapping with nasty distortions everywhere.
The process seems to work flawlessly for a single side or plane; perhaps the Projection modifier isn't supposed to work with multiple faces like a box? Is it just a single planar projection modifier?
6th Venom@Posted: Fri Jun 13, 2008 6:59 pm : QPsiren wrote:
Is it just a single planar projection modifier?
Not at all, it can be used to project any high models on a low version, characters or whatever... like simple cubes!

Just test that: Erase your projection modifier from the stack, select a new "edit poly" modifier, then re-select all your faces (or object), then disable the edit mode (just click on the yellow words to turn these grey) and only then apply a projection modifier, pick your reference (high poly), etc, etc... (press 0 to quickly open the projection window)
Maybe your problem is that you didn't applied a normal UVW map before your UVW unwarp, or maybe it's because you selected only 1 face in your editable poly before applying your UVW unwarp...
I don't know ^^, but the problem really come from the UVW definition as the error said.
lowdragon@Posted: Fri Jun 13, 2008 9:14 pm : thx for the detailed illustration - healps a lot.

As a side not to zBrush users, beside all the ways doing this inside zbrush i usually doing a mix - by importing a complete object and some "filler" (stones, pipes etc.) and placing the main object on the canvas. If this is done ... one is able to tile the canvas by pressing "ö" (on my, german, keyboard layout) and shifting the canvas. With help of the marker (plug-in -> multi-marker) or snapshot tools it is than possible to add the "filler" with correct z-depth - so there are on the same level as the main object.
Note that by using canvas shifting the model drops to canvas and can only further edited with 2.5D painting!
The local, depth and color_textures can be grapped by painting with the "NormalRGBMaterial" and colorpalette/alphapalette.
See also "QuickStartCanvasModeling_WEB.pdf" and "QuickStartEnvironmentModeling_WEB.pdf".
It is a little tricky to make them tilable but after some rough, first steps it is pretty nice and fast to get the details in there.
sorry for hijacking
mikebart@Posted: Sun Oct 29, 2006 4:50 am : This tutorial will show you how to build a brick arch and then bake diffuse and normal maps from a high poly model using the projection modifier.
Baking multiple maps using the Projection Modifier in 3dsmax8 by Michael Bartlett
Introduction.
In this tutorial you will learn how to produce diffuse maps and normal maps in 3dsmax using the projection modifier. As an example I’ll show you how to make a simple brick archway.
I hope I can explain this in a simple way, as it’s really quite a simple technique. In fact I wouldn’t call this an advance tutorial at all but it does require some modeling skill as well as a lot of time if you wish to extend this tutorial into your own project and add more detail to the mesh, which I hope you do.
1. Setting up the grid for use with Doom3.
1. Open the Customize/Units Setup tab and set the display unit scale to Metric
2. Open the Customize/Grid and snap settings tab and follow the image below
 2. Making a brick.
READ THIS, this brick is slightly larger than your every day, average brick, I decided early on in this project to make the bricks this size as they fit into e.g. a 512x512 texture much easier than if I was to use a scale brick. Just thought you might like to know incase your fussy about that sort of stuff. If you want to create a different size brick, or a building stone, anything, go ahead. In fact you could build it entirely out of old Cereal boxes if you wanted to, whatever you like. It won’t affect the outcome of this tutorial.
1. Turn on Snaps Toggle

and make a box; length: 8, width: 16 and height: 6
2. With the box selected open the Hierarchy tab,

Select Affect pivot only and then center to object, the pivot should now be in the centre of the box.
3. Scale the brick to 97.0 that’s 97%, this will allow room for mortar so dont do this if you want the bricks sealed, the option’s yours.
4, Turn off Snaps Toggle. Chamfer the external edges slightly, this is necessary for the normal map.
5. To create the nicks and cuts seen in the image below I’ve used the cut tool in edit poly mode and then manipulated vertexes, or if you prefer you can make a few random shapes and subtract them from the brick using the Boolean tool. To get the indent which is always found on the bottom of a brick I’ve used the inset and bevel tool’s found in edit poly mode.

The brick contains about 200 poly’s so that’s 400 tris in Doom3.
6. We don’t want all the bricks to look the same, so copy the original brick and manipulate a few vertexes, cut some more with the Boolean tool if you feel it necessary.
Do this several times, take note that I’ve kept them all in the same mesh and have copied them as elements within the same editable poly.

As you can see in the image above, I’ve made 6 different ones, but they are all made from the same original brick we started with. You can also flip and rotate them to get a bit more variety.
3. Adding Colour
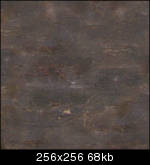
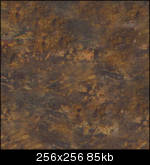
1. You can either use these diffuse maps or you can create your own. I’ve used 3 different ones.


The materials we’re looking at are the top three in the material editor pic below, load the brick_large01.jpg into the diffuse slot, do the same with the next 2 .jpg files.
note: You can also add a bumpmap and specular map to the material, and they will get rendered to texture too, the bumpmap gets added to the normal map and you get a much better result than you would using the nvidia plugin with photoshop and overlaying the diffuse as im pretty sure this method corrupts normalmap (changes direction of normals)
edit: There is a way to overlay the baked normalmap with the nvidia plugin properly by lowering the value of the blue channel on the overlayed map, I personally havent played with this method myself so if someone has some more info on this I can edit it in.

2. Make 2 more copy’s of the bricks, drag and drop the 3 textures onto the bricks as shown below.
 4. Stacking the bricks.
1. Go into editable poly mode and start stacking the bricks into a solid wall by copying them as elements within the editable poly.
2. Then remove the bricks which will be used as a doorway, but once again you can do whatever you want.
3. Turn off snapping and use the move and rotate tools to position the bricks where you need them respective of the grid, to get the general layout do most of the work in the front view, and tweak a few bricks here and there to make it look old and distressed.
4. The doorway fits inside a 128x128x16 cube, you may notice the bricks protruding from the edges are the same as the bricks on its opposite sides, this is so that the texture will tile horizontally. If you need special bricks for a special detail then you can modify one of the original bricks, I’ve made special triangular bricks to fit around the arch and I use the slice plane tool in edit poly mode to make these.
Finally, name the object ‘bricks_01’.
 5. Low poly mesh and Mortar mesh.
1. Create a new box surrounding the shape of the bricks, if you’re following the tutorial it should be 128x128x16, you’ll need to turn on snapping again for this, keep it tight.
Make another box the same shape as the opening and use the Boolean tool to cut the shape of the doorway. Name this object ‘mortar01’

2. Copy ‘mortar01’ and drag it off to the side. This will be our low poly mesh so name it ‘brickdoor01_low. (remember to keep it snapped to the grid!)
3. Select ‘mortar01’ again and ‘convert to editable poly’ then right click in the viewport and ‘Isolate selection’.
Chamfer the inside edges of the arch and divide a few poly’s on the front and back of the arch using the cut tool as shown below, push and pull a few vertexes here and there to give the mortar a bit of shape.

Apply the appropriate material to ‘mortar01’.

4. Exit Isolation mode. Go into vertex mode and start manipulating vertexes so that you expose some, if not all of the brick like in the pic below.
 6. UVW Mapping the Low Poly Model
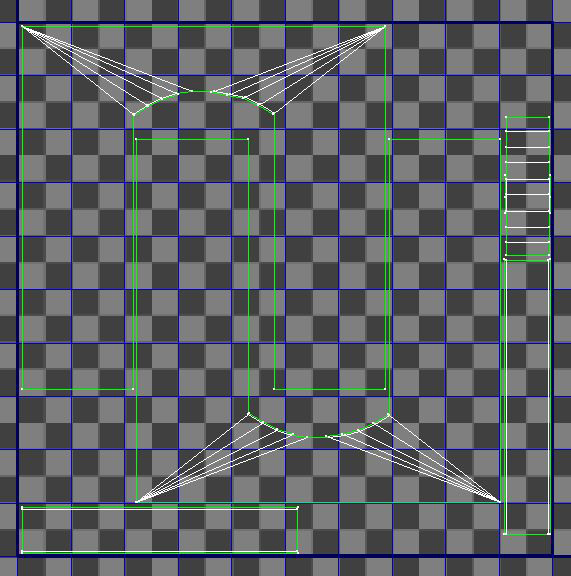
1. Select the low poly model and add an ‘Unwrap UVW’ modifier to it.
2. I’m not going to try and explain to you how to unwrap a model for a UVW map. Personally, even after reading the tutorials that came with max I found that its just one of those things you learn with experience, by doing.
Another good way to get some good tips on UVW mapping is to open up the skins from games and compare them to their relative models, see how the pros do it.
However, this is a pretty simple model to unwrap though, so you shouldn’t have a problem. If you do have a problem, just refer to the image below.
 7. Projection
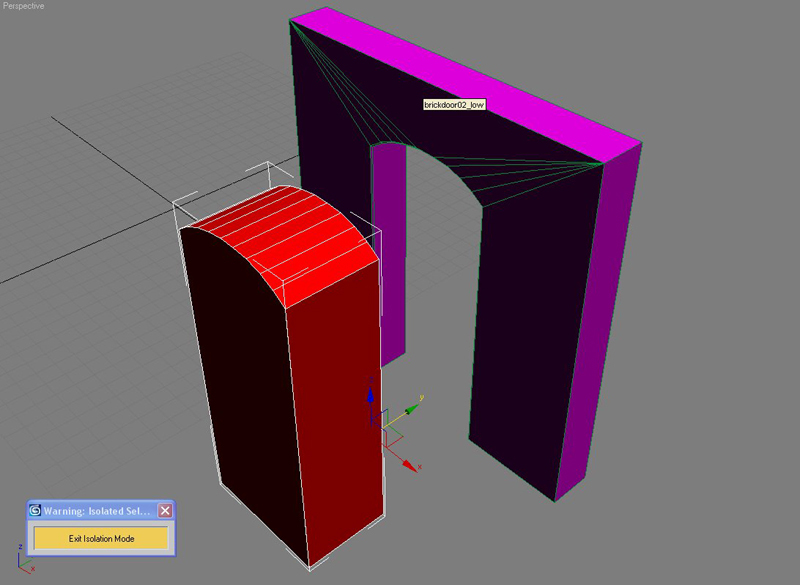
1. Place the low poly model over the bricks and mortar. (Remember to keep it snapped to the grid)
2. Add a Projection modifier to the stack, click on ‘Pick list’ and select both the bricks and the mortar and click the ‘add’ button.
3. You’ll notice the blue cage surrounding ‘brickdoor01_low’ has gone a bit crazy now (oops). In the cage menu click the ‘Reset’ button and it should go back to normal.
4. Still focusing on the cage, turn on shaded and push the cage so that it’s surrounding the bricks.
NOTE: any part of the high poly model outside of the cage won’t get projected onto the low poly model therefore; the cage must surround every part of the high poly model.

5. From the Rendering pull down menu, open ‘Render to Texture’, (the low poly model must be selected for this.)
6. In the Projection mapping menu tick the ‘Enable’ box.
In the Output menu add both the ‘DiffuseMap’, 'Specularmap' and the ‘NormalsMap’
Set the size to whatever you want, I’ve chosen 1024 but we can always resize them later on.
7. In the ‘File Name and Type’ slot, type in the path of where you want to save the images and save them as ‘.tga’ files

8. Finally, click the ‘Render’ button at the bottom. Don’t worry about what you see in the render window, the maps will by saved appropriately.
Well that’s pretty much it. I hope you enjoyed this tutorial and benefit from it, if you come across a problem and need some help then feel free to ask.
By the way, this is my first ever tutorial so some feedback and suggestions would by great.
 edit:
edit: added diffuse map .jpg files
mikebart@Posted: Sun Oct 29, 2006 5:06 am :
Jack Rammsdell@Posted: Sun Oct 29, 2006 6:29 am : nice work, this really comes in handy

BJA@Posted: Sun Oct 29, 2006 9:54 am : Awesome tutorial, very easy to read and understand. Have to make some tests as soon as I get on my 3ds max. An offline version like a .pdf file or so would have been great (for users like me who don't have all-time internet access).
At point 3 (Adding Colour) you mentioned a .zip file indluding your materials. I'm just curious beucause I couldn't find it anywhere.
mikebart@Posted: Sun Oct 29, 2006 10:37 am : thanks, Im glad you found it easy to read
, Ill upload the .zip as soon as I get a chance, might be in the next few days. Would it be easy enough to print it?
BJA@Posted: Sun Oct 29, 2006 1:16 pm : A .pdf would also be good for guys who don't have a printer
efx@Posted: Sun Oct 29, 2006 8:58 pm : Fantastic, thanks for doing this!
i_luv_pixels@Posted: Tue Nov 21, 2006 3:13 am : awesome tutorial!!!! its an amazing technique !!! I just learned how to do it yesterday!!! then i found your tutorial!!!!! really opened my mind to another level of this technique!!! thanks a lot!!!!! O i just joined the forum so HELLO!!!
Do you know where i can find a tutorial on floaters..im sure you know what im talking about.
Tron@Posted: Tue Nov 28, 2006 5:46 am : Woo, I'll have to test this out when I get home, but I think you may have just solved a problem I was having through this tutorial.
=NoMercy=@Posted: Wed Mar 14, 2007 1:21 am : Yeah I've been out of the modding scene for a bit. So call me a noob all you like
Do you think you can quickly make a tutorial on how I can implement this into Doom3? I am so lost for not mapping for a few months its not even funny. It doesn't have to be extremely detailed, I tend to catch onto things really quick.
Thanks, awsome tutorial!
mikebart@Posted: Wed Mar 14, 2007 3:29 am : check out Brian Trepanings Video tutorials he taught me everything I know about exporting to .ase for doom3, hes the man.
http://www.trepaning.com/d3Vids/d3Vids.htm
mikebart@Posted: Fri Apr 06, 2007 5:06 am : Just added some diffuse textures for the bricks and mortar, they're a bit rough so you might want to make your own, sorry I took so long getting these up.
parsonsbear@Posted: Sat Apr 07, 2007 11:25 pm : just added where?
mikebart@Posted: Sun Apr 08, 2007 12:26 am : I put some thumbnails in the tutorial itself, they're just jpegs.
Bo$bevok@Posted: Sun Apr 08, 2007 2:58 pm : the textures are great mikebart and my model im working on with your method looks a million times better with them...
now i just need to look more about getting models in doom3 properly.
renderhjs@Posted: Sat May 05, 2007 9:15 pm : very helpfull tutorial,- thx for providing it
SplutteringChubb@Posted: Wed Jun 27, 2007 7:08 pm : definately a great tutorial..
i have finally got working models into the game but im now attempting to create normalmaps as well...
I was a little confused as to a few things on the tutorial, because im not doing it -exactly- but changing it for the objects im making..
for one:
- do you have to uvw-map/unwrap the hi-poly.. - the individual bricks and mortar?
irishlostboy1980@Posted: Wed Jun 27, 2007 8:22 pm : SplutteringChubb wrote:
- do you have to uvw-map/unwrap the hi-poly.. - the individual bricks and mortar?
use UVW map. it should do the trick just fine.
mikebart@Posted: Thu Jun 28, 2007 12:46 am : yep, you can just use a uvw map 'box' for the mortar, and the same can be applied to the bricks as a group, and then scale the uvw box to suit.
The textures on the high poly model are really just base textures, i'd also recommend finishing the diffuse and specular maps off on photoshop and an AO (ambient occlusion) render overlayed onto the diffuse can really finish it off too.
SplutteringChubb@Posted: Thu Jun 28, 2007 3:12 pm : Aah.. ok, so i must uvw map those as well....
..But as im not making 'bricks' and a 'wall' my objects arent perfect rectangles and as such im not sure if i can still just simply apply a box-uvmap over it...
or is the uvwmap over the lo-poly all that's really needed for later texturing of the object? - ill be honest i dont fully understand how this normal mapping works, ive read a fair few articles..
And also, when you export the object... you delete the hi-poly very dont you? because all that's needed is the low... am i correct,
- i have also been using Brian Trepanings video's and between them and this tutorial im sure its a complete guide as to how to get your stuff ingame... But i keep jumping into thnings i dont understand here, trying to make my stuff more complicated
- great tutorial again though, when i do get it to work ill be over the moon
Bo$bevok@Posted: Thu Jun 28, 2007 4:02 pm : when exporting you dont have to delete the hi-poly model. all that needs to happen is you select the low poly model and go to "export selected".
irishlostboy1980@Posted: Thu Jun 28, 2007 4:47 pm : first off; you can use "UVW map" on any shape you want. the "box" setting are really just .... handles i guess you could call them, for the automatic uvw tool. it would help if we knew what you were using it on, but in general, try it and fiddle with it and see if it works. i have used UVW map on trees and stuff like that. works fine.
on the subject of normal maps. "understanding" them, and the reasons behind what you do to create them, is the most important thing to get your head around. once you do that, you can find all kinds of ways to make them, and judge which is the best way for the task at hand.
QPsiren@Posted: Fri Jun 13, 2008 3:28 pm : EDIT: Yikes I bumped a year-old thread. Sorry about that. If this is better posted in a new thread, please let me know.
--------------------------------
I'm having some trouble with this tutorial; on the whole it's great, but Max isn't generating the normalmap properly.
Here's what I do, following the tutorial:
1. Create high-poly and low-poly models. These models are usually in the same XYZ position, but they're moved apart for these images

2. Unwrap the low-poly model. For speed and testing I used a simple Flatten Mapping, although I'd be more precise on an actual model

3. Select the low-poly model and hit "Render To Texture", then "Pick" the high-poly model. All options are set as according to the tutorial images, including a cage Reset

4. When I hit Render, I get this warning (more on this later)

5. The render happens, which shows this in Max

6. Open the generated normalmap in Photoshop to check it out

-----
So there seem to be a few problems:
1. Render To Texture wants me to unwrap the high-poly model. I think this is an assumed step in the original instructions ("3. Adding Colour"), so I try it anyway (the high-poly has a brick texture on it too). The warning (#4 above) goes away, but the normalmap still isn't generated properly
2. The box projection of the Projection Modifier really doesn't want to project more than one side at a time. Sometimes, by luck and random button-pressing, I can generate two sides of the cube. But I've never been able to generate all 6 sides
3. The projection cage: it defaults to around the low-poly model. I've left it on the low-poly, moved it over to the high-poly and stretched it over both models. Nothing seems to change the output I get (except the cage-stretching result looks *really* nasty)
Can anyone help?
6th Venom@Posted: Fri Jun 13, 2008 4:32 pm : Be sure to not use "automatic unwarp", and UVW1 in the render to texture options (check that your object's uvw mapping is on the 1 slot too), and for the cage, you got to reset the cage and manually expand it with one of the "grower" option (don't recall the exact name).
QPsiren@Posted: Fri Jun 13, 2008 4:49 pm : Thanks for the reply.
I make sure to not use Automatic Unwrap since it puts all faces in the same UV space (just like a basic box-unwrap), and point the Render To Texture option to UVW Channel 1 - which is where the manual unwrap is stored.
I've messed with the cage a lot, including expanding it by 0.01 so it sits just outside the high-poly model. This results in either no mapping whatsoever, or a mapping with nasty distortions everywhere.
The process seems to work flawlessly for a single side or plane; perhaps the Projection modifier isn't supposed to work with multiple faces like a box? Is it just a single planar projection modifier?
6th Venom@Posted: Fri Jun 13, 2008 6:59 pm : QPsiren wrote:
Is it just a single planar projection modifier?
Not at all, it can be used to project any high models on a low version, characters or whatever... like simple cubes!

Just test that: Erase your projection modifier from the stack, select a new "edit poly" modifier, then re-select all your faces (or object), then disable the edit mode (just click on the yellow words to turn these grey) and only then apply a projection modifier, pick your reference (high poly), etc, etc... (press 0 to quickly open the projection window)
Maybe your problem is that you didn't applied a normal UVW map before your UVW unwarp, or maybe it's because you selected only 1 face in your editable poly before applying your UVW unwarp...
I don't know ^^, but the problem really come from the UVW definition as the error said.
lowdragon@Posted: Fri Jun 13, 2008 9:14 pm : thx for the detailed illustration - healps a lot.

As a side not to zBrush users, beside all the ways doing this inside zbrush i usually doing a mix - by importing a complete object and some "filler" (stones, pipes etc.) and placing the main object on the canvas. If this is done ... one is able to tile the canvas by pressing "ö" (on my, german, keyboard layout) and shifting the canvas. With help of the marker (plug-in -> multi-marker) or snapshot tools it is than possible to add the "filler" with correct z-depth - so there are on the same level as the main object.
Note that by using canvas shifting the model drops to canvas and can only further edited with 2.5D painting!
The local, depth and color_textures can be grapped by painting with the "NormalRGBMaterial" and colorpalette/alphapalette.
See also "QuickStartCanvasModeling_WEB.pdf" and "QuickStartEnvironmentModeling_WEB.pdf".
It is a little tricky to make them tilable but after some rough, first steps it is pretty nice and fast to get the details in there.
sorry for hijacking
mikebart@Posted: Sun Oct 29, 2006 4:50 am : This tutorial will show you how to build a brick arch and then bake diffuse and normal maps from a high poly model using the projection modifier.
Baking multiple maps using the Projection Modifier in 3dsmax8 by Michael Bartlett
Introduction.
In this tutorial you will learn how to produce diffuse maps and normal maps in 3dsmax using the projection modifier. As an example I’ll show you how to make a simple brick archway.
I hope I can explain this in a simple way, as it’s really quite a simple technique. In fact I wouldn’t call this an advance tutorial at all but it does require some modeling skill as well as a lot of time if you wish to extend this tutorial into your own project and add more detail to the mesh, which I hope you do.
1. Setting up the grid for use with Doom3.
1. Open the Customize/Units Setup tab and set the display unit scale to Metric
2. Open the Customize/Grid and snap settings tab and follow the image below
 2. Making a brick.
READ THIS, this brick is slightly larger than your every day, average brick, I decided early on in this project to make the bricks this size as they fit into e.g. a 512x512 texture much easier than if I was to use a scale brick. Just thought you might like to know incase your fussy about that sort of stuff. If you want to create a different size brick, or a building stone, anything, go ahead. In fact you could build it entirely out of old Cereal boxes if you wanted to, whatever you like. It won’t affect the outcome of this tutorial.
1. Turn on Snaps Toggle

and make a box; length: 8, width: 16 and height: 6
2. With the box selected open the Hierarchy tab,

Select Affect pivot only and then center to object, the pivot should now be in the centre of the box.
3. Scale the brick to 97.0 that’s 97%, this will allow room for mortar so dont do this if you want the bricks sealed, the option’s yours.
4, Turn off Snaps Toggle. Chamfer the external edges slightly, this is necessary for the normal map.
5. To create the nicks and cuts seen in the image below I’ve used the cut tool in edit poly mode and then manipulated vertexes, or if you prefer you can make a few random shapes and subtract them from the brick using the Boolean tool. To get the indent which is always found on the bottom of a brick I’ve used the inset and bevel tool’s found in edit poly mode.

The brick contains about 200 poly’s so that’s 400 tris in Doom3.
6. We don’t want all the bricks to look the same, so copy the original brick and manipulate a few vertexes, cut some more with the Boolean tool if you feel it necessary.
Do this several times, take note that I’ve kept them all in the same mesh and have copied them as elements within the same editable poly.

As you can see in the image above, I’ve made 6 different ones, but they are all made from the same original brick we started with. You can also flip and rotate them to get a bit more variety.
3. Adding Colour
1. You can either use these diffuse maps or you can create your own. I’ve used 3 different ones.


The materials we’re looking at are the top three in the material editor pic below, load the brick_large01.jpg into the diffuse slot, do the same with the next 2 .jpg files.
note: You can also add a bumpmap and specular map to the material, and they will get rendered to texture too, the bumpmap gets added to the normal map and you get a much better result than you would using the nvidia plugin with photoshop and overlaying the diffuse as im pretty sure this method corrupts normalmap (changes direction of normals)
edit: There is a way to overlay the baked normalmap with the nvidia plugin properly by lowering the value of the blue channel on the overlayed map, I personally havent played with this method myself so if someone has some more info on this I can edit it in.

2. Make 2 more copy’s of the bricks, drag and drop the 3 textures onto the bricks as shown below.
 4. Stacking the bricks.
1. Go into editable poly mode and start stacking the bricks into a solid wall by copying them as elements within the editable poly.
2. Then remove the bricks which will be used as a doorway, but once again you can do whatever you want.
3. Turn off snapping and use the move and rotate tools to position the bricks where you need them respective of the grid, to get the general layout do most of the work in the front view, and tweak a few bricks here and there to make it look old and distressed.
4. The doorway fits inside a 128x128x16 cube, you may notice the bricks protruding from the edges are the same as the bricks on its opposite sides, this is so that the texture will tile horizontally. If you need special bricks for a special detail then you can modify one of the original bricks, I’ve made special triangular bricks to fit around the arch and I use the slice plane tool in edit poly mode to make these.
Finally, name the object ‘bricks_01’.
 5. Low poly mesh and Mortar mesh.
1. Create a new box surrounding the shape of the bricks, if you’re following the tutorial it should be 128x128x16, you’ll need to turn on snapping again for this, keep it tight.
Make another box the same shape as the opening and use the Boolean tool to cut the shape of the doorway. Name this object ‘mortar01’

2. Copy ‘mortar01’ and drag it off to the side. This will be our low poly mesh so name it ‘brickdoor01_low. (remember to keep it snapped to the grid!)
3. Select ‘mortar01’ again and ‘convert to editable poly’ then right click in the viewport and ‘Isolate selection’.
Chamfer the inside edges of the arch and divide a few poly’s on the front and back of the arch using the cut tool as shown below, push and pull a few vertexes here and there to give the mortar a bit of shape.

Apply the appropriate material to ‘mortar01’.

4. Exit Isolation mode. Go into vertex mode and start manipulating vertexes so that you expose some, if not all of the brick like in the pic below.
 6. UVW Mapping the Low Poly Model
1. Select the low poly model and add an ‘Unwrap UVW’ modifier to it.
2. I’m not going to try and explain to you how to unwrap a model for a UVW map. Personally, even after reading the tutorials that came with max I found that its just one of those things you learn with experience, by doing.
Another good way to get some good tips on UVW mapping is to open up the skins from games and compare them to their relative models, see how the pros do it.
However, this is a pretty simple model to unwrap though, so you shouldn’t have a problem. If you do have a problem, just refer to the image below.
 7. Projection
1. Place the low poly model over the bricks and mortar. (Remember to keep it snapped to the grid)
2. Add a Projection modifier to the stack, click on ‘Pick list’ and select both the bricks and the mortar and click the ‘add’ button.
3. You’ll notice the blue cage surrounding ‘brickdoor01_low’ has gone a bit crazy now (oops). In the cage menu click the ‘Reset’ button and it should go back to normal.
4. Still focusing on the cage, turn on shaded and push the cage so that it’s surrounding the bricks.
NOTE: any part of the high poly model outside of the cage won’t get projected onto the low poly model therefore; the cage must surround every part of the high poly model.

5. From the Rendering pull down menu, open ‘Render to Texture’, (the low poly model must be selected for this.)
6. In the Projection mapping menu tick the ‘Enable’ box.
In the Output menu add both the ‘DiffuseMap’, 'Specularmap' and the ‘NormalsMap’
Set the size to whatever you want, I’ve chosen 1024 but we can always resize them later on.
7. In the ‘File Name and Type’ slot, type in the path of where you want to save the images and save them as ‘.tga’ files

8. Finally, click the ‘Render’ button at the bottom. Don’t worry about what you see in the render window, the maps will by saved appropriately.
Well that’s pretty much it. I hope you enjoyed this tutorial and benefit from it, if you come across a problem and need some help then feel free to ask.
By the way, this is my first ever tutorial so some feedback and suggestions would by great.
 edit:
edit: added diffuse map .jpg files
mikebart@Posted: Sun Oct 29, 2006 5:06 am :
Jack Rammsdell@Posted: Sun Oct 29, 2006 6:29 am : nice work, this really comes in handy

BJA@Posted: Sun Oct 29, 2006 9:54 am : Awesome tutorial, very easy to read and understand. Have to make some tests as soon as I get on my 3ds max. An offline version like a .pdf file or so would have been great (for users like me who don't have all-time internet access).
At point 3 (Adding Colour) you mentioned a .zip file indluding your materials. I'm just curious beucause I couldn't find it anywhere.
mikebart@Posted: Sun Oct 29, 2006 10:37 am : thanks, Im glad you found it easy to read
, Ill upload the .zip as soon as I get a chance, might be in the next few days. Would it be easy enough to print it?
BJA@Posted: Sun Oct 29, 2006 1:16 pm : A .pdf would also be good for guys who don't have a printer
efx@Posted: Sun Oct 29, 2006 8:58 pm : Fantastic, thanks for doing this!
i_luv_pixels@Posted: Tue Nov 21, 2006 3:13 am : awesome tutorial!!!! its an amazing technique !!! I just learned how to do it yesterday!!! then i found your tutorial!!!!! really opened my mind to another level of this technique!!! thanks a lot!!!!! O i just joined the forum so HELLO!!!
Do you know where i can find a tutorial on floaters..im sure you know what im talking about.
Tron@Posted: Tue Nov 28, 2006 5:46 am : Woo, I'll have to test this out when I get home, but I think you may have just solved a problem I was having through this tutorial.
=NoMercy=@Posted: Wed Mar 14, 2007 1:21 am : Yeah I've been out of the modding scene for a bit. So call me a noob all you like
Do you think you can quickly make a tutorial on how I can implement this into Doom3? I am so lost for not mapping for a few months its not even funny. It doesn't have to be extremely detailed, I tend to catch onto things really quick.
Thanks, awsome tutorial!
mikebart@Posted: Wed Mar 14, 2007 3:29 am : check out Brian Trepanings Video tutorials he taught me everything I know about exporting to .ase for doom3, hes the man.
http://www.trepaning.com/d3Vids/d3Vids.htm
mikebart@Posted: Fri Apr 06, 2007 5:06 am : Just added some diffuse textures for the bricks and mortar, they're a bit rough so you might want to make your own, sorry I took so long getting these up.
parsonsbear@Posted: Sat Apr 07, 2007 11:25 pm : just added where?
mikebart@Posted: Sun Apr 08, 2007 12:26 am : I put some thumbnails in the tutorial itself, they're just jpegs.
Bo$bevok@Posted: Sun Apr 08, 2007 2:58 pm : the textures are great mikebart and my model im working on with your method looks a million times better with them...
now i just need to look more about getting models in doom3 properly.
renderhjs@Posted: Sat May 05, 2007 9:15 pm : very helpfull tutorial,- thx for providing it
SplutteringChubb@Posted: Wed Jun 27, 2007 7:08 pm : definately a great tutorial..
i have finally got working models into the game but im now attempting to create normalmaps as well...
I was a little confused as to a few things on the tutorial, because im not doing it -exactly- but changing it for the objects im making..
for one:
- do you have to uvw-map/unwrap the hi-poly.. - the individual bricks and mortar?
irishlostboy1980@Posted: Wed Jun 27, 2007 8:22 pm : SplutteringChubb wrote:
- do you have to uvw-map/unwrap the hi-poly.. - the individual bricks and mortar?
use UVW map. it should do the trick just fine.
mikebart@Posted: Sun Oct 29, 2006 4:50 am : This tutorial will show you how to build a brick arch and then bake diffuse and normal maps from a high poly model using the projection modifier.
Baking multiple maps using the Projection Modifier in 3dsmax8 by Michael Bartlett
Introduction.
In this tutorial you will learn how to produce diffuse maps and normal maps in 3dsmax using the projection modifier. As an example I’ll show you how to make a simple brick archway.
I hope I can explain this in a simple way, as it’s really quite a simple technique. In fact I wouldn’t call this an advance tutorial at all but it does require some modeling skill as well as a lot of time if you wish to extend this tutorial into your own project and add more detail to the mesh, which I hope you do.
1. Setting up the grid for use with Doom3.
1. Open the Customize/Units Setup tab and set the display unit scale to Metric
2. Open the Customize/Grid and snap settings tab and follow the image below
 2. Making a brick.
READ THIS, this brick is slightly larger than your every day, average brick, I decided early on in this project to make the bricks this size as they fit into e.g. a 512x512 texture much easier than if I was to use a scale brick. Just thought you might like to know incase your fussy about that sort of stuff. If you want to create a different size brick, or a building stone, anything, go ahead. In fact you could build it entirely out of old Cereal boxes if you wanted to, whatever you like. It won’t affect the outcome of this tutorial.
1. Turn on Snaps Toggle

and make a box; length: 8, width: 16 and height: 6
2. With the box selected open the Hierarchy tab,

Select Affect pivot only and then center to object, the pivot should now be in the centre of the box.
3. Scale the brick to 97.0 that’s 97%, this will allow room for mortar so dont do this if you want the bricks sealed, the option’s yours.
4, Turn off Snaps Toggle. Chamfer the external edges slightly, this is necessary for the normal map.
5. To create the nicks and cuts seen in the image below I’ve used the cut tool in edit poly mode and then manipulated vertexes, or if you prefer you can make a few random shapes and subtract them from the brick using the Boolean tool. To get the indent which is always found on the bottom of a brick I’ve used the inset and bevel tool’s found in edit poly mode.

The brick contains about 200 poly’s so that’s 400 tris in Doom3.
6. We don’t want all the bricks to look the same, so copy the original brick and manipulate a few vertexes, cut some more with the Boolean tool if you feel it necessary.
Do this several times, take note that I’ve kept them all in the same mesh and have copied them as elements within the same editable poly.

As you can see in the image above, I’ve made 6 different ones, but they are all made from the same original brick we started with. You can also flip and rotate them to get a bit more variety.
3. Adding Colour
1. You can either use these diffuse maps or you can create your own. I’ve used 3 different ones.


The materials we’re looking at are the top three in the material editor pic below, load the brick_large01.jpg into the diffuse slot, do the same with the next 2 .jpg files.
note: You can also add a bumpmap and specular map to the material, and they will get rendered to texture too, the bumpmap gets added to the normal map and you get a much better result than you would using the nvidia plugin with photoshop and overlaying the diffuse as im pretty sure this method corrupts normalmap (changes direction of normals)
edit: There is a way to overlay the baked normalmap with the nvidia plugin properly by lowering the value of the blue channel on the overlayed map, I personally havent played with this method myself so if someone has some more info on this I can edit it in.

2. Make 2 more copy’s of the bricks, drag and drop the 3 textures onto the bricks as shown below.
 4. Stacking the bricks.
1. Go into editable poly mode and start stacking the bricks into a solid wall by copying them as elements within the editable poly.
2. Then remove the bricks which will be used as a doorway, but once again you can do whatever you want.
3. Turn off snapping and use the move and rotate tools to position the bricks where you need them respective of the grid, to get the general layout do most of the work in the front view, and tweak a few bricks here and there to make it look old and distressed.
4. The doorway fits inside a 128x128x16 cube, you may notice the bricks protruding from the edges are the same as the bricks on its opposite sides, this is so that the texture will tile horizontally. If you need special bricks for a special detail then you can modify one of the original bricks, I’ve made special triangular bricks to fit around the arch and I use the slice plane tool in edit poly mode to make these.
Finally, name the object ‘bricks_01’.
 5. Low poly mesh and Mortar mesh.
1. Create a new box surrounding the shape of the bricks, if you’re following the tutorial it should be 128x128x16, you’ll need to turn on snapping again for this, keep it tight.
Make another box the same shape as the opening and use the Boolean tool to cut the shape of the doorway. Name this object ‘mortar01’
2. Copy ‘mortar01’ and drag it off to the side. This will be our low poly mesh so name it ‘brickdoor01_low. (remember to keep it snapped to the grid!)
3. Select ‘mortar01’ again and ‘convert to editable poly’ then right click in the viewport and ‘Isolate selection’.
Chamfer the inside edges of the arch and divide a few poly’s on the front and back of the arch using the cut tool as shown below, push and pull a few vertexes here and there to give the mortar a bit of shape.

Apply the appropriate material to ‘mortar01’.

4. Exit Isolation mode. Go into vertex mode and start manipulating vertexes so that you expose some, if not all of the brick like in the pic below.
 6. UVW Mapping the Low Poly Model
1. Select the low poly model and add an ‘Unwrap UVW’ modifier to it.
2. I’m not going to try and explain to you how to unwrap a model for a UVW map. Personally, even after reading the tutorials that came with max I found that its just one of those things you learn with experience, by doing.
Another good way to get some good tips on UVW mapping is to open up the skins from games and compare them to their relative models, see how the pros do it.
However, this is a pretty simple model to unwrap though, so you shouldn’t have a problem. If you do have a problem, just refer to the image below.
 7. Projection
1. Place the low poly model over the bricks and mortar. (Remember to keep it snapped to the grid)
2. Add a Projection modifier to the stack, click on ‘Pick list’ and select both the bricks and the mortar and click the ‘add’ button.
3. You’ll notice the blue cage surrounding ‘brickdoor01_low’ has gone a bit crazy now (oops). In the cage menu click the ‘Reset’ button and it should go back to normal.
4. Still focusing on the cage, turn on shaded and push the cage so that it’s surrounding the bricks.
NOTE: any part of the high poly model outside of the cage won’t get projected onto the low poly model therefore; the cage must surround every part of the high poly model.

5. From the Rendering pull down menu, open ‘Render to Texture’, (the low poly model must be selected for this.)
6. In the Projection mapping menu tick the ‘Enable’ box.
In the Output menu add both the ‘DiffuseMap’, 'Specularmap' and the ‘NormalsMap’
Set the size to whatever you want, I’ve chosen 1024 but we can always resize them later on.
7. In the ‘File Name and Type’ slot, type in the path of where you want to save the images and save them as ‘.tga’ files

8. Finally, click the ‘Render’ button at the bottom. Don’t worry about what you see in the render window, the maps will by saved appropriately.
Well that’s pretty much it. I hope you enjoyed this tutorial and benefit from it, if you come across a problem and need some help then feel free to ask.
By the way, this is my first ever tutorial so some feedback and suggestions would by great.
 edit:
edit: added diffuse map .jpg files
mikebart@Posted: Sun Oct 29, 2006 5:06 am :
Jack Rammsdell@Posted: Sun Oct 29, 2006 6:29 am : nice work, this really comes in handy

BJA@Posted: Sun Oct 29, 2006 9:54 am : Awesome tutorial, very easy to read and understand. Have to make some tests as soon as I get on my 3ds max. An offline version like a .pdf file or so would have been great (for users like me who don't have all-time internet access).
At point 3 (Adding Colour) you mentioned a .zip file indluding your materials. I'm just curious beucause I couldn't find it anywhere.
mikebart@Posted: Sun Oct 29, 2006 10:37 am : thanks, Im glad you found it easy to read
, Ill upload the .zip as soon as I get a chance, might be in the next few days. Would it be easy enough to print it?
BJA@Posted: Sun Oct 29, 2006 1:16 pm : A .pdf would also be good for guys who don't have a printer
efx@Posted: Sun Oct 29, 2006 8:58 pm : Fantastic, thanks for doing this!
i_luv_pixels@Posted: Tue Nov 21, 2006 3:13 am : awesome tutorial!!!! its an amazing technique !!! I just learned how to do it yesterday!!! then i found your tutorial!!!!! really opened my mind to another level of this technique!!! thanks a lot!!!!! O i just joined the forum so HELLO!!!
Do you know where i can find a tutorial on floaters..im sure you know what im talking about.
Tron@Posted: Tue Nov 28, 2006 5:46 am : Woo, I'll have to test this out when I get home, but I think you may have just solved a problem I was having through this tutorial.
=NoMercy=@Posted: Wed Mar 14, 2007 1:21 am : Yeah I've been out of the modding scene for a bit. So call me a noob all you like
Do you think you can quickly make a tutorial on how I can implement this into Doom3? I am so lost for not mapping for a few months its not even funny. It doesn't have to be extremely detailed, I tend to catch onto things really quick.
Thanks, awsome tutorial!
mikebart@Posted: Wed Mar 14, 2007 3:29 am : check out Brian Trepanings Video tutorials he taught me everything I know about exporting to .ase for doom3, hes the man.
http://www.trepaning.com/d3Vids/d3Vids.htm
mikebart@Posted: Fri Apr 06, 2007 5:06 am : Just added some diffuse textures for the bricks and mortar, they're a bit rough so you might want to make your own, sorry I took so long getting these up.
parsonsbear@Posted: Sat Apr 07, 2007 11:25 pm : just added where?
mikebart@Posted: Sun Apr 08, 2007 12:26 am : I put some thumbnails in the tutorial itself, they're just jpegs.
Bo$bevok@Posted: Sun Apr 08, 2007 2:58 pm : the textures are great mikebart and my model im working on with your method looks a million times better with them...
now i just need to look more about getting models in doom3 properly.
renderhjs@Posted: Sat May 05, 2007 9:15 pm : very helpfull tutorial,- thx for providing it
SplutteringChubb@Posted: Wed Jun 27, 2007 7:08 pm : definately a great tutorial..
i have finally got working models into the game but im now attempting to create normalmaps as well...
I was a little confused as to a few things on the tutorial, because im not doing it -exactly- but changing it for the objects im making..
for one:
- do you have to uvw-map/unwrap the hi-poly.. - the individual bricks and mortar?
irishlostboy1980@Posted: Wed Jun 27, 2007 8:22 pm : SplutteringChubb wrote:
- do you have to uvw-map/unwrap the hi-poly.. - the individual bricks and mortar?
use UVW map. it should do the trick just fine.
mikebart@Posted: Thu Jun 28, 2007 12:46 am : yep, you can just use a uvw map 'box' for the mortar, and the same can be applied to the bricks as a group, and then scale the uvw box to suit.
The textures on the high poly model are really just base textures, i'd also recommend finishing the diffuse and specular maps off on photoshop and an AO (ambient occlusion) render overlayed onto the diffuse can really finish it off too.
SplutteringChubb@Posted: Thu Jun 28, 2007 3:12 pm : Aah.. ok, so i must uvw map those as well....
..But as im not making 'bricks' and a 'wall' my objects arent perfect rectangles and as such im not sure if i can still just simply apply a box-uvmap over it...
or is the uvwmap over the lo-poly all that's really needed for later texturing of the object? - ill be honest i dont fully understand how this normal mapping works, ive read a fair few articles..
And also, when you export the object... you delete the hi-poly very dont you? because all that's needed is the low... am i correct,
- i have also been using Brian Trepanings video's and between them and this tutorial im sure its a complete guide as to how to get your stuff ingame... But i keep jumping into thnings i dont understand here, trying to make my stuff more complicated
- great tutorial again though, when i do get it to work ill be over the moon


