Super Happy Cow@Posted: Fri Jun 15, 2007 9:37 am : My "job" right now is doing the texture work for a bunch of statics for a mod, but I'm having a terribly hard time progressing. Why? Normal maps suck. Well, they don't suck so much as they are awesome, and difficult to implement for a nub.
So here's my problem:
The model I'm texturing with light a few yards away:

The model I'm texturing with light very close to it.

Ignore the artifacts on the sides of the main pole. I'm sure you dudes know that too much high poly detail on too small of a texture = poopie.

I think it might have something to do with the colors of my normal map, but the knowledge I have about NMaps isn't helping. From what I've tested:
Green = Facing Down Red = Facing Left Blue = Facing the screen Purple = Facing up Blueish Green = Facing Right And Yellow = the back of the model, and I don't think that's ever on a local space map. : [
My two questions are: From your experience what do you guys think the problem is? And what program/method/settings do you use for normal mapping?
I appreciate the help so much, as this is making me a sad cow. : [
rich_is_bored@Posted: Fri Jun 15, 2007 10:45 am : Super Happy Cow wrote:
I'm sure you dudes know that too much high poly detail on too small of a texture = poopie.
Increasing the number of samples per pixel would fix that. As for how you go about doing that, it's dependent on what tool you're using to render the normal map.
Quote:
I think it might have something to do with the colors of my normal map, but the knowledge I have about NMaps isn't helping.
The easiest way to understand it is to think of the image in terms of it's RGB components rather than the image as a whole. For instance, I made this diagram up yesterday...
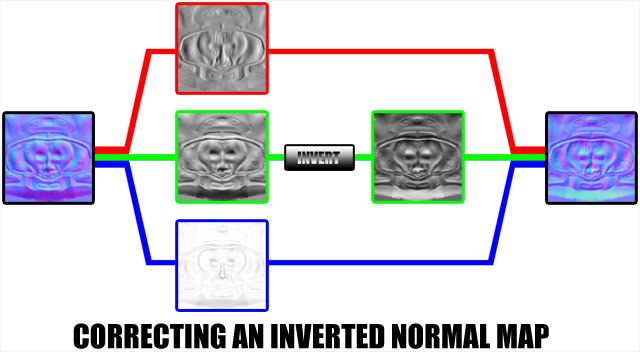
In this example, the normal map on the left won't produce the intended result in Doom 3 but the problem is corrected very easily by inverting the green channel as depicted by the normal map on the right.
As for each channel itself and what you should be looking for...
The red channel represents the horizontal displacement. It should appear as if it's being illuminated from the right.
The green channel represents the vertical displacement. For Doom 3 engine based games, it should appear as if it's being illuminated from the bottom.
Depending on the application you used to render your normal map, you may need to invert this channel in an image editing application. And by judging your normal map, this appears to be the case.
The blue channel is, from the perspective of an artist, unimportant so you don't really need to concern yourself with it.
So in summary, increase the number of samples per pixel when rendering the normal map and invert the green channel in an image editing application.
The Happy Friar@Posted: Fri Jun 15, 2007 2:36 pm : if you're going for roughcut wood, i'd say the problem is you're using normal maps.

Roughcut doesn't really have any self-generated shadows that normals could be used for (displacement, yet, for notches & things). You'd be better off using just a color texture & a spec map to give it a "rough" look when a light shines on it.
pbmax@Posted: Fri Jun 15, 2007 3:50 pm : height maps also work very well for the fine detail (like wood grain).
Super Happy Cow@Posted: Fri Jun 15, 2007 4:43 pm : It's not supposed to have dark shadows when with light in front of it, as it's supposed to look like someone put it in his mouth, and chewed on it a little bit. It does look like how I intend, if the tiny holes in the normal are taken out(i did that before but overwrote the image by accident), and put in the bump instead. I'd say that it looks a bit too intense, but it's still supposed to look uneven, and it needs to have some holes in it, near the mid lower half, where people would be tearing it away. I'll try the green now. ; ]
Inverting green didn't work. : [ I'll try inverting other colors, or something. ; [
rich_is_bored@Posted: Sat Jun 16, 2007 5:44 am : Inverting the other color channels doesn't stand a chance of fixing the problem. In my experience, the red and blue channels are treated the same regardless what application the normal map is rendered.
Any chance I can see a screenshot of the high poly model?
Kristus@Posted: Sat Jun 16, 2007 7:51 am : When you're making normalmaps for Doom3, you really should use Renderbump as there's no better tool for it.
Looking at the normalmap I'm seeing the polycount of the hi-poly (seeing as you don't appear to use smoothgropes, on either the hi or low poly... Or Anti-aliasing for that matter-), so it's hardly because you got too much detail or too fine detail in it. (not that that would result in this anyway)
I know that the rendered Normalmaps from Max7 are buggy. So if that's what you're using then, it's possible that's why you get this issue.
About heightmaps, their strength is that you can define their power with the material file, but they're just baked into the normalmap at runtime, so it's not like it makes any actual difference of visuals, compared to if the detail had been on the hi-poly itself. But fine detail like that takes a lot of polies.

Of course, most normalmap renders can bake a heightmap into the normalmaps just like Doom3 do.
Super Happy Cow@Posted: Sat Jun 16, 2007 7:58 am : 
That's it. Sits in the same exact spot as the lowpoly and everything.
What programs/settings do you guys use to get models working in D3/Q4
Rayne@Posted: Sat Jun 16, 2007 8:16 am : 3D max, Lightwave, and Modo are the best choices for the process of creating models for DooM3.
Theorically, any other 3d app is fine but just keep in mind that not every program can output .ase or .lwo files...
Just check if there is a WORKING plugin to export such file types in the case your modelling app doesn't support them natively.
To bake normal maps, I use Xnormal, great little application, easy to use, lots of options, and it outputs good normal maps. Just google for " Xnormal " ..
Super Happy Cow@Posted: Sun Jun 17, 2007 3:25 am : Kristus wrote:
When you're making normalmaps for Doom3, you really should use Renderbump as there's no better tool for it.
Looking at the normalmap I'm seeing the polycount of the hi-poly (seeing as you don't appear to use smoothgropes, on either the hi or low poly... Or Anti-aliasing for that matter-), so it's hardly because you got too much detail or too fine detail in it. (not that that would result in this anyway)
I know that the rendered Normalmaps from Max7 are buggy. So if that's what you're using then, it's possible that's why you get this issue.
About heightmaps, their strength is that you can define their power with the material file, but they're just baked into the normalmap at runtime, so it's not like it makes any actual difference of visuals, compared to if the detail had been on the hi-poly itself. But fine detail like that takes a lot of polies.
Of course, most normalmap renders can bake a heightmap into the normalmaps just like Doom3 do.
Hmmm. How'd I miss that post? I kept checking and checking...Hmmm.
Renderbump was like...the first thing I tried weeks ago, but I couldn't get that to work, either. Then, Quake 4 just couldn't read the lwo I exported from Blender, now it just keeps crashing. : [

I actually got this error just now, which is weird, since a few minutes ago it was crashing without leaving one.
textures/tpole/tpole
{
renderbump -size 1024 -trace .01 -aa 2 -unweld -localmap -colormap -mergehigh models/hpmodels/tpole_local.tga models/hpmodels/tpole_high.lwo
diffuseMap textures/tpole/tpole_d.tga
bumpMap addnormals ( textures/tpole/tpole_local.tga, heightmap ( textures/tpole/tpole_h.tga, 5 ) )
}
Bleh. Does the .lwo path point to a file inside the q4base folder, or the pk4? And what about the ase? (already tried both ways and get the same problems)
Kristus@Posted: Sun Jun 17, 2007 9:05 am : It sais it can't allocate any bytes. So, (I've not checked this) maybe the directory information is incorrect.
And no, you shouldn't put it in a pk4. That's just something you'll use when your project is to be released really.
Super Happy Cow@Posted: Sun Jun 17, 2007 7:00 pm : Hmmmm. I wonder if it's because the high poly wasn't converted to tris...
I was confident that would work, but nope. Nothing. My directory information is fine. Instead of putting everything in a pk4, I put them in the basefolders, same issue. Quads - Tris, same issue. : [
BNA!@Posted: Sun Jun 17, 2007 7:43 pm : Super Happy Cow wrote:
Hmmmm. I wonder if it's because the high poly wasn't converted to tris...
I was confident that would work, but nope. Nothing. My directory information is fine. Instead of putting everything in a pk4, I put them in the basefolders, same issue. Quads - Tris, same issue. : [
Make sure to:
- always only use triangled polygons
- delete the name of the UV map on your high poly model (unless you need it for other purposes) and rename all surfaces that are named like a) the high poly model or b) the low poly model or c) any of the low poly model UV maps (the last tips fall under the "planets line up correctly" category of tips which can go wrong)
- rename your material names accordingly if you move them around
And finally please don't forget it works for everyone, so it's a mistake on your side of the keyboard. Check for spelling errors, warning messages from the engine... It happens to me occasionally as well.
Super Happy Cow@Posted: Sun Jun 17, 2007 10:37 pm : Can't imagine what I'm doing wrong. When I try to merge with the high poly lwo, the engine crashes. When I try it with the ase, Q4 fails to allocate whatever amount of memory.
Would anyone mind looking at this for me? The lwo is only 4 megs, while everything else is about 1.


