TUTORIAL - RELIEF MAPPED DECALSThis is short tutorial on one nice trick: how to use Relief Mapping Shader to make deep and good looking decals.
Basically the one issue we have with RMS is that edges of brush with relief mapped texture will look strange because of ‘pushing inside the surface of the dents represented in heightmap. After thinking a little bit about that I came up with slightly strange, but nicely working solution for this kind of thing for decals, so we can use relief mapping in those decals without worrying about some of graphical distortions
What we need:
- Relief Mapping Shader by Fabio Policarpo, downloadable from
http://doom3.filefront.com/file/DOOM_3_ ... ping;50039 or one of Sikkpins revisions of said shader available here:
viewtopic.php?f=56&t=22990&start=0- Normal2depth.exe tool, which is included in the package mentioned above from doom3filefront.
- Gimp, Photoshop, or any other image editing software giving us ability to create alpha channels, do a magic wand selection and save 32-bit TGA files. We will use Photoshop here.
1.
Whats great with Relief Mapping Shader for D3 is that it uses height maps stored in specular map files, and if specular map alpha channel doesn’t have such a height map, texture will be rendered in game as a standard, flat bumpmap. Having this in mind we can safely use Relief Mapping Shader for just selected textures and the ones which will be making problems (brush edge ones, where continuity of tiling of the texture is broken) can be left untouched. But decals used for decorations of walls can be relief mapped too!
What we need is some basic texture which we will be using as a decal. Lets create one. I made those pipes in 3dsmax, then rendered normalmap, and created diffuse and specular stages by blending, editing, modifying some diffuse textures from OpenFootage.net

2.
What we now need is to pack those textures into *.pk4 (lets say we make textures/reliefdecal folder structure for it) and let it through normal2depth.exe file (you can, of course, render height map in 3d app if you’re using one). Lets put resulted specular file, which will appear in textures/reliefdecal folder in new dierectory, alongside with diffuse and normal stage and open all of them in Photoshop
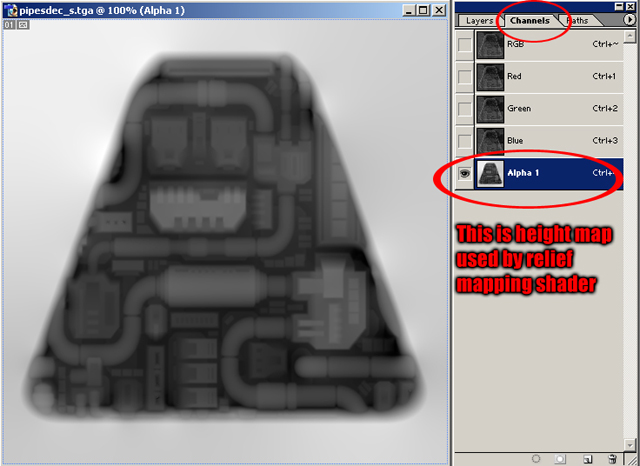
If You select specular image and go into ‘channels’ tab, you’ll see, that after red, green and blue channels there’s another one, alpha channel 1.

By clicking on that channel we can see heightmap generated by normal2depth.exe. It’s not the way we want it, but we will fix it. First select all, then copy that image, then make new document of the same dimensions and paste image there, so we can have heightmap in separate window.
Now lets take normal map, copy all and paste it onto height channel (step 1). Using magic wand selection lets select the purple area around the normals of our decal. Now we need to turn that layer off, so we can see heightmap underneath, select height map in layers tab (step 2) and paint selected area of field outside our decals heightmap to completely white. We can also play around with brightness and contrast to enhance detail (step 3), but we have to remember, that completely color white = 0 at z-axis, and color black – deepest possible z-axis.

Copy all of the heightmap, go back to specular image and replace alpha channel image with newly tweaked one. Save as 32-bit TGA file.
3.
Now lets make our decal a decal

.
Copy all of the normalmap image and paste it onto diffuse same way you did in step 1 in heightmap tweak. Select area around our decal normals. Now, very important thing: to get rid of tiling issue, which would appear on the decal too, go to select->inverse to inverse selection and then without deselecting go to select->modify->expand and put there, lets say 2 or 4 value for pixels. The selection will expand slightly away from the normalmap (so heightmap respectively too) border. Turn the normalmap layer off and go to diffuse layer.


To make alpha channel for diffuse map, which is used to define, which parts of the texture should be transparent and which visible, go to select->save selection->ok. If you go to channels tab, you’ll see our diffuse have black and white alpha channel, in which the black area is the transparent area, and white area is visible in game.
You can additionally select all the area outside the decal normals, expand that selection by the value you used earlier, and tweak the brightness/contrast of the diffuse, so frame of the decal will slightly stand out from the rest.
Save as 32-bit TGA file.
Now pack newly created diffusemap and specularmap alongside with normalmap and use this material to define them:
Code:
textures/reliefdecal/pipesdec
{
noshadows
qer_editorimage textures/reliefdecal/pipesdec_d.tga
{
blend diffusemap
map textures/reliefdecal/pipesdec_d.tga
alphatest 0.5
}
bumpmap textures/reliefdecal/pipesdec_local.tga
specularmap textures/reliefdecal/pipesdec_s.tga
}
Alphatest 0.5 in the diffusestage is responsible for transparency of decal elements.
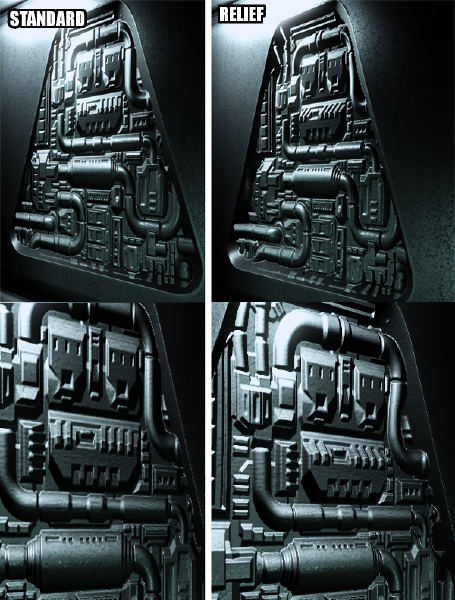
All right, lets see how it looks in game! Here I used Sikkpins Cook-Torrance lighting revision of Mr. Fabios Relief Mapping Shader

Looks way better with relief, doesn’t it?
. What happened here is the way Relief Mapping shader works in action. It considers white area of heightmap as a surface at level zero of the Z axis, so there’s no problem with tiling it, and placing it alongside surface of other brushes. We needed just 2 pixels of that white area around the decal included in alpha channel of diffusemap, so it will be rendered nicely inside D3.
The possibilities are limitless using this technique. Sure, you’ll still have to remember, that small ‘border’ will be visible, but then again it can easily be worked out in any kind of tech/rock decal. Lets say you’ll model huge hole in the brick wall. Then You model/render normamap of said decal and fix the heightmap, but after creation of diffuse alpha stage responsible for transparency You’re ending up with artificially looking frame of said hole.. just make another texture, in which there will be dirt around the hole, make another material with blend filter stage, and then just place both textures (hole and dirt) on top of each other, so dirt will cover the small frame, and effect looks amazingly good. And Your big hole won't be flat normalmap, but will look like an actual 3d hole
Hope You guys find this thing useful
Thx!
It may not be visible so much in this example, but you can do miracles with this technique
, same goes for Parallax Occlusion Mapping of Sikkpins, however i don't know how to tweak height map so effect would look good, so i went with relief.
More stuff related to this coming today
nice tutorial mth....
finally someone experimenting with equaling the area around a parallax/relief decal to 0 height. This should be extremely useful for bullet hole decals too...
TUTORIAL - RELIEF MAPPED DECALSThis is short tutorial on one nice trick: how to use Relief Mapping Shader to make deep and good looking decals.
Basically the one issue we have with RMS is that edges of brush with relief mapped texture will look strange because of ‘pushing inside the surface of the dents represented in heightmap. After thinking a little bit about that I came up with slightly strange, but nicely working solution for this kind of thing for decals, so we can use relief mapping in those decals without worrying about some of graphical distortions
What we need:
- Relief Mapping Shader by Fabio Policarpo, downloadable from
http://doom3.filefront.com/file/DOOM_3_ ... ping;50039 or one of Sikkpins revisions of said shader available here:
viewtopic.php?f=56&t=22990&start=0- Normal2depth.exe tool, which is included in the package mentioned above from doom3filefront.
- Gimp, Photoshop, or any other image editing software giving us ability to create alpha channels, do a magic wand selection and save 32-bit TGA files. We will use Photoshop here.
1.
Whats great with Relief Mapping Shader for D3 is that it uses height maps stored in specular map files, and if specular map alpha channel doesn’t have such a height map, texture will be rendered in game as a standard, flat bumpmap. Having this in mind we can safely use Relief Mapping Shader for just selected textures and the ones which will be making problems (brush edge ones, where continuity of tiling of the texture is broken) can be left untouched. But decals used for decorations of walls can be relief mapped too!
What we need is some basic texture which we will be using as a decal. Lets create one. I made those pipes in 3dsmax, then rendered normalmap, and created diffuse and specular stages by blending, editing, modifying some diffuse textures from OpenFootage.net

2.
What we now need is to pack those textures into *.pk4 (lets say we make textures/reliefdecal folder structure for it) and let it through normal2depth.exe file (you can, of course, render height map in 3d app if you’re using one). Lets put resulted specular file, which will appear in textures/reliefdecal folder in new dierectory, alongside with diffuse and normal stage and open all of them in Photoshop
If You select specular image and go into ‘channels’ tab, you’ll see, that after red, green and blue channels there’s another one, alpha channel 1.
By clicking on that channel we can see heightmap generated by normal2depth.exe. It’s not the way we want it, but we will fix it. First select all, then copy that image, then make new document of the same dimensions and paste image there, so we can have heightmap in separate window.
Now lets take normal map, copy all and paste it onto height channel (step 1). Using magic wand selection lets select the purple area around the normals of our decal. Now we need to turn that layer off, so we can see heightmap underneath, select height map in layers tab (step 2) and paint selected area of field outside our decals heightmap to completely white. We can also play around with brightness and contrast to enhance detail (step 3), but we have to remember, that completely color white = 0 at z-axis, and color black – deepest possible z-axis.

Copy all of the heightmap, go back to specular image and replace alpha channel image with newly tweaked one. Save as 32-bit TGA file.
3.
Now lets make our decal a decal

.
Copy all of the normalmap image and paste it onto diffuse same way you did in step 1 in heightmap tweak. Select area around our decal normals. Now, very important thing: to get rid of tiling issue, which would appear on the decal too, go to select->inverse to inverse selection and then without deselecting go to select->modify->expand and put there, lets say 2 or 4 value for pixels. The selection will expand slightly away from the normalmap (so heightmap respectively too) border. Turn the normalmap layer off and go to diffuse layer.


To make alpha channel for diffuse map, which is used to define, which parts of the texture should be transparent and which visible, go to select->save selection->ok. If you go to channels tab, you’ll see our diffuse have black and white alpha channel, in which the black area is the transparent area, and white area is visible in game.
You can additionally select all the area outside the decal normals, expand that selection by the value you used earlier, and tweak the brightness/contrast of the diffuse, so frame of the decal will slightly stand out from the rest.
Save as 32-bit TGA file.
Now pack newly created diffusemap and specularmap alongside with normalmap and use this material to define them:
Code:
textures/reliefdecal/pipesdec
{
noshadows
qer_editorimage textures/reliefdecal/pipesdec_d.tga
{
blend diffusemap
map textures/reliefdecal/pipesdec_d.tga
alphatest 0.5
}
bumpmap textures/reliefdecal/pipesdec_local.tga
specularmap textures/reliefdecal/pipesdec_s.tga
}
Alphatest 0.5 in the diffusestage is responsible for transparency of decal elements.
All right, lets see how it looks in game! Here I used Sikkpins Cook-Torrance lighting revision of Mr. Fabios Relief Mapping Shader
Looks way better with relief, doesn’t it?
. What happened here is the way Relief Mapping shader works in action. It considers white area of heightmap as a surface at level zero of the Z axis, so there’s no problem with tiling it, and placing it alongside surface of other brushes. We needed just 2 pixels of that white area around the decal included in alpha channel of diffusemap, so it will be rendered nicely inside D3.
The possibilities are limitless using this technique. Sure, you’ll still have to remember, that small ‘border’ will be visible, but then again it can easily be worked out in any kind of tech/rock decal. Lets say you’ll model huge hole in the brick wall. Then You model/render normamap of said decal and fix the heightmap, but after creation of diffuse alpha stage responsible for transparency You’re ending up with artificially looking frame of said hole.. just make another texture, in which there will be dirt around the hole, make another material with blend filter stage, and then just place both textures (hole and dirt) on top of each other, so dirt will cover the small frame, and effect looks amazingly good. And Your big hole won't be flat normalmap, but will look like an actual 3d hole
Hope You guys find this thing useful
Thx!
It may not be visible so much in this example, but you can do miracles with this technique
, same goes for Parallax Occlusion Mapping of Sikkpins, however i don't know how to tweak height map so effect would look good, so i went with relief.
More stuff related to this coming today
nice tutorial mth....
finally someone experimenting with equaling the area around a parallax/relief decal to 0 height. This should be extremely useful for bullet hole decals too...