How to connect two rooms, add working doors and block efficiently the visibility so you wont have to render more than what you really see.
Basically it's a 3in1 tutorial, but you'll like it, wont take you too much time and what you learn is something you will need every single day as a mapper.
I'm referencing to the first D3W tutorial often, so make sure that you at least take a look at it:
D3W Tutorial: Getting started with your first map
That's the map I've created with this little tutorial:
http://www.doom3world.org/doom3/tut/bna ... _doors.rar
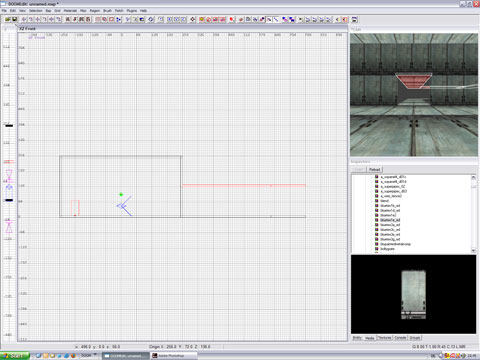
This said we start with two boxes, one of them has an info_player_start in it and both are lit as in the first tutorial (by now you sould be able to crank out these two boxes in less than 60 seconds).
Just in case you don't know yet:
When you select something in DoomEdit and hit the space bar it'll clone it so you have a perfect copy, you'll need that a few times now.
If you want to select the whole box at once to duplicate it, just make a brush which encloses the whole thing - right click into the grid, selection > select inside.
Top down starting view like this:

Next step is to create a good cut into the wall, otherwise we wouldn't be able to walk from room 1 to room 2
So just select the wall in front of you by shift+lmb clicking it:

Then we ctrl+tab to side view (or was it frontview? doesn't matter - just look at the screenshot, you can't go wrong):

Now drag outside the selected brush and resize it so it looks like this:

Now clone this, place it to the right side, clone it one more time, place it in the middle an resize it so it looks like this:

Done that? Fine - go to room2, delete the wall we just edited, go back to room1, select the three brushes now making our wall with entry, clone them and drag them over to room2 so it looks like room1.
Sounds complicated, but it's only because it's my second language and I'd rather play Doom now
Let's progress - we need an infamous claustrophobic corridor to walk from room1 to room2.
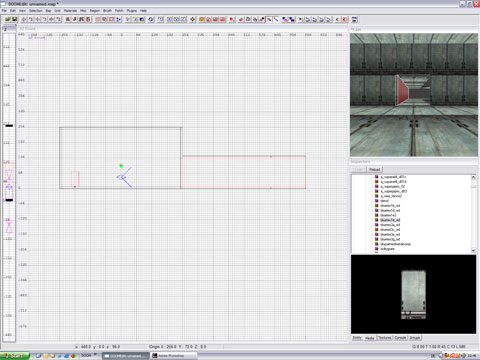
The fastest way is to select the floor of room1 (or room2, doesn't matter), clone it, drag it outside to line up exactely with the floor, resize it so that it extends the opening in the wall for one unit on both sides and make it a similar shape as shown below:

Now you clone that and drag it over to room2.
Clone it one more time and hit the z-axis rotate button - will rotate your clone at 90degrees. Line it up so it looks like this (make sure the brushes touch each other perfectly and line up with the floors in the rooms):

Select the three floor brushes, clone them and drag them upwards to form the ceiling. Make sure to align them with the top part of our nice hole in the wall:
Now we need walls - clone one of the floor brushes, drag it upwards so it just sits on the floor (don't leave a gap open and don't overlap them).
Then you resize it so it's only a unit thick (that's why we extended the floor and the cieling one unit beyond the hole in the wall) and resize it upwards to match up with the cieling:
Continue, repeat, z-axis rotate till it looks like this - always make sure not to leave any gaps open!!

Claustrophobic and dark is cool, but pitch black is not, so we quickly add a light in the middle of the corridor.
Watch your map from all sides and make sure the light is not outside the corridor tho:

Now we add a door. To do so we right click and choose func_door.
This will insert something that looks like a random brush, don't mind at this stage:

Since we want our door to look cool, we use a model for it.
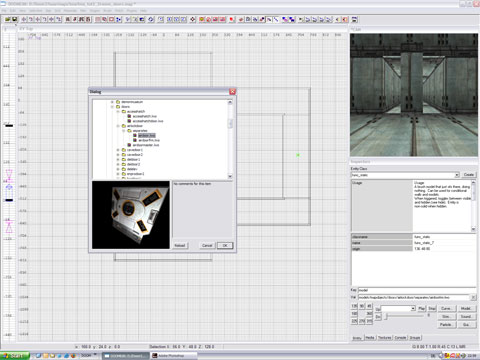
To do so we right click and select the option new model.
This will open the fancy model browser (in the preview window: rotate the model with the lmb and resize it with alt + rmb)
In our case: models/mapobjects/doors/airlockdoor/separates/airdoor.lwo ffor the door and
models/mapobjects/doors/airlockdoor/separates/airdoorfrm.lwo for the frame.
Both models will show up just as boxes when you add them - select the boxes and clone them, then the models will show up nicely (most famous Radiant bug since ever). Delete the old boxes, keep the models (these are func_statics now).
We wont really need them, but now you've learned how to add models.
Now select your func_door and switch to the entity tab in the inspector window.
In the lower right click the "model" button which will bring up the already shown model browser. Select the door model we've talked about previously.
As usual you'll still see the box - select it, clone it delete old box...
Now you have a nice model as a door.
Use the z-axis rotate button so it faces the wall hole.
Then move it into the hole:

Should look like this:

Now select the frame we've brought into the map earlier and line it up with the func_door and the wall.
You'll see small red dots in the view - these are the pivot points of the models. id software had modeled both in a fashion so that these points should line up (pure design decision, not a functionality you need to learn now).
Drag the models into places:

Select both, the func_door and the func_static showing the door frame, clone them and move the copy to room2:

Now make a brush that fits just nicely into the wallhole and the func_door we've created earlier - this will be our visportal. Make it a little thinner than the func_door.
Assign the visportal material: textures > editor > visportal to the brush face either facing towards or away from us, no real difference.
The other faces you texture with textures > common > nodraw.
Quick workflow / tool tip:
Select the brush you want to act as a visportal and give it the nodraw material, then deselect it and select only designated visportal face by ctrl+shift clicking it in the cam window. Then assign the visportal material.

Copy, clone roate... till it looks like this:

Save the map, compile it and load it up.
Enjoy your initial pleasure seeing a working door
Beyond that you've achieved a seond goal - you have learnt how to block sufficiently the visibility.
Quick explanation:
The engine draws every part of the level eve when you can't see it.
This obviously is a bad idea for performance.
That's why you use visportals - these tell the engine how far it can look.
If you see a visportal, the engine checks whether this visportal can see another visportal. If so then the engine checks whether this visportal can see another one - if the first visportal can't see the third, the engine wont rrender the world benind it - that's called "reducing overdraw" to throw in a catch phrase.
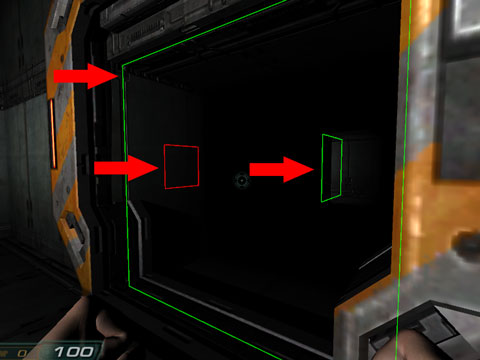
if you lower the console and enter "r_showPortals 1" you can see your visportals ingame.
Red means it's closed, nothing behind it get's rendered, green means it's open and renders stuff to the next red visportal (highly simplified, but I hope you get the concept):
A viportal insice a func_door automatically actvates itself when the door opens.
By typing "r_showtris 3" in the console you'll get a nice wireframe view which shows you which triangles get rendered and which don't.
See how the corridor doesn't get rendered when the door is closed:


As usual, it's late, I was in a hurry, needed the money and any possible excuse else for any potential errors, don't get me started on typos and exotic grammar...
Comments welcome below