Introduction
Welcome to the second in a series of three Scripting Tutorials.
In the last tutorial I broke down scripting to the most basic elements. I explained the concept of programming and how a computer interprets code. I also included a list of commands thats syntax and function are known. And finally I walked you through creating a simple spinning box.
Now you should already have a pretty good idea of how to script, if not program in general. You now know how to make a spinning box but who wants to put something dumb like that in their levels. Not me, and we are not going to continue where the other tutorial left off.
In this tutorial we will begin making a mechanical arm. To save you the time and trouble of manually creating these moving parts I have included everything you will need in the zip in the link below. I am sparing you the trouble of learning a 3D modeling package which by the way is not easy when you are a complete newbie like myself.
FILE IS NO LONGER AVAILABLE
Eventually, I should get around to the third installment of these tutorials where we will take the knowledge and quite possibly the mechanical arm from this tutorial and create an assembly line. Um... it might take awhile for me to finish the advanced tutorial.
Creating Objects: Modeling Package VS. D3Radient (Part 1)
This will probably end up turning in to some big debate as to which method to use. Some may find creating objects in a 3rd party modeling package easier while others will think D3Radient is the way to go. Here is a list of pros and cons to each method.
- Many external object formats (LWOs, ASEs, ECT...) import straight into the engine without conversion.
- Native D3Radient objects can be created in the editor.
- 3D modeling packages have more object related tools than D3Radient.
- External objects cannot be textured in D3Radient, they require a separate material file.
- External objects can be rotated in the editor without affecting their axises.
- Native D3Radient objects inherit their axises from the game during dmap compile.
- An external objects origin (pivot point) is assigned at it's origin (0, 0, 0) in its respective modeling program.
- A Native D3Radient objects origin is assigned to the center of the object upon creation.
Intermediate: Creating a Mechanical Arm
Before you can run you have to learn to walk. We were crawling around in the last tutorial and hopefully by the end of this one you should be walking around on two feet.
I am trying to streamline this tutorial so that we can jump right into scripting. So, extract the zip to [Your Doom 3 Directory]\base and make sure you allow it to extract to the subfolders. You will have a precompiled map, all the separate pieces of the arm, and the appropriate material file. Please excuse the poor texturing as I didn't feel it was nessecary to model I high poly version and create a normalmap.
Now let me explain what I have already done for you.
I have created a simple map. It is one room with 6 func_movers, a light, and a player starting point. This map uses the "same name" method so make sure you name and place your script appropriately. The "model" key/value pairs of all six func_movers have been set to the appropriate models in the model directory. The func_movers were moved and rotated to the positions which they should be bound.
Note: You do not have to model 3D objects in external programs. You can create these from within D3Radient however there will be slight differences. I go into detail about the changes nessecary at the end of this tutorial.
The only thing I didn't do for you was give you the script itself. You'll be writing that up as we go.
So let's get to making a script so you can see this cool arm and start moving it.
First open editpad... or notepad if your stubborn. We are going to save a basic script just so we can load the map in the background. Copy the following into your text editor.
Code:
////////////////////////////////////////////////////
//
// Setup binds and times etc...
//
////////////////////////////////////////////////////
void setup_objects()
{
}
////////////////////////////////////////////////////
//
// Mechanical Movement...
//
////////////////////////////////////////////////////
////////////////////////////////////////////////////
//
// MAIN
//
////////////////////////////////////////////////////
void main ()
{
setup_objects ();
sys.wait (5);
}
//
// Setup binds and times etc...
//
////////////////////////////////////////////////////
void setup_objects()
{
}
////////////////////////////////////////////////////
//
// Mechanical Movement...
//
////////////////////////////////////////////////////
////////////////////////////////////////////////////
//
// MAIN
//
////////////////////////////////////////////////////
void main ()
{
setup_objects ();
sys.wait (5);
}
Now save this code as rich_scripting_tutorial_2.script. You did remeber that we're going to save this script to the maps folder right? Good, now we have a basic script that runs but does nothing visual.
So... Load Doom 3 and type "map rich_scripting_tutorial_2" in the console. Switch to windowed mode so we can ALT + TAB between the game and text editor.
What you should see is a simple square room with a mechanical arm hanging from the ceiling. The first thing we will need to do is attatch all these objects together so that they are in a child-parent relationship.
Let me explain child-parent relationships real quick.
Do you remember in the last tutorial how we attatched a light to the cube and watched how the light inhereted all the movements of the cube? That was a child-parent relationship. The light was a child to the cube. The cube was a parent to the light.
So how is this going to play out in this tutorial? Well this arm is composed of several pieces which all move independantly. Here are the pieces and the names I assigned each entity in the editor.
- The base of the arm. (arm_base)
- The shaft of the arm. (arm_shaft)
- The rotating cuff of the arm. (finger_joint)
- The fingers of the arm. (finger_1...2...3)
If I were to rotate the base of the arm, I would expect all the parts to rotate with it. If I were to bend the shaft of the arm, I would expect all the parts except the base to move with it. If I were to rotate the cuff, I would expect the fingers to rotate with it. And the fingers... well they have nothing attached to them at least yet. We'll attatch things to the fingers in the next tutorial.
So we need to add some bind commands to our setup_objects function. Add this code.
Code:
$arm_shaft.bind($arm_base);
$finger_joint.bind($arm_shaft);
$finger_1.bind($finger_joint);
$finger_2.bind($finger_joint);
$finger_3.bind($finger_joint);
$finger_joint.bind($arm_shaft);
$finger_1.bind($finger_joint);
$finger_2.bind($finger_joint);
$finger_3.bind($finger_joint);
Now the pieces are bound and I could move the entire arm as one piece just by moving the base. Let's create a test funciton to do so.
Add the following code under the mechanical movements section.
Code:
void rotate_base_90_CW ()
{
$arm_base.rotateOnce('0 90 0');
sys.print ("rotating base 90 degrees CW\n");
sys.waitFor($arm_base);
}
{
$arm_base.rotateOnce('0 90 0');
sys.print ("rotating base 90 degrees CW\n");
sys.waitFor($arm_base);
}
This function will tell the base to rotate once 90 degrees clockwise. Add a call to rotate_base_90_CW to the main function and you are ready to test. Check to make sure your code looks like this and save.
Code:
////////////////////////////////////////////////////
//
// Setup binds and times etc...
//
////////////////////////////////////////////////////
void setup_objects()
{
$arm_shaft.bind($arm_base);
$finger_joint.bind($arm_shaft);
$finger_1.bind($finger_joint);
$finger_2.bind($finger_joint);
$finger_3.bind($finger_joint);
}
////////////////////////////////////////////////////
//
// Mechanical Movement...
//
////////////////////////////////////////////////////
void rotate_base_90_CW ()
{
$arm_base.rotateOnce('0 90 0');
sys.print ("rotating base 90 degrees CW\n");
sys.waitFor($arm_base);
}
////////////////////////////////////////////////////
//
// MAIN
//
////////////////////////////////////////////////////
void main ()
{
setup_objects ();
sys.wait (5);
rotate_base_90_CW ();
}
//
// Setup binds and times etc...
//
////////////////////////////////////////////////////
void setup_objects()
{
$arm_shaft.bind($arm_base);
$finger_joint.bind($arm_shaft);
$finger_1.bind($finger_joint);
$finger_2.bind($finger_joint);
$finger_3.bind($finger_joint);
}
////////////////////////////////////////////////////
//
// Mechanical Movement...
//
////////////////////////////////////////////////////
void rotate_base_90_CW ()
{
$arm_base.rotateOnce('0 90 0');
sys.print ("rotating base 90 degrees CW\n");
sys.waitFor($arm_base);
}
////////////////////////////////////////////////////
//
// MAIN
//
////////////////////////////////////////////////////
void main ()
{
setup_objects ();
sys.wait (5);
rotate_base_90_CW ();
}
Now reload the map. After a five second delay the entire arm should rotate and stop.
Now we have tested the movement of the base. Let's add functions for the rest of the parts.
Add this code to the mechanical movement section.
Code:
void bend_arm_45_FW ()
{
$arm_shaft.rotateOnce('45 0 0');
sys.print ("bending arm 45 degrees FW\n");
sys.waitFor($arm_shaft);
}
void rotate_fingers_1800_CW ()
{
$finger_joint.rotateOnce('0 1800 0');
sys.print ("rotating fingers 1800 degrees CW\n");
sys.waitFor($finger_joint);
}
void finger_release ()
{
$finger_1.rotateOnce('45 0 0');
$finger_2.rotateOnce('45 0 0');
$finger_3.rotateOnce('45 0 0');
sys.print ("releasing finger grapple\n");
sys.waitFor($finger_1);
sys.waitFor($finger_2);
sys.waitFor($finger_3);
}
{
$arm_shaft.rotateOnce('45 0 0');
sys.print ("bending arm 45 degrees FW\n");
sys.waitFor($arm_shaft);
}
void rotate_fingers_1800_CW ()
{
$finger_joint.rotateOnce('0 1800 0');
sys.print ("rotating fingers 1800 degrees CW\n");
sys.waitFor($finger_joint);
}
void finger_release ()
{
$finger_1.rotateOnce('45 0 0');
$finger_2.rotateOnce('45 0 0');
$finger_3.rotateOnce('45 0 0');
sys.print ("releasing finger grapple\n");
sys.waitFor($finger_1);
sys.waitFor($finger_2);
sys.waitFor($finger_3);
}
Now add these calls to the main function.
Code:
bend_arm_45_FW ();
rotate_fingers_1800_CW ();
finger_release ();
rotate_fingers_1800_CW ();
finger_release ();
Again check to see that your code looks like this and save.
Code:
////////////////////////////////////////////////////
//
// Setup binds and times etc...
//
////////////////////////////////////////////////////
void setup_objects()
{
$arm_shaft.bind($arm_base);
$finger_joint.bind($arm_shaft);
$finger_1.bind($finger_joint);
$finger_2.bind($finger_joint);
$finger_3.bind($finger_joint);
}
////////////////////////////////////////////////////
//
// Mechanical Movement...
//
////////////////////////////////////////////////////
void rotate_base_90_CW ()
{
$arm_base.rotateOnce('0 90 0');
sys.print ("rotating base 90 degrees CW\n");
sys.waitFor($arm_base);
}
void bend_arm_45_FW ()
{
$arm_shaft.rotateOnce('45 0 0');
sys.print ("bending arm 45 degrees FW\n");
sys.waitFor($arm_shaft);
}
void rotate_fingers_1800_CW ()
{
$finger_joint.rotateOnce('0 1800 0');
sys.print ("rotating fingers 1800 degrees CW\n");
sys.waitFor($finger_joint);
}
void finger_release ()
{
$finger_1.rotateOnce('45 0 0');
$finger_2.rotateOnce('45 0 0');
$finger_3.rotateOnce('45 0 0');
sys.print ("releasing finger grapple\n");
sys.waitFor($finger_1);
sys.waitFor($finger_2);
sys.waitFor($finger_3);
}
////////////////////////////////////////////////////
//
// MAIN
//
////////////////////////////////////////////////////
void main ()
{
setup_objects ();
sys.wait (5);
rotate_base_90_CW ();
bend_arm_45_FW ();
rotate_fingers_1800_CW ();
finger_release ();
}
//
// Setup binds and times etc...
//
////////////////////////////////////////////////////
void setup_objects()
{
$arm_shaft.bind($arm_base);
$finger_joint.bind($arm_shaft);
$finger_1.bind($finger_joint);
$finger_2.bind($finger_joint);
$finger_3.bind($finger_joint);
}
////////////////////////////////////////////////////
//
// Mechanical Movement...
//
////////////////////////////////////////////////////
void rotate_base_90_CW ()
{
$arm_base.rotateOnce('0 90 0');
sys.print ("rotating base 90 degrees CW\n");
sys.waitFor($arm_base);
}
void bend_arm_45_FW ()
{
$arm_shaft.rotateOnce('45 0 0');
sys.print ("bending arm 45 degrees FW\n");
sys.waitFor($arm_shaft);
}
void rotate_fingers_1800_CW ()
{
$finger_joint.rotateOnce('0 1800 0');
sys.print ("rotating fingers 1800 degrees CW\n");
sys.waitFor($finger_joint);
}
void finger_release ()
{
$finger_1.rotateOnce('45 0 0');
$finger_2.rotateOnce('45 0 0');
$finger_3.rotateOnce('45 0 0');
sys.print ("releasing finger grapple\n");
sys.waitFor($finger_1);
sys.waitFor($finger_2);
sys.waitFor($finger_3);
}
////////////////////////////////////////////////////
//
// MAIN
//
////////////////////////////////////////////////////
void main ()
{
setup_objects ();
sys.wait (5);
rotate_base_90_CW ();
bend_arm_45_FW ();
rotate_fingers_1800_CW ();
finger_release ();
}
Now again, reload the map in game and watch as the arm rotates, bends, the cuff rotates, and the fingers extend. This is getting impressive.
Now let's add some more functions so we have a little more control over the arms movement.
Add the following code to the mechanical movement section.
Code:
void rotate_base_90_CCW ()
{
$arm_base.rotateOnce('0 -90 0');
sys.print ("rotating base 90 degrees CCW\n");
sys.waitFor($arm_base);
}
void bend_arm_45_BW ()
{
$arm_shaft.rotateOnce('-45 0 0');
sys.print ("bending arm 45 degrees BW\n");
sys.waitFor($arm_shaft);
}
void rotate_fingers_1800_CCW ()
{
$finger_joint.rotateOnce('0 -1800 0');
sys.print ("rotating fingers 1800 degrees CCW\n");
sys.waitFor($finger_joint);
}
void finger_grasp ()
{
$finger_1.rotateOnce('-45 0 0');
$finger_2.rotateOnce('-45 0 0');
$finger_3.rotateOnce('-45 0 0');
sys.print ("contracting finger grapple\n");
sys.waitFor($finger_1);
sys.waitFor($finger_2);
sys.waitFor($finger_3);
}
{
$arm_base.rotateOnce('0 -90 0');
sys.print ("rotating base 90 degrees CCW\n");
sys.waitFor($arm_base);
}
void bend_arm_45_BW ()
{
$arm_shaft.rotateOnce('-45 0 0');
sys.print ("bending arm 45 degrees BW\n");
sys.waitFor($arm_shaft);
}
void rotate_fingers_1800_CCW ()
{
$finger_joint.rotateOnce('0 -1800 0');
sys.print ("rotating fingers 1800 degrees CCW\n");
sys.waitFor($finger_joint);
}
void finger_grasp ()
{
$finger_1.rotateOnce('-45 0 0');
$finger_2.rotateOnce('-45 0 0');
$finger_3.rotateOnce('-45 0 0');
sys.print ("contracting finger grapple\n");
sys.waitFor($finger_1);
sys.waitFor($finger_2);
sys.waitFor($finger_3);
}
Now be creative here and try your own combination of movements by adding, changing, and deleting function calls from the main function. Save the script and reload the map in game.
You should be able to create any kind of motion desireable. What you will notice is that the arm is not moving very fluidly. Let's change that. This time it won't take too much code.
Add these lines to the setup_objects function.
Code:
$arm_base.time (.5);
$arm_shaft.time (.3);
$finger_joint.time (1);
$finger_1.time (.3);
$finger_2.time (.3);
$finger_3.time (.3);
$arm_base.accelTime (.3);
$arm_shaft.accelTime (.3);
$finger_joint.accelTime (.3);
$finger_1.accelTime (.3);
$finger_2.accelTime (.3);
$finger_3.accelTime (.3);
$arm_base.decelTime (.3);
$arm_shaft.decelTime (.3);
$finger_joint.decelTime (.3);
$finger_1.decelTime (.3);
$finger_2.decelTime (.3);
$finger_3.decelTime (.3);
These lines change the speed of each part, and add an amount of acceleration and deceleration. Feel free to adjust these values and experiment.
Check your code to see that looks similar to this and save.
Code:
////////////////////////////////////////////////////
//
// Setup binds and times etc...
//
////////////////////////////////////////////////////
void setup_objects()
{
$arm_shaft.bind($arm_base);
$finger_joint.bind($arm_shaft);
$finger_1.bind($finger_joint);
$finger_2.bind($finger_joint);
$finger_3.bind($finger_joint);
$arm_base.time (.5);
$arm_shaft.time (.3);
$finger_joint.time (1);
$finger_1.time (.3);
$finger_2.time (.3);
$finger_3.time (.3);
$arm_base.accelTime (.3);
$arm_shaft.accelTime (.3);
$finger_joint.accelTime (.3);
$finger_1.accelTime (.3);
$finger_2.accelTime (.3);
$finger_3.accelTime (.3);
$arm_base.decelTime (.3);
$arm_shaft.decelTime (.3);
$finger_joint.decelTime (.3);
$finger_1.decelTime (.3);
$finger_2.decelTime (.3);
$finger_3.decelTime (.3);
}
////////////////////////////////////////////////////
//
// Mechanical Movement...
//
////////////////////////////////////////////////////
void rotate_base_90_CW ()
{
$arm_base.rotateOnce('0 90 0');
sys.print ("rotating base 90 degrees CW\n");
sys.waitFor($arm_base);
}
void rotate_base_90_CCW ()
{
$arm_base.rotateOnce('0 -90 0');
sys.print ("rotating base 90 degrees CCW\n");
sys.waitFor($arm_base);
}
void bend_arm_45_FW ()
{
$arm_shaft.rotateOnce('45 0 0');
sys.print ("bending arm 45 degrees FW\n");
sys.waitFor($arm_shaft);
}
void bend_arm_45_BW ()
{
$arm_shaft.rotateOnce('-45 0 0');
sys.print ("bending arm 45 degrees BW\n");
sys.waitFor($arm_shaft);
}
void rotate_fingers_1800_CW ()
{
$finger_joint.rotateOnce('0 1800 0');
sys.print ("rotating fingers 1800 degrees CW\n");
sys.waitFor($finger_joint);
}
void rotate_fingers_1800_CCW ()
{
$finger_joint.rotateOnce('0 -1800 0');
sys.print ("rotating fingers 1800 degrees CCW\n");
sys.waitFor($finger_joint);
}
void finger_release ()
{
$finger_1.rotateOnce('45 0 0');
$finger_2.rotateOnce('45 0 0');
$finger_3.rotateOnce('45 0 0');
sys.print ("releasing finger grapple\n");
sys.waitFor($finger_1);
sys.waitFor($finger_2);
sys.waitFor($finger_3);
}
void finger_grasp ()
{
$finger_1.rotateOnce('-45 0 0');
$finger_2.rotateOnce('-45 0 0');
$finger_3.rotateOnce('-45 0 0');
sys.print ("contracting finger grapple\n");
sys.waitFor($finger_1);
sys.waitFor($finger_2);
sys.waitFor($finger_3);
}
////////////////////////////////////////////////////
//
// MAIN
//
////////////////////////////////////////////////////
void main ()
{
setup_objects ();
sys.wait (5);
rotate_base_90_CW ();
finger_release ();
bend_arm_45_FW ();
rotate_fingers_1800_CW ();
}
//
// Setup binds and times etc...
//
////////////////////////////////////////////////////
void setup_objects()
{
$arm_shaft.bind($arm_base);
$finger_joint.bind($arm_shaft);
$finger_1.bind($finger_joint);
$finger_2.bind($finger_joint);
$finger_3.bind($finger_joint);
$arm_base.time (.5);
$arm_shaft.time (.3);
$finger_joint.time (1);
$finger_1.time (.3);
$finger_2.time (.3);
$finger_3.time (.3);
$arm_base.accelTime (.3);
$arm_shaft.accelTime (.3);
$finger_joint.accelTime (.3);
$finger_1.accelTime (.3);
$finger_2.accelTime (.3);
$finger_3.accelTime (.3);
$arm_base.decelTime (.3);
$arm_shaft.decelTime (.3);
$finger_joint.decelTime (.3);
$finger_1.decelTime (.3);
$finger_2.decelTime (.3);
$finger_3.decelTime (.3);
}
////////////////////////////////////////////////////
//
// Mechanical Movement...
//
////////////////////////////////////////////////////
void rotate_base_90_CW ()
{
$arm_base.rotateOnce('0 90 0');
sys.print ("rotating base 90 degrees CW\n");
sys.waitFor($arm_base);
}
void rotate_base_90_CCW ()
{
$arm_base.rotateOnce('0 -90 0');
sys.print ("rotating base 90 degrees CCW\n");
sys.waitFor($arm_base);
}
void bend_arm_45_FW ()
{
$arm_shaft.rotateOnce('45 0 0');
sys.print ("bending arm 45 degrees FW\n");
sys.waitFor($arm_shaft);
}
void bend_arm_45_BW ()
{
$arm_shaft.rotateOnce('-45 0 0');
sys.print ("bending arm 45 degrees BW\n");
sys.waitFor($arm_shaft);
}
void rotate_fingers_1800_CW ()
{
$finger_joint.rotateOnce('0 1800 0');
sys.print ("rotating fingers 1800 degrees CW\n");
sys.waitFor($finger_joint);
}
void rotate_fingers_1800_CCW ()
{
$finger_joint.rotateOnce('0 -1800 0');
sys.print ("rotating fingers 1800 degrees CCW\n");
sys.waitFor($finger_joint);
}
void finger_release ()
{
$finger_1.rotateOnce('45 0 0');
$finger_2.rotateOnce('45 0 0');
$finger_3.rotateOnce('45 0 0');
sys.print ("releasing finger grapple\n");
sys.waitFor($finger_1);
sys.waitFor($finger_2);
sys.waitFor($finger_3);
}
void finger_grasp ()
{
$finger_1.rotateOnce('-45 0 0');
$finger_2.rotateOnce('-45 0 0');
$finger_3.rotateOnce('-45 0 0');
sys.print ("contracting finger grapple\n");
sys.waitFor($finger_1);
sys.waitFor($finger_2);
sys.waitFor($finger_3);
}
////////////////////////////////////////////////////
//
// MAIN
//
////////////////////////////////////////////////////
void main ()
{
setup_objects ();
sys.wait (5);
rotate_base_90_CW ();
finger_release ();
bend_arm_45_FW ();
rotate_fingers_1800_CW ();
}
Now the arm moves more fluid and looks realistic. You should have a fully functional mechanical arm behaving how you want it. This should provide a good reference for constructing just about anything.
Conclusion
Hey, were done! That was a lot of copying and pasting.
Hopefully you understand what you were doing. If not just bombard me with questions like last time and I will try to answer them.
Don't stop reading here. There is one last section that should answer most of your questions.
Creating Objects: Modeling Package VS. D3Radient (Part 2)
Some of you may have noticed that the fingers all rotate on the X axis yet, they move in different directions. How is this possible?
Well, there is some quirkiness related to the way you script objects depending on whether they are models or brushes.
Let's talk about some of the pros and cons listed earlier. This is pretty difficult to explain in words alone so I busted out photoshop and make some simple diagrams to help things along.
First, take a look at the picture below.
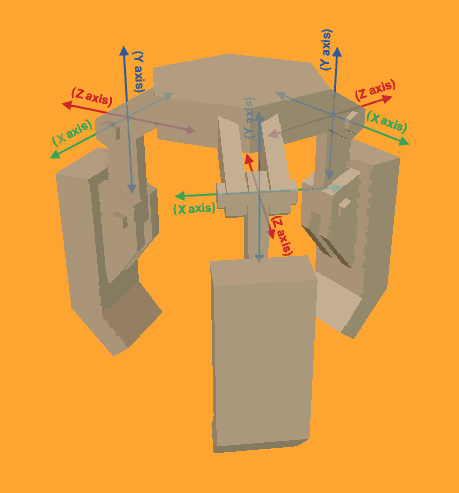
This is the hand portion of the mechanical arm. It is comprised of Finger_Joint.lwo and three instances of Finger.lwo.
Notice how each instance of finger.lwo is rotated. Notice also that in each instance, the X axis is running parallel to the connecting rod. This is why I can use the command ...
Code:
finger_X.rotateOnce('45 0 0');
... on all three fingers and they will rotate away from the center of Finger_Joint.lwo.
Now, whether I use a modeling package or D3Radient to create these objects my goal is the same. I want my objects, and their axises to be oriented like the picture above before I start animating it. The problem is that the steps involved are radically different because the game treats brushes and models differently.
Model Scripting Setup
If you use a 3rd party modeling package to create your objects, you can rotate your objects into postition in D3Radient and the objects' pivot points rotate with them. You can save your map with your objects in place and immediately begin scripting their animations.
- Build each object using your modeling package, so it is in line with the axis you plan to use in your animation.
- Ensure that the origin (0, 0, 0) is positioned where you plan to rotate your object.
- Follow the appropriate steps to ensure Doom 3 will import the object.
- Assign each part to an entity through the use of the "model" key/value pair.
- Move, Rotate, and otherwise position each part in place.
- Save the map and begin scripting the animation.
Brush Scripting Setup
If I create an object in D3Radient and make it an entity, it won't matter how I move or rotate it. The pivot point will not rotate. The Z axis for that object will always run up and down. The X axis for that object will always run east to west. The Y axis for that object will always run north to south.
The only time the pivot point actually rotates is when you rotate the objects with a script. In order to set things up like the arm in this tutorial, when you're working with brushes, you have build the objects in line with the axis you plan to use in your animation, save your map with them in that position, and then assemble the pieces using a portion of your script prior to actually animating your scene.
- Build each object using brushes in D3Radient, so it is in line with the axis you plan to use in your animation.
- Select the brushes that make up one part and form and entity out of the group.
- Repeat the step above for each part.
- Adjust the origin of each part so it is positioned where you plan to rotate the object.
- Position each part in place but do not rotate them.
- Save the map, and using a portion of your script, quickly rotate the objects into place.
- Begin scripting the animation.
More on Each Methods Differences
Look at the picture below.

Here is Finger.lwo. Notice that when I created this object I made certain that the X axis was running through the connecting rod. This makes certain that when the object is rotated around the X axis in a script, it rotates around the connecting rod.
There are some more tricks involved. Also notice that the X, Y, and Z axis all meet at the center of the connecting rod. This is where the origin or "center point" will be placed when the object is loaded in D3Radient. So, if I were to rotate in any other direction (not that I would want to) it would rotate around the corresponding axis where the axis runs through the object.
The origin is also the point used when you move your object. Let's say I told the finger to move to 342, 23, 975 (again, not that I would want to). The object would move until the origin was resting at 342, 23, 975.
Now, Lets say I wanted to make this same shape in D3Radient. Again, I would have to make the X axis run through the connecting rod.
I would have to open the entities properties and type in a numerical value for the origin key/value pair.
After doing this for each part I have three identical fingers. But I have to make sure they all are in line with the X axis. How am I going to make my arm look like the first picture and have all the fingers in line?
Well, I make the fingers in line and compile the map. Now before the player even gets the opportunity to start moving around in my map, I have to quickly move these fingers into their correct positions with a portion of my script.
This requires I adjust the time of each finger so the objects move incredibly fast. Then I can move and rotate them into postition. Then set all those time values to the values I intend to use during animation. Finally, I can begin animating them.
That pretty much sums it up. Don't get it? Post your questions here please. I want to make this the equivalent of a "scripting for dummies" book.