BNA!@Posted: Sun Aug 08, 2004 12:18 pm :
Hi fellow mappers!

Today we finally build something round :)

The final product will look like this:

Image

Since I've learnt form previous mistakes - here's the map file:
http://www.doom3world.org//doom3/tut/bn ... _patch.rar

As usual we start with a box:

Image

The in the top down view we create a new brush the height of the building and 64 grid units square.

Then we go to patch > cylinder

Image

Congrats - you have made your first cylinder!

Image

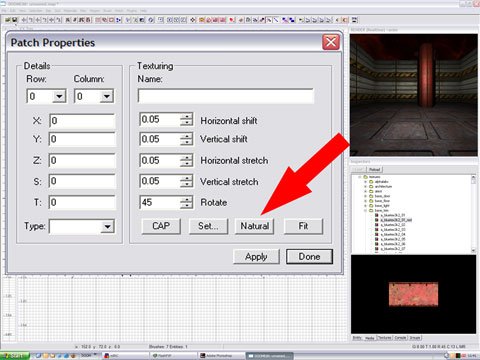
The texture should look a littel awkward, so we hit shift+s to bring up the patch inspector and click on natural to let the material cover our shiny new cylinder in a proper way:

Image

Now that we know how to create a cylinder, we want to make a corner of our box map round.

Again make a square brush as described above but this time choose bevel.

Image

The outcome should look like this:
(again "naturalize the material as described above)

Image

Now we need to rotate it so it faces into the right direction:

Image

Terror, fire, flames - my name is world wide - The texture is gone!
BNA!'s sucky tutorial...

Relax - patches only have one side. Since we've rotated it, the material faces the fall and leaves you with nothing but an invisible patch.

Go to patch > matrix - invert
This inverts the texture projection matrix, or in othe words: It'll look into the other direction now.

Texture's back, shock is gone, let's continue.

Image

Since we want to resize the patch but the thing only shows up as a flat banana, I'd highly suggest you switch to show primitive bounding box display:

Image

Now move it to the corner and make it a little bigger - feel free to toy around with it as much as you want, we wont touch that particular patch again in this tutorial.

Image

Now we need to do some technical work - make a technical correct map stuff so to say.

Select the both walls which meet behind our nice bevel:

Image

With these two walls still selected, activate the clipper tool (shortcut "x") and place two clipping points as shown in the img below - these two points should clip the wall exactely where the bevel meets the wall.

You'll see the wall to split in two colors - red and yellow.

If you now hit simply enter, the yellow part get's deleted.
If you press ctrl+enter the selction flips (red2yellow and vice versa).
If you press shift+enter both parts will remain in the map - and that's exactely what we will do now.

Image

Repeat it on the other side of the bevel:

Image

Deselect the walls, only keep the remaining parts hidden behind the bevel selected.

Give them this material: textures > common > caulk.

Caulk is a transparent but solid texture.
That means it'll block your map from the void and you can't walk through it ingame, but it's still seethrough.

Image

I've moved the bevel away to illustrate it for you:

Image

Now we make a skilljump you'll like - we bend a cylinder.

Select the cylinder we've previously made and clone it, place it anywhere in your map.

Keep it selected and hit "v" - now you can see some purple and green dots on screen.

These are vertex points - vertex points, vertices, are what make up polygons. How many vertex points has a triangle? 3...

Look up the web for a good glossary on them, but for now just accept that they're vertex points and that we can manipulate the cylinder with them :)

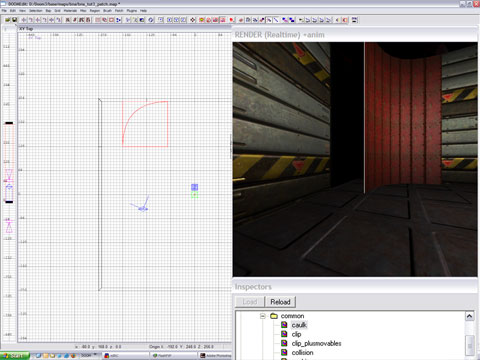
Before you drag something around, make sure to have "drill down rows and columns" activated. That means that the whole row or column of vertex controll points will get dragged when you select the dot as seen in the image below.

Image

Now we grab the first row of vertex points (you only see one dot, but when you alter the view you'll see it's a row of them) and drag it down like below (don't mind the green diamond, it's just the light which sits there)

Image

Continue with the other points till it'll look like this:

Image

Now grab the middle rows of points and lign them up so they match the coordinates of their mates on the ends of the pipe.

What do you have - a quarter of a doughnut :)

You can also bend patches by patch bendmode, but I could never familiarize with that tool, so I live it to others to write a tut for a tool that takes you longer than dragging around vertices :)

Image

Now we want to make a spikey hell tooth, or something like that.

Make a square brush, and got to patch > cone

The result will look like this:

Image

Give it a disgusting scrolling texture, in this case I chose hell/anustube (insert lame joke here). "Naturlalize" it in the patch inspector.

Image

Now flip it around.

Image

Hit "v" again to switch to vertex editig mode.

Image

Drag the top vertex point down.

Image

Adjust the middle vertex points so the thing looks a bit more natural.

Image

Then move it up and stick it a little inside our pipe which now forms some sort of simple gate. (I have cloned and rotated it earlier, so both line up as one half circle.)

Image
Image

Clone your tooth, flip it and move to the sides, sould look like this:

Image

Well, that's it - now you're able to make some patches, bend stuff and add more atmosphere to your level...

As usual, comments below and don't froget to tell me my typos or errata :)


Coolbreeze78@Posted: Sun Aug 08, 2004 12:22 pm :
Thanks for the tutorial... I was begining to get bored :lol:


Acid303@Posted: Sun Aug 08, 2004 12:24 pm :
Thanx for another tutorial !

It looks hard but i'll try it later today, the weather is too damn hot for thinking atm :lol:


BNA!@Posted: Sun Aug 08, 2004 12:36 pm :
Acid303 wrote:
It looks hard but i'll try it later today, the weather is too damn hot for thinking atm :lol:


It's not really hard and you will definately want and need to learn these techniques, otherwise you'll forever make boxes :)


korn@Posted: Sun Aug 08, 2004 12:46 pm :
BNA! wrote:
It's not really hard and you will definately want and need to learn these techniques, otherwise you'll forever make boxes :)


agreed, these are the basic's of curves, and a very nice job on this tutorial i might add :)


BNA!@Posted: Sun Aug 08, 2004 12:51 pm :
korn wrote:
agreed, these are the basic's of curves, and a very nice job on this tutorial i might add :)


Thanks korn!


Coolbreeze78@Posted: Sun Aug 08, 2004 1:06 pm :
Your next tutorial should be focused on Creativity! Thats one department that I am lacking in. :cry:


BNA!@Posted: Sun Aug 08, 2004 1:23 pm :
Coolbreeze78 wrote:
Your next tutorial should be focused on Creativity! Thats one department that I am lacking in. :cry:


Smoke crack?


Coolbreeze78@Posted: Sun Aug 08, 2004 1:26 pm :
Used to do weed but that started making me get very paranoid and see things .... hmm... kinda like the looney people in the game... :?


_shank@Posted: Sun Aug 08, 2004 2:37 pm :
another good tutorial...just one thing...whenever you mention something plz explain what it does...

Quote:
Before you drag something around, make sure to have "drill down rows and columns" activated.


would be better if you would explain what "drill down rows and columns" does


Burrito@Posted: Sun Aug 08, 2004 3:07 pm :
Coolbreeze78 wrote:
Used to do weed but that started making me get very paranoid and see things .... hmm... kinda like the looney people in the game... :?

And he told you it was weed, right? Dont trust anyone! :o


Genie@Posted: Sun Aug 08, 2004 3:07 pm :
Thanks for this one BNA!


OldRod@Posted: Sun Aug 08, 2004 9:22 pm :
Very nice!! Thanks! :)


bljohnson@Posted: Tue Aug 10, 2004 7:25 pm :
Very nice tutorial. One thing tho - your screenshots are off starting at this step:

Quote:
Make a square brush, and got to patch > cone


The screenshot that is below that should be moved up prior to this step so the screenshot below that is actually the cone screenshot (and so forth since it throws off all screenshots after that). I got a little confused until I figured out I had to scroll down to the screenshot after the next step to see what you meant.

One small thing.. and I'm not sure if this is just me or not. But the tutorial says to "Naturalize" the hell texture on cone. When I try this it doesn't look correct. If I choose "Fit" instead of "Natural" my cone things look more like your screenshot (and much more disgusting).

Great tutorial!


Use3d@Posted: Tue Aug 10, 2004 7:30 pm :
Whew, this looks mighty complicated...


bljohnson@Posted: Tue Aug 10, 2004 7:33 pm :
Quote:
Whew, this looks mighty complicated...


It really isnt. The hardest part is lining up the middle section vertices to look correct. This is my first time editing doom levels (or any levels for that matter). I did the first two tutorials and this one was a snap (actually easier than tutorial #2 i thought - I had a lot of trouble getting the airlock door lined up to the walls correctly).


pi@Posted: Tue Aug 10, 2004 10:41 pm :
I noticed you mitered your edges in this tutorial (I don't think you did in the previous two). Is there a reason for this? And what method do you use for mitering?


Coolbreeze78@Posted: Tue Aug 10, 2004 11:17 pm :
The best method is the way Id does their rooms. Check out the D3W Intro video there is a video in that set that shows how to do it. The reason they just barely have the brushes touching is to make sure that textures on them don't go behind other brushes and cause problems when you are trying to align them.

Link for videos:
http://www.fileplanet.com/files/140000/144104.shtml

Also check out this video for the best way to optimize your maps:
http://www.planetdoom.com/leveled/videotuts/index.shtml

My method is to select the caulk texture and use it for all my brushes until I get my rooms laid out. Then come back in and select just the face of the wall or floor that I want a texture on then start texturing my rooms. You do this by Ctrl + Shift + LMB. If you want to select multiple faces use Ctrl + Alt + Shift + LMB. Not sure if you like this way but I have seen that this is the best meathod for creating the smoothest running maps.


NatureBoy@Posted: Thu Aug 12, 2004 8:31 pm :
Can anyone tell me how to drag a cylinder patch so i can achieve an angle? I'm not sure if thats the right terminology to use for it, but basically what i want to do is pull down one end of the tube like you can do with a brush using Ctrl+LClick. Kind of like this:

edit: hmm well my diagrams not working, hopefully you can understand what i'm trying to say :wink:


k40t1k_g3m1n1@Posted: Tue Aug 17, 2004 12:55 am :
Can someone help me, when I go to patch>cylinder it makes my brush into a cylinder but when I hit esc and deselect it it disappears, can someone help me figure out what is wrong? :?