Lets begin.
We're going to start of with a fresh map and a player start.
What we will be doing here is a very simple curved hallway using 4 3x3 patch meshes.
We'll start by working in the Top View, with a 16x16 grid (remember, always stick to the grid !)
First, select a texture you would like to use for your floor and draw out a brush with the approximate size you would like your curved hallway to be - I'm opting for a fairly thin corridor - you can always modify the size later, however it's best to get it the right width first time. (screenshot 1)

Screenshot 1
Once you've created the floor brush, leave it selected as we will now change it into a 3x3 patch mesh.
From Patch menu, select 'simple patch mesh' and in the Patch Density dialogue box that pops up (screenshot 2), keep the default 3x3 setting. (screenshot 3)

Screenshot 2

Screenshot 3
You'll see our brush becomes a thin one sided patch mesh. (Screenshot 4)

Screenshot 4
If for some reason you are not seeing a texture on the face of the mesh, press CTRL+I to invert the patch - this basically switches which side of the patch a texture is on.
Now comes the tricky bit - we're going to bend this patch into a 90degree hallway shape.
To do this, we need to use Vertex Editing.
Make sure your patch is selected. Hit V to switch to Vertex Editing mode. (hitting V again will return you back to standard selecting)
You'll notice green and purple boxes appear on your mesh - these are the mesh control points and you move them by clicking and dragging them. They represent the Columns and Rows of the mesh. (Screenshot 5)

Screenshot 5
I'm going to add numbers to the points in the screenshots to make it easier to see how we are going to move them. You can zoom out in your Top View at this point if you need to. (Screenshot 6)

Screenshot 6
Lets start by moving your mouse pointer over vertex point 3, click and drag it to the position indicated in the screenshot. You'll notice our mesh bends. (Screenshot 7)
Screenshot 7
Now we will move the mouse over point 2 and drag that into the position indicated in the screenshot. (Screenshot 8 )

Screenshot 8
It's very important when you first start editing meshes to get a feel for the order in which you move the vertex points. One of the common mistakes when your a begginner is working out which point to drag - at some point, your going to get a horribly shaped mess of a mesh, it takes a bit of time to get the hang of it, so just follow what I'm doing for now and it'll become clear.
Now move vertex point 1 to the position indicated in the screenshot. (Screenshot 9)

Screenshot 9
At this point, you'll start to see why I'm positioning them in the specific place on the grid - take a look at vertex points 7, 8 & 9 in the Top View and notice how the points 3,2 & 1 that we moved have the same spacing between them.
Now we have a very odd shaped bend for our floor. To fix this, we need to work with Vertex points 4, 5 & 6 - basically, we are going to align our rows and columns. By this stage, you should have the hang of moving vertex points, so move points 4,5 & 6 into the same position as the screenshot. Move 4 & 5 up and 6 just slightly down. (Screenshot 10)
Screenshot 10
We have a perfect curve. Notice how the vertex points align with each other in rows and columns. Following the 90 degree bend, 9, 6 & 3 if you trace a line from point to point for a perfect 90degree bend, as do 8,5 & 2 and 7,4 & 1 - this is the key to creating accurate bends in all patch meshes (of course, if your creating more organic meshes, the positions of vertex points will be - more organic)
You'll also notice the floor mesh fits into an exact square on the major darker) grid lines - 5 by 5.
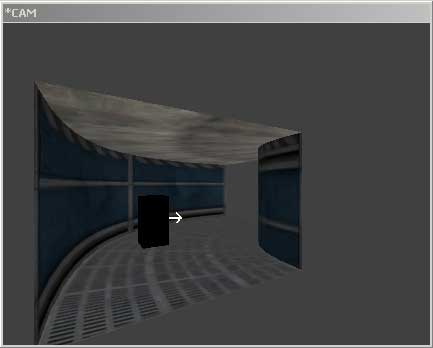
Now we're going to use the camera view to see how our texture is looking on our mesh. Deselect the patch so you can see more clearly how the texture looks. You'll see it curves along with your patch, but it looks a little stretched and odd. (Screenshot 11)

Screenshot 11
We're going to fix that. Select the patch again and bring up the Patch Properties dialogue box (Shift+S)
Click the Natural button, select Done and then deselect your patch in the 3D view. (Screenshot 12)

Screenshot 12
The texture is looking better already. I'm not going to go into too much detail now about texturing patch meshes - suffice to say that you'll be using Natural quite a lot. You'll also get a feel for what textures work best when using curves. In this case, I don't think the texture I chose for this tutorial is the best fit, but it'll do ! (Screenshot 13)

Screenshot 13
So, there we have ourselves a curved floor. Now we'll go onto making our walls, which, for the purposes of this tutorial, could be very easy to create, but I'm going to show you the "difficult" way simply because it will give you more understanding of how to manipulate patches. If you look at any of the id software doom3 levels, you'll see the complex shapes they have created, so it's best to get a feel for manipulating patch meshes rather than always sticking to the easy route.
The easy route to create our wall in this case would be a bevel. I'll quickly show you how that's done before proceeding with the "difficult" way.
In the Top View, draw out a brush that fits exactly over the extents of your curved floor mesh. (Screenshot 14)

Screenshot 14
In your Patch menu, select Bevel. (Screenshot 15)

Screenshot 15
You'll notice it creates a curve, but it's on the wrong side. (Screenshot 16)
We simply need to rotate it into the correct position.

Screenshot 16
With the bevel selected, use the Z -> N rotate button in the top button bar to rotate the bevel into position. In this case, we'll click twice to rotate 90degrees each time. Then we just need to move it in the XY Top view until it fits into place on the grid aligned to the outer edge of our floor (Screenshot 17)
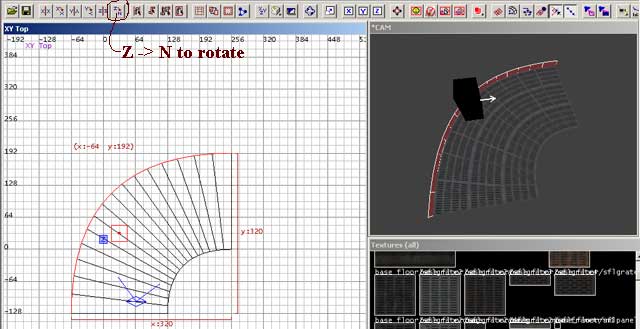
Screenshot 17
There we have it - the easy way. From here you would set the height of the wall you require by dragging it up in the side view and then texture it. After that, you would create another bevel for your inside wall.
But now lets go onto the "difficult" way of doing things, a way that will give you more insight into how patch meshes work.
Delete the bevel if you followed that section of this tutorial and we'll get started on creating the same thing "manually" from a 3x3 patch mesh.
The first thing we're going to do is to create a brush in the approximate position - we're going to assume our hallway is still straight and draw an outside wall. Select a wall texture you would like and in the Top View draw out your brush. (Screenshot 18 )

Screenshot 18
What we want to do now is to switch views as we are going to change our brush into a patch mesh. If we did that in the top view, it would create a patch mesh related to the view - a floor basically. So we'll switch to an appropriate side view. To switch views, you can use CTRL+TAB - at this stage I'll point out that obviously everyone has a preference as to how they position windows in radiant. I stick to a slightly modified default and only use one window for the 2D view and TAB between the various options.
I've switched to YZ Front view as I want to create a patch along the length of the brush I've created.
I've also adjusted the height of my brush to 128 (Screenshot 19) - always using the grid when working in radiant.

Screenshot 19
In our YZ Front view, we can now create our mesh. Go to the Patch menu, select Simple Patch mesh, accept the default 3x3 in the Patch Density dialogue box and your brush will now become a patch mesh.
Switch back to your XY Top view and you'll notice our patch is just a thin line. (Screenshot 20)

Screenshot 20
We want it positioned so that the bottom of it in the XY Top View it touches point 7 of our floor patch mesh. Now we'll go into vertex editing mode. Select your new patch mesh and hit V.
I'm going to number the points again, in this case, I'm going to work in the XY Top View and number them 10,11 & 12. (Screenshot 21) We're actually working with columns in our top view in this case. If you look in the side view, there are obviously more vertex points, but for sake of clarity, we're working with columns. When you move your mouse over and drag the points 10, 11 & 12 in default mode, you are actually dragging 3 vertex points each time.

Screenshot 21
Before we start to drag the points, I'll explain basically how dragging works. If there are vertex points below the one you are working with, as is the case here, when you first move your mouse over, click and start dragging, all the points under it will move at the same time. If you stop dragging and release the mouse button and then click and move the vertex point again, you will be moving a single vertex point and you will see one below it left "behind"
This will be very useful as you get better at manipulating meshes, but for now, it's just irritating. If this happens while you are dragging, just Undo (CTRL+Z), and toggle out and then back into vertex editing mode (V) and try again.
Ok, we've got that out of the way, so lets start moving our vertex points into position.
In this case, vertex point 12 should already be in position, if not, go out of vertex editing mode and drag your mesh to the right place (point 12 should be over the top of our floor meshes point 7)
So all we need to do is to drag point 10 and 11. First drag point 10. You'll notice that it forms a strange curve (Screenshot 22), so we need to move point 11 into the right position (Screenshot 23)

Screenshot 22

Screenshot 23
You'll immediately see that our wall mesh fits perfectly with our floor mesh. Once again, our vertex points, drawing straight lines from 12 to 10, form a perfect 90degree bend.
Vertex points 10, 11 and 12 of our wall correspond to points 1, 4 & 7 on our floor mesh. They align perfectly with the grid. This is vitally important when creating patch meshes, as you don't want any gaps appearing - it must be a perfect fit. We're working in a nice even grid size of 16x16 which makes life a lot easier in this case.
That's it - our outside wall is done. (Screenshot 24)

Screenshot 24
Now we need to align our texture correctly and if neccessary, adjust the height of our wall. Once again, the scope of this tutorial does not cover the exact methods of texturing patches - I'll just say that I'm working with texture sizes in mind. My wall is 128 units high, so I'll texture it with a 128pixel wall texture to make life easier. Select your patch mesh, bring up the Patch Properties dialogue box (Shift+S) and once again, click Natural. You can then shift your texture vertically to position it by either using the shift keys in the Patch Properties dialogue box, or by using SHIFT+Arrow keys in your 3D window. I prefer using the 3D window and the SHIFT+Arrow keys to move textures around.
Now we get onto our inside wall.
We're going to use the same method as our outside wall.
In the XY Top view, draw out a brush as indicated (Screenshot 25).

Screenshot 25
Switch to the YZ Side view and from the Patch menu, select Simple Patch Mesh, as we did when we created the previous patch meshes. Once again, keep the default 3x3 in the patch density dialogue box.
For some reason - I'm not sure whether it's a bug in the editor or a feature I'm not aware of - the patch mesh positions itself in the same place as our outer wall - as you can see in the screenshot 3D view (Screenshot 26)

Screenshot 26
No worries, we'll ignore that - Switch to the XY Top view and move it into the position indicated in the screenshot. (Screenshot 27)
Screenshot 27
You may not see a texture showing up on this patch in the 3D view - that's usually because the texture is on the outside face of our patch. Select the patch and hit CTRL+I to invert it.
With the patch selected, go into vertex editing mode (V)
Once again, we'll number the vertex points, in this case, 13, 14 & 15
Point 15 should already be in position as indicated in the screenshot, if not, go out of vertex editing mode and move the patch until it is. (Screenshot 28 )

Screenshot 28
In vertex editing mode, move points 13 and 14 into the position indicated. (Screenshot 29) Once again, we've formed a perfect 90degree bend with our vertex points. our points 13, 14 & 15 correspond with points 3, 6 & 9 on our floor mesh.

Screenshot 29
Now adjust your texture to suit and our inner wall is complete ! (Screenshot 30)

Screenshot 30
Our ceiling, in this case, is simplicity itself. Select the floor mesh and duplicate it (Screenshot 31)

Screenshot 31
Move it into position as indicated in the screenshot - toggle between the side and top views to position correctly. Our texture is on the wrong side of the mesh (Screenshot 32), so we'll click CTRL+I to invert it. Choose an appropriate texture for the ceiling. Check out your handy work in the 3D view. (Screenshot 33)
You've now got yourself a curved hallway.

Screenshot 32
Screenshot 33
The final touch is to put a caulk hull around your corridor. I'm not going to go into detail here, but you need caulk around patch meshes for a few reasons. One of them is to aid in preventing the dreaded "sparklies" that can occur in the seams of patch meshes - there's technical info about this on the net if you want to find out more.
So, draw a caulk hull as indicated in the screenshot. (Screenshot 34) You'll obviously want to keep either side of the curved walkway open so you can create adjoining standard brush work for your corridor.
Make sure that the caulk hull fits perfectly around your meshes - it's up to you how you build it. Use the grid !

Screenshot 34
In the screenshot below (Screenshot 35), I've added some brushwork corridor extensions, a light and have done a quick test render.

Screenshot 35
You can download the map used to make screenshots for this tutorial here.
Your basic corridor is done. There's a million different things you can do with patch meshes, this tutorial is just a basic example. If you wanted to add additional trim to your floor - for instance metal skirting, you could draw out a simple square cylinder patch mesh and bend it in the same way as we created our floor. You could put a pipe on the ceiling using a simple cylinder - the possibilities are endless.
That concludes this basic patch mesh tutorial !
EDIT 29 august 2004: The following important info added, thanks to comments in this thread.
I've forgotten one very important aspect of patch mesh editing and that's something called Patch Subdivision. But first, we'll see why I'm bringing this up.
If you've followed the tutorial exactly as I created it, you'll notice that our inside walls curve doesn't align correctly with the curve of our floor (Screenshot 36)

Screenshot 36
Now, you could probably get away with that ingame, but it's best to fix it as it can sometimes cause rendering problems in the game.
So how do we fix it ?
Well, first, lets look at our curved floor/ceiling brushes in the top view and examine the segments, or subdivisions. In this case, we have 16 vertical subdivisions. (Screenshot 37)
Screenshot 37
Now lets look at our inner wall - it's best to look in the 3D view in this case. I've hidden all the other surrounding geometry to make things clearer. (Screenshot 38 )

Screenshot 38
Notice, we only have 8 horizontal subdivisions in this case ?
It should be noted that this has nothing to do with our vertex points, but rather to do with the smoothness of the curve we are creating.
Luckily, it's very easy to fix this. All we need to do is to adjust either our wall/floor & ceiling to 8 vertical subdivisions or our inner wall to 16 horizontal subdivisions. I'm going to set the inner wall to 16 horizontal subdivisions because I want a nice smooth curve.
To adjust this, you would think we would use the Patch Properties dialogue box (SHIFT+S), well, no, for some reason we use the Surface Inspector (S) - no big deal.
With the inner wall selected, hit S to bring up our surface inspector dialogue box (Screenshot 39)

Screenshot 39
I've circled the area we want to adjust. Click the "Subdivide Patch checkbox" and then in the horizontal slider, adjust it to 16 and make sure the vertical is set to 1 and click OK. (Screenshot 40)

Screenshot 40
Now, if we zoom in our XY Top view right in to where our inner wall curve meets our ceiling/floor curves, you'll see it aligns perfectly !
I've updated the map download so that it's correct.
