bb_matt@Posted: Wed Aug 25, 2004 5:59 pm : This is the first in a series of tutorials on creating pipes/cables for Doom3.
They are all over the doom3 world and so it's good to know how to create them.
This will be a short and sweet tutorial that will show you the easiest way to make a pipe section and a 90degree bend in it.
To start off with, lets get our editor setup.
I'm going to start with selecting a texture, in this case, from the media browser, I'm going to choose textures/object/tecpipe1yel - it's a faded yellow pipe texture.
Then I'm going to set my grid to 16x16 - it's a good round value to work at when manipulating larger patch meshes.
I'm going to work in the XY Top View.
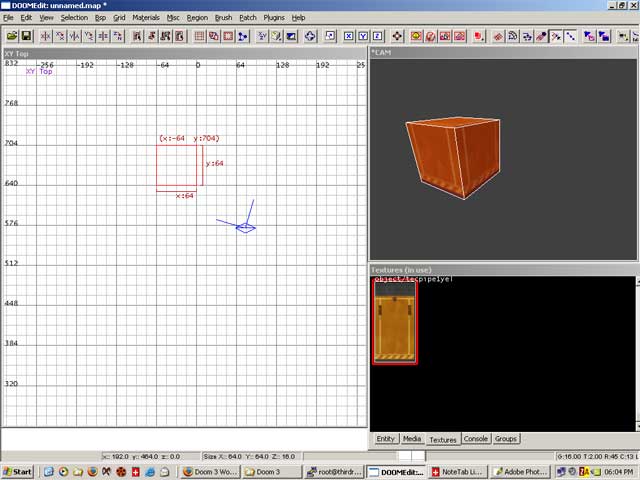
Start of by drawing out a 64x64 brush - align it to the major grid lines.
I'm working here with default standard sizes - do yourself a favour, and try to stick to pipe sizes that are easy to work with. 64x64 is a good standard pipe size, you'll find lots of them in the official doom3 maps. (Screenshot 1)
 Screenshot 1
From the Patch menu, choose Cylinder (Screenshot 2). Your 64x64 brush will change to a patch mesh cylinder. (Screenshot 3)
 Screenshot 2
 Screenshot 3
At this point, you'll notice in the XY Top view your looking down onto the cylinder. It doesn't matter what view you create the cylinder in, it will always default to creating the cylinder like this (please correct me if I'm wrong here), so you'll often need to use your axis rotation buttons.
For now, we're going to stick with the default orientation of our cylinder and we're going to now make it into a 90degree bend, working in a side view.
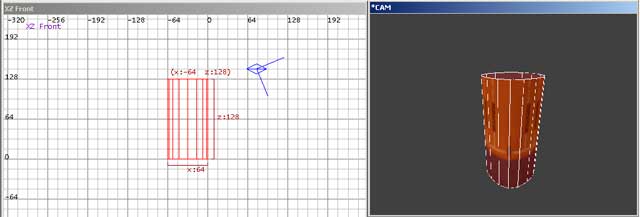
Switch to your XZ Front view for the purposes of this tutorial. The first thing we're going to do is to stretch our cylinder on the Z axis to make it 128 units tall. Select your cylinder and drag it upward (or downwards) until it's 128 units tall. (Screenshot 4)
 Screenshot 4
Why we are making it this height will become clear when we start vertex manipulating our cylinder. Basically, we're creating a 90degree bend, so we need some space to work with - once again, standard grid sizes are the best way to do this.
Go into vertex editing mode (keyboard shortcut is V) and you'll see our vertex control points appear. (Screenshot 5)
 Screenshot 5
You'll notice that in 3D view, you can see how the vertex points make up our columns and rows and in the 2D view, we can only "see" the front vertex points. The key to easy patch mesh manipulation is knowing when to keep things simple by working in specific views. To bend our cylinder, we are going to work entirely in the XZ Front view for this tutorial.
I'm going to number our visible vertex points in the 2D view from 1 to 9.
Before we start to drag the points, I'll explain basically how dragging works. If there are vertex points below the one you are working with, as is the case here, when you first move your mouse over, click and start dragging, all the points under it will move at the same time. If you stop dragging and release the mouse button and then click and move the vertex point again, you will be moving a single vertex point and you will see one below it left "behind"
This will be very useful as you get better at manipulating meshes, but for now, it's just irritating. If this happens while you are dragging, just Undo (CTRL+Z), and toggle out and then back into vertex editing mode (V) and try again. (Screenshot 6)
 Screenshot 6
Lets start by moving point 3 - notice where I'm moving it to - you'll immediately see why I made my cylinder 128 units high. (Screenshot 7)
 Screenshot 7
Now move point 2. (Screenshot 8 ) We move our vertex points in the best order we can, to avoid overlapping. Try moving point 1 before point 2 and you'll see what a mess it looks - you can do it this way and move point 2 afterwards, but it's best to get into the habit of working out which is best to move first.
 Screenshot 8
Now move point 1 (Screenshot 9)
If you've followed my other tutorials, you'll see how the method is identical to creating a 90degree bend in a flat patch mesh.
 Screenshot 9
Now move points 4 & 5 into the positions shown. (Screenshot 10)
Point 6 is already in the right place.
Our vertex points, drawing straight lines from 7 to 4 to 1, 8 to 5 to 2 and 9 to 6 to 3 form 90degree bends, thus making our cylinder a 90degree bend.
 Screenshot 10
That's it - your done.
Now you just need to get your texture aligned properly - to do that, bring up the patch inspector (shift s), and click on Natural, or use the shortcut key CTRL+N (Screenshot 11)
 Screenshot 11
Creating pipe pieces that fit onto either end of this is really too simple to write a tutorial for, simply follow our first step of creating the cylinder and change it's length or height to suit. You can clone your 90degree bend (SPACE) and use the axis rotate buttons to change it's orientation and fit bits of pipe onto it - very easy !
For more information on patch mesh editing, look on the forum for other patch mesh tutorials by myself and others !
MNeMiC@Posted: Wed Aug 25, 2004 6:57 pm : awsome, greatly illustrated and nicely explained.
Origin73@Posted: Wed Aug 25, 2004 7:01 pm : Thank you for another excellent tutorial!

Strife@Posted: Wed Aug 25, 2004 7:09 pm : Thanks a lot! I was just getting to the point where I was going to start fooling around with creating these myself, but you saved me a lot of time.

Budo@Posted: Wed Aug 25, 2004 10:28 pm : Nice
DAGOOP@Posted: Mon Dec 06, 2004 4:40 pm : Strife
If you try and make them yourself, you'll end up with the same problem I ran into.... to many backwards triangles... Thanks for this tutorial bb this helps alot.... the fight goes on.. to many backwards triangles is a bad thing...

Dogstar@Posted: Tue Nov 16, 2010 12:40 pm :
doom1234@Posted: Sat Nov 17, 2012 2:37 pm : This is great, however I can't figure it out that well from the words and the pictures don't work for some reason, anyway you can fix it?
The Happy Friar@Posted: Sat Nov 17, 2012 6:50 pm : It's the same in Q3A as it is in D3 based games, so here's a q3a one with pics!
http://modsonline.com/Tutorials-read-450.html
bb_matt@Posted: Wed Aug 25, 2004 5:59 pm : This is the first in a series of tutorials on creating pipes/cables for Doom3.
They are all over the doom3 world and so it's good to know how to create them.
This will be a short and sweet tutorial that will show you the easiest way to make a pipe section and a 90degree bend in it.
To start off with, lets get our editor setup.
I'm going to start with selecting a texture, in this case, from the media browser, I'm going to choose textures/object/tecpipe1yel - it's a faded yellow pipe texture.
Then I'm going to set my grid to 16x16 - it's a good round value to work at when manipulating larger patch meshes.
I'm going to work in the XY Top View.
Start of by drawing out a 64x64 brush - align it to the major grid lines.
I'm working here with default standard sizes - do yourself a favour, and try to stick to pipe sizes that are easy to work with. 64x64 is a good standard pipe size, you'll find lots of them in the official doom3 maps. (Screenshot 1)
 Screenshot 1
From the Patch menu, choose Cylinder (Screenshot 2). Your 64x64 brush will change to a patch mesh cylinder. (Screenshot 3)
 Screenshot 2
 Screenshot 3
At this point, you'll notice in the XY Top view your looking down onto the cylinder. It doesn't matter what view you create the cylinder in, it will always default to creating the cylinder like this (please correct me if I'm wrong here), so you'll often need to use your axis rotation buttons.
For now, we're going to stick with the default orientation of our cylinder and we're going to now make it into a 90degree bend, working in a side view.
Switch to your XZ Front view for the purposes of this tutorial. The first thing we're going to do is to stretch our cylinder on the Z axis to make it 128 units tall. Select your cylinder and drag it upward (or downwards) until it's 128 units tall. (Screenshot 4)
 Screenshot 4
Why we are making it this height will become clear when we start vertex manipulating our cylinder. Basically, we're creating a 90degree bend, so we need some space to work with - once again, standard grid sizes are the best way to do this.
Go into vertex editing mode (keyboard shortcut is V) and you'll see our vertex control points appear. (Screenshot 5)
 Screenshot 5
You'll notice that in 3D view, you can see how the vertex points make up our columns and rows and in the 2D view, we can only "see" the front vertex points. The key to easy patch mesh manipulation is knowing when to keep things simple by working in specific views. To bend our cylinder, we are going to work entirely in the XZ Front view for this tutorial.
I'm going to number our visible vertex points in the 2D view from 1 to 9.
Before we start to drag the points, I'll explain basically how dragging works. If there are vertex points below the one you are working with, as is the case here, when you first move your mouse over, click and start dragging, all the points under it will move at the same time. If you stop dragging and release the mouse button and then click and move the vertex point again, you will be moving a single vertex point and you will see one below it left "behind"
This will be very useful as you get better at manipulating meshes, but for now, it's just irritating. If this happens while you are dragging, just Undo (CTRL+Z), and toggle out and then back into vertex editing mode (V) and try again. (Screenshot 6)
 Screenshot 6
Lets start by moving point 3 - notice where I'm moving it to - you'll immediately see why I made my cylinder 128 units high. (Screenshot 7)
 Screenshot 7
Now move point 2. (Screenshot 8 ) We move our vertex points in the best order we can, to avoid overlapping. Try moving point 1 before point 2 and you'll see what a mess it looks - you can do it this way and move point 2 afterwards, but it's best to get into the habit of working out which is best to move first.
 Screenshot 8
Now move point 1 (Screenshot 9)
If you've followed my other tutorials, you'll see how the method is identical to creating a 90degree bend in a flat patch mesh.
 Screenshot 9
Now move points 4 & 5 into the positions shown. (Screenshot 10)
Point 6 is already in the right place.
Our vertex points, drawing straight lines from 7 to 4 to 1, 8 to 5 to 2 and 9 to 6 to 3 form 90degree bends, thus making our cylinder a 90degree bend.
 Screenshot 10
That's it - your done.
Now you just need to get your texture aligned properly - to do that, bring up the patch inspector (shift s), and click on Natural, or use the shortcut key CTRL+N (Screenshot 11)
 Screenshot 11
Creating pipe pieces that fit onto either end of this is really too simple to write a tutorial for, simply follow our first step of creating the cylinder and change it's length or height to suit. You can clone your 90degree bend (SPACE) and use the axis rotate buttons to change it's orientation and fit bits of pipe onto it - very easy !
For more information on patch mesh editing, look on the forum for other patch mesh tutorials by myself and others !
MNeMiC@Posted: Wed Aug 25, 2004 6:57 pm : awsome, greatly illustrated and nicely explained.
Origin73@Posted: Wed Aug 25, 2004 7:01 pm : Thank you for another excellent tutorial!

Strife@Posted: Wed Aug 25, 2004 7:09 pm : Thanks a lot! I was just getting to the point where I was going to start fooling around with creating these myself, but you saved me a lot of time.

Budo@Posted: Wed Aug 25, 2004 10:28 pm : Nice
DAGOOP@Posted: Mon Dec 06, 2004 4:40 pm : Strife
If you try and make them yourself, you'll end up with the same problem I ran into.... to many backwards triangles... Thanks for this tutorial bb this helps alot.... the fight goes on.. to many backwards triangles is a bad thing...

Dogstar@Posted: Tue Nov 16, 2010 12:40 pm :
doom1234@Posted: Sat Nov 17, 2012 2:37 pm : This is great, however I can't figure it out that well from the words and the pictures don't work for some reason, anyway you can fix it?
The Happy Friar@Posted: Sat Nov 17, 2012 6:50 pm : It's the same in Q3A as it is in D3 based games, so here's a q3a one with pics!
http://modsonline.com/Tutorials-read-450.html
bb_matt@Posted: Wed Aug 25, 2004 4:59 pm : This is the first in a series of tutorials on creating pipes/cables for Doom3.
They are all over the doom3 world and so it's good to know how to create them.
This will be a short and sweet tutorial that will show you the easiest way to make a pipe section and a 90degree bend in it.
To start off with, lets get our editor setup.
I'm going to start with selecting a texture, in this case, from the media browser, I'm going to choose textures/object/tecpipe1yel - it's a faded yellow pipe texture.
Then I'm going to set my grid to 16x16 - it's a good round value to work at when manipulating larger patch meshes.
I'm going to work in the XY Top View.
Start of by drawing out a 64x64 brush - align it to the major grid lines.
I'm working here with default standard sizes - do yourself a favour, and try to stick to pipe sizes that are easy to work with. 64x64 is a good standard pipe size, you'll find lots of them in the official doom3 maps. (Screenshot 1)
 Screenshot 1
From the Patch menu, choose Cylinder (Screenshot 2). Your 64x64 brush will change to a patch mesh cylinder. (Screenshot 3)
 Screenshot 2
 Screenshot 3
At this point, you'll notice in the XY Top view your looking down onto the cylinder. It doesn't matter what view you create the cylinder in, it will always default to creating the cylinder like this (please correct me if I'm wrong here), so you'll often need to use your axis rotation buttons.
For now, we're going to stick with the default orientation of our cylinder and we're going to now make it into a 90degree bend, working in a side view.
Switch to your XZ Front view for the purposes of this tutorial. The first thing we're going to do is to stretch our cylinder on the Z axis to make it 128 units tall. Select your cylinder and drag it upward (or downwards) until it's 128 units tall. (Screenshot 4)
 Screenshot 4
Why we are making it this height will become clear when we start vertex manipulating our cylinder. Basically, we're creating a 90degree bend, so we need some space to work with - once again, standard grid sizes are the best way to do this.
Go into vertex editing mode (keyboard shortcut is V) and you'll see our vertex control points appear. (Screenshot 5)
 Screenshot 5
You'll notice that in 3D view, you can see how the vertex points make up our columns and rows and in the 2D view, we can only "see" the front vertex points. The key to easy patch mesh manipulation is knowing when to keep things simple by working in specific views. To bend our cylinder, we are going to work entirely in the XZ Front view for this tutorial.
I'm going to number our visible vertex points in the 2D view from 1 to 9.
Before we start to drag the points, I'll explain basically how dragging works. If there are vertex points below the one you are working with, as is the case here, when you first move your mouse over, click and start dragging, all the points under it will move at the same time. If you stop dragging and release the mouse button and then click and move the vertex point again, you will be moving a single vertex point and you will see one below it left "behind"
This will be very useful as you get better at manipulating meshes, but for now, it's just irritating. If this happens while you are dragging, just Undo (CTRL+Z), and toggle out and then back into vertex editing mode (V) and try again. (Screenshot 6)
 Screenshot 6
Lets start by moving point 3 - notice where I'm moving it to - you'll immediately see why I made my cylinder 128 units high. (Screenshot 7)
 Screenshot 7
Now move point 2. (Screenshot 8 ) We move our vertex points in the best order we can, to avoid overlapping. Try moving point 1 before point 2 and you'll see what a mess it looks - you can do it this way and move point 2 afterwards, but it's best to get into the habit of working out which is best to move first.
 Screenshot 8
Now move point 1 (Screenshot 9)
If you've followed my other tutorials, you'll see how the method is identical to creating a 90degree bend in a flat patch mesh.
 Screenshot 9
Now move points 4 & 5 into the positions shown. (Screenshot 10)
Point 6 is already in the right place.
Our vertex points, drawing straight lines from 7 to 4 to 1, 8 to 5 to 2 and 9 to 6 to 3 form 90degree bends, thus making our cylinder a 90degree bend.
 Screenshot 10
That's it - your done.
Now you just need to get your texture aligned properly - to do that, bring up the patch inspector (shift s), and click on Natural, or use the shortcut key CTRL+N (Screenshot 11)
 Screenshot 11
Creating pipe pieces that fit onto either end of this is really too simple to write a tutorial for, simply follow our first step of creating the cylinder and change it's length or height to suit. You can clone your 90degree bend (SPACE) and use the axis rotate buttons to change it's orientation and fit bits of pipe onto it - very easy !
For more information on patch mesh editing, look on the forum for other patch mesh tutorials by myself and others !
MNeMiC@Posted: Wed Aug 25, 2004 5:57 pm : awsome, greatly illustrated and nicely explained.
Origin73@Posted: Wed Aug 25, 2004 6:01 pm : Thank you for another excellent tutorial!

Strife@Posted: Wed Aug 25, 2004 6:09 pm : Thanks a lot! I was just getting to the point where I was going to start fooling around with creating these myself, but you saved me a lot of time.

Budo@Posted: Wed Aug 25, 2004 9:28 pm : Nice
DAGOOP@Posted: Mon Dec 06, 2004 3:40 pm : Strife
If you try and make them yourself, you'll end up with the same problem I ran into.... to many backwards triangles... Thanks for this tutorial bb this helps alot.... the fight goes on.. to many backwards triangles is a bad thing...

Dogstar@Posted: Tue Nov 16, 2010 11:40 am :