bb_matt@Posted: Thu Aug 26, 2004 2:01 pm : UPDATED: New section added - addition of 45degree pipe joining two 45degree elbow pipes
In this, the second part of the pipes set of tutorials, I'm going to show you how to create a 45degree bend.
In the first part, we created a 90degree bend, if you haven't gone through that yet and are unfamiliar with the concepts, I suggest you read it first, because we'll be using similar concepts in this tutorial.
Patch Mesh Tutorial 3 | pipes 1, 90° bend
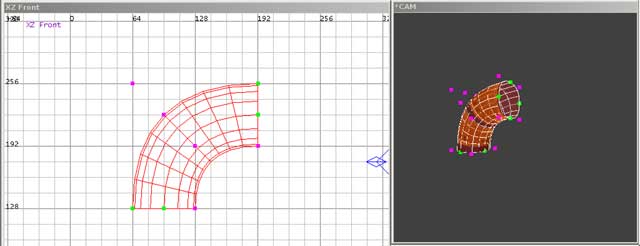
The first thing we are going to do is to load up a 90degree bend - if you don't have one handy,
download this map, or quickly create yourself a 64 unit diameter pipe at 90degrees as indicated in the screenshot below (Screenshot 1) - make it in the XZ Front view for the purpose of this tutorial.
 Screenshot 1
We're going to use this as our template because quite simply, it's the most logical method of creating a 45degree bend that is accurate and efficient - once you are used to creating them, you won't need a template.
Now, select your 90degree pipe and clone it (Screenshot 2)
 Screenshot 2
Then, in your XZ Front view, drag your duplicated 90degree pipe and move it directly over the original one. (Screenshot 3)
 Screenshot 3
Keep it selected and go into vertex editing mode (Keyboard shortcut V) (Screenshot 4)
 Screenshot 4
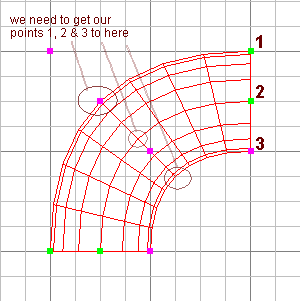
Now if you take a look at our 90degree pipe, it's very easy to see at which point it's at a 45degree angle - the middle part. What we need to do is to manipulate our vertex points to align over that middle part.
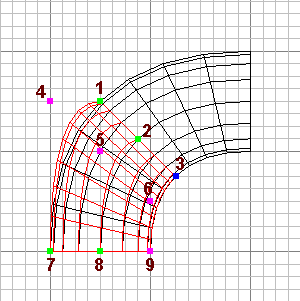
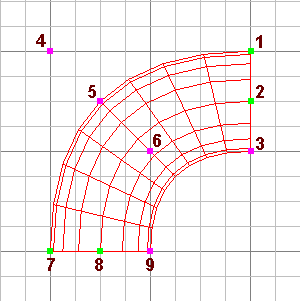
I'm going to number our points as per the first pipe tutorial from 1 to 9 (Screenshot 5)
 Screenshot 5
What we need to do, is to move our points 1, 2 & 3 into the positions I've indicated with circles (Screenshot 6), but first, we need to move points 4,5 & 6 out of the way by moving them down.
We are not going to position them exactly just yet - I want to get 1,2 & 3 in the right position first.
 Screenshot 6
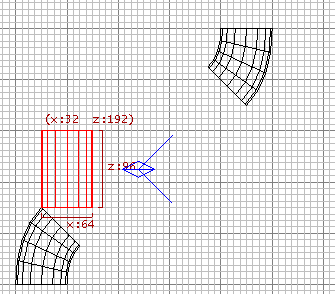
My grid is set at 16x16 - I'm going to need a smaller grid size than that, so I'm going to bring it down to 8x8.
I'm going to recap on vertex moving from the previous tutorial for the sake of clarity.
Recap : Before we start to drag the points, I'll explain basically how dragging works. If there are vertex points below the one you are working with, as is the case here, when you first move your mouse over, click and start dragging, all the points under it will move at the same time. If you stop dragging and release the mouse button and then click and move the vertex point again, you will be moving a single vertex point and you will see one below it left "behind"
This will be very useful as you get better at manipulating meshes, but for now, it's just irritating. If this happens while you are dragging, just Undo (CTRL+Z), and toggle out and then back into vertex editing mode (V) and try again.
Lets move our points 4, 5 & 6 out of the way - moving them all down by four 8x8 grid units should be fine for our purposes, as I've done in the screenshot below (Screenshot 7)
You'll see the outline of our original 90degree pipe below - we need that for reference.
 Screenshot 7
Now we'll start by moving point 1 into position. (Screenshot 8 )
 Screenshot 8
It looks totally horrible - but don't worry, we're not done and you have to get used to seeing odd shapes when your manipulating meshes - just keep your eye on the end product and work out the best way to move your points. The real trick is not to confuse yourself with the 2D/3D views and work in one view at a time. Even though it looks like we're moving only one vertex point at a time in the 2D view we are working in, as I mentioned in the Recap above, we are actually moving the ones below as well - this simplifies things a lot. when you get more proficient, you'll be moving single points to create all sorts of cool shapes.
Lets carry on by moving points 2 & 3 into the position indicated below. (Screenshot 9)
 Screenshot 9
Observe closely where I've moved them too - see how they line up midway down our template 90degree pipe ? - they align perfectly with the middle.
Now it's time to go back to our vertex points 4, 5 & 6 and get this pipe into the right shape.
If your remember in our 90degree pipe tutorial, I mentioned how the vertex points form a 90degree angle when you trace a line inbetween the points - for example, points 7,4 & 1
Well, the same concept applies in this case, except of course, we want to form a 45degree angle.
Point 6 is already in the correct position in my case (Screenshot 9), so I'm going to move points 4 and 5 into position as per the screenshot below (Screenshot 10)
 Screenshot 10
There we go - a 45degree pipe. Now you can quite easily see the 45degree angle if you draw imaginary lines from vertex points 7,4 and 1, 8,5 & 2 and 9,6 & 3
At this point I'll say that getting odd angles, like 55 or 72 requires some guesswork and working on a much finer grid - you may be tempted, if you want to create odd angles, to work of the grid - DONT. You can use your 90degree bend as a template and just use a bit of eye judgement to create different angles.
Our final product - I've moved our new 45degree pipe to one side of our 90degree one.
To wrap up, naturalise the texture (CTRL+N or SHIFT+S to bring up the patch inspector and click NATURAL) (Screenshot 11)
 Screenshot 11
Creating pipe pieces that fit onto the flat end of our pipe is easy, simply create a new cylinder with the same diameter, your desired height and move it into place. You can clone your cylinders (SPACE) and use the axis rotate buttons to change thier orientation and fit other bits of pipe onto it - very easy !
However, attaching a cylinder to the 45degree bend requires a bit more work - you can simple rotate a cylinder by 45 degrees - but watch out for your Vertex point positions, as you'll notice, it won't fit properly and your vertex points will be off the grid.
I'm now going to touch on how to effectively attach a straight pipe to the 45degree bend.
First of all, discard your 90degree bend for now, or move it out of the way.
Then, in the XY Top view, create a standard cylinder, 64x64 (the same diameter as our 45degree pipe) - don't worry about it's height for now. (Screenshot 12)
 Screenshot 12
Then select and duplicate our 45degree pipe (SPACE BAR) and in the XZ Front view, move it up above our original 45degree bend. (Screenshot 13)
 Screenshot 13
What we are going to do now is to manipulate our duplicated 45degree pipe so that we can use our straight bit of pipe to attach the two of them. I want to get our 45degree angle on the opposite side to what it currently is in the XZ Front view, and to do that, I'm going to flip it vertically and then horizontally.
Select your 45degree pipe and in your axis manipulate buttons on the button bar, click Z-Axis Flip and after that, X-Axis Flip (Screenshot 14)
 Screenshot 14
Now, In the XZ Front view I'm going to put my 45degree pipe into the correct place to form a 45degree line between it and our other 45degree pipe. This is straight forward for 45degree pipes - simply work out an exact square around the two pipes. In this case, I've got 5x5 square of major gridlines containing my two pipes. (Screenshot 15)
 Screenshot 15
Then I'm going to select my cylinder I created earlier and move it into a position we can start vertex editing from. (Screenshot 16)
 Screenshot 16
Go into vertex editing mode and start manipulating the points. (Screenshot 17)
 Screenshot 17
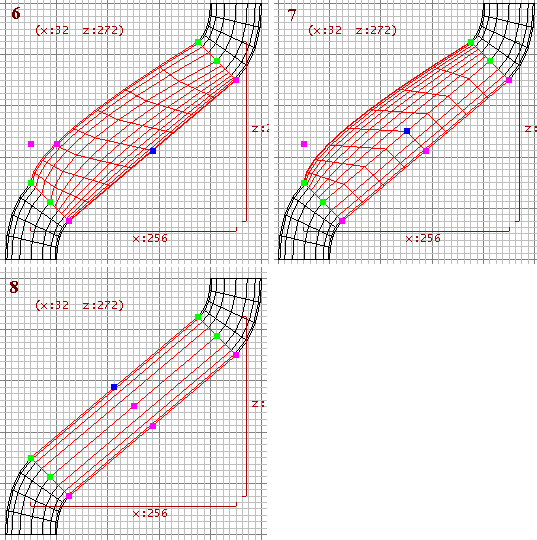
I'm not going to number the points in this case, because by now, if you've been following these tutorials, you should have a solid understanding of where we will move the points to, I'm just going to show visually in the series of small screenshots below how I go about joining our two 45degree pipes with the cylinder. (Screenshot 18 ) Note: The point that is blue is the one I've moved in the steps below.
 Screenshot 18
At this point you can see I've joined our 45degree pipes together, but now need to get the shape right by moving our remaining points. The key to this is straightforward - we're working with a 45degree bend, so lets move them into 45degree angles between the other points and themselves. (Screenshot 19)
 Screenshot 19
There we have our connection - the key to working with 45degree angles is similar to that of 90degrees - lining the vertex points up on the grid working with the angle you are trying to create.
 Rendered
Finish of by aligning your textures. A good trick here is to select all of your pipes and align there textures all at once.
Download the completed pipe.
You may be wondering why I just didn't do an arbitrary rotation of 45degrees on the straight bit of pipe. I didn't, because I wanted to show the power and simplicity of vertex editing with meshes. You could just as easily first rotate your pipe and then vertex edit - but just rotating it and trying to join it would be impossible/messy without vertex editing and you'd end up with the same amount of steps to edit anyway.
In our next tutorial on pipes, we'll work with odd angles and curves and create ourselves some crazy curvy cables that you see all over Doom3.
Random Tip 1: When working with finer grid sizes, if your vertex points go off the grid for whatever reason, hit the CTRL+G key and they'll align to the grid - watch out when you do this, make sure your grid is set right to ensure your points don't overlap each other.
Random Tip 2: You can move multiple vertex points at once by first making sure you have no vertex points selected and secondly, by drawing out a box around the points you want.
For more information on patch mesh editing, look on the forum for other patch mesh tutorials by myself and others.
UPDATED: New section added - addition of 45degree pipe joining two 45degree elbow pipes
BNA!@Posted: Thu Aug 26, 2004 6:17 pm : Nice one - should help a few people to get started with patches, thanks matt!
bb_matt@Posted: Sat Aug 28, 2004 10:44 am : Thanks BNA.
They may not come in handy right away, as most newbies are experimenting with the cool stuff first, but hopefully will be useful over time.
I've updated this tutorial - added how to connect a 45degree pipe between two 45degree elbow pipes.
I was going to leave that to the next tutorial, but I figured it would be best to wrap this one up properly.
MNeMiC@Posted: Sat Aug 28, 2004 10:57 am : totally hawsome, if its not too much post a picture of the final product rendered of this tutorial =D
bb_matt@Posted: Sat Aug 28, 2004 11:10 am : Cheers - added a render view.
I'm thinking what I may do when I've completed a set of text/screenshot tutorials is to do a video tutorial covering everything again - I'll have to see.
Alternatively, I may use flash to show vertex manipulation that create more complex shapes.
KungFuGuy@Posted: Wed Dec 15, 2004 11:57 pm : bb_matt wrote:
In our next tutorial on pipes, we'll work with odd angles and curves and create ourselves some crazy curvy cables that you see all over Doom3.
Still waiting . . .

Method@Posted: Thu Dec 16, 2004 1:05 am : This is the tutorial which shows how to create wires:
http://www.gamedesign.net/book/view/688
Method
Dogstar@Posted: Tue Nov 16, 2010 12:42 pm :
bb_matt@Posted: Thu Aug 26, 2004 2:01 pm : UPDATED: New section added - addition of 45degree pipe joining two 45degree elbow pipes
In this, the second part of the pipes set of tutorials, I'm going to show you how to create a 45degree bend.
In the first part, we created a 90degree bend, if you haven't gone through that yet and are unfamiliar with the concepts, I suggest you read it first, because we'll be using similar concepts in this tutorial.
Patch Mesh Tutorial 3 | pipes 1, 90° bend
The first thing we are going to do is to load up a 90degree bend - if you don't have one handy,
download this map, or quickly create yourself a 64 unit diameter pipe at 90degrees as indicated in the screenshot below (Screenshot 1) - make it in the XZ Front view for the purpose of this tutorial.
 Screenshot 1
We're going to use this as our template because quite simply, it's the most logical method of creating a 45degree bend that is accurate and efficient - once you are used to creating them, you won't need a template.
Now, select your 90degree pipe and clone it (Screenshot 2)
 Screenshot 2
Then, in your XZ Front view, drag your duplicated 90degree pipe and move it directly over the original one. (Screenshot 3)
 Screenshot 3
Keep it selected and go into vertex editing mode (Keyboard shortcut V) (Screenshot 4)
 Screenshot 4
Now if you take a look at our 90degree pipe, it's very easy to see at which point it's at a 45degree angle - the middle part. What we need to do is to manipulate our vertex points to align over that middle part.
I'm going to number our points as per the first pipe tutorial from 1 to 9 (Screenshot 5)
 Screenshot 5
What we need to do, is to move our points 1, 2 & 3 into the positions I've indicated with circles (Screenshot 6), but first, we need to move points 4,5 & 6 out of the way by moving them down.
We are not going to position them exactly just yet - I want to get 1,2 & 3 in the right position first.
 Screenshot 6
My grid is set at 16x16 - I'm going to need a smaller grid size than that, so I'm going to bring it down to 8x8.
I'm going to recap on vertex moving from the previous tutorial for the sake of clarity.
Recap : Before we start to drag the points, I'll explain basically how dragging works. If there are vertex points below the one you are working with, as is the case here, when you first move your mouse over, click and start dragging, all the points under it will move at the same time. If you stop dragging and release the mouse button and then click and move the vertex point again, you will be moving a single vertex point and you will see one below it left "behind"
This will be very useful as you get better at manipulating meshes, but for now, it's just irritating. If this happens while you are dragging, just Undo (CTRL+Z), and toggle out and then back into vertex editing mode (V) and try again.
Lets move our points 4, 5 & 6 out of the way - moving them all down by four 8x8 grid units should be fine for our purposes, as I've done in the screenshot below (Screenshot 7)
You'll see the outline of our original 90degree pipe below - we need that for reference.
 Screenshot 7
Now we'll start by moving point 1 into position. (Screenshot 8 )
 Screenshot 8
It looks totally horrible - but don't worry, we're not done and you have to get used to seeing odd shapes when your manipulating meshes - just keep your eye on the end product and work out the best way to move your points. The real trick is not to confuse yourself with the 2D/3D views and work in one view at a time. Even though it looks like we're moving only one vertex point at a time in the 2D view we are working in, as I mentioned in the Recap above, we are actually moving the ones below as well - this simplifies things a lot. when you get more proficient, you'll be moving single points to create all sorts of cool shapes.
Lets carry on by moving points 2 & 3 into the position indicated below. (Screenshot 9)
 Screenshot 9
Observe closely where I've moved them too - see how they line up midway down our template 90degree pipe ? - they align perfectly with the middle.
Now it's time to go back to our vertex points 4, 5 & 6 and get this pipe into the right shape.
If your remember in our 90degree pipe tutorial, I mentioned how the vertex points form a 90degree angle when you trace a line inbetween the points - for example, points 7,4 & 1
Well, the same concept applies in this case, except of course, we want to form a 45degree angle.
Point 6 is already in the correct position in my case (Screenshot 9), so I'm going to move points 4 and 5 into position as per the screenshot below (Screenshot 10)
 Screenshot 10
There we go - a 45degree pipe. Now you can quite easily see the 45degree angle if you draw imaginary lines from vertex points 7,4 and 1, 8,5 & 2 and 9,6 & 3
At this point I'll say that getting odd angles, like 55 or 72 requires some guesswork and working on a much finer grid - you may be tempted, if you want to create odd angles, to work of the grid - DONT. You can use your 90degree bend as a template and just use a bit of eye judgement to create different angles.
Our final product - I've moved our new 45degree pipe to one side of our 90degree one.
To wrap up, naturalise the texture (CTRL+N or SHIFT+S to bring up the patch inspector and click NATURAL) (Screenshot 11)
 Screenshot 11
Creating pipe pieces that fit onto the flat end of our pipe is easy, simply create a new cylinder with the same diameter, your desired height and move it into place. You can clone your cylinders (SPACE) and use the axis rotate buttons to change thier orientation and fit other bits of pipe onto it - very easy !
However, attaching a cylinder to the 45degree bend requires a bit more work - you can simple rotate a cylinder by 45 degrees - but watch out for your Vertex point positions, as you'll notice, it won't fit properly and your vertex points will be off the grid.
I'm now going to touch on how to effectively attach a straight pipe to the 45degree bend.
First of all, discard your 90degree bend for now, or move it out of the way.
Then, in the XY Top view, create a standard cylinder, 64x64 (the same diameter as our 45degree pipe) - don't worry about it's height for now. (Screenshot 12)
 Screenshot 12
Then select and duplicate our 45degree pipe (SPACE BAR) and in the XZ Front view, move it up above our original 45degree bend. (Screenshot 13)
 Screenshot 13
What we are going to do now is to manipulate our duplicated 45degree pipe so that we can use our straight bit of pipe to attach the two of them. I want to get our 45degree angle on the opposite side to what it currently is in the XZ Front view, and to do that, I'm going to flip it vertically and then horizontally.
Select your 45degree pipe and in your axis manipulate buttons on the button bar, click Z-Axis Flip and after that, X-Axis Flip (Screenshot 14)
 Screenshot 14
Now, In the XZ Front view I'm going to put my 45degree pipe into the correct place to form a 45degree line between it and our other 45degree pipe. This is straight forward for 45degree pipes - simply work out an exact square around the two pipes. In this case, I've got 5x5 square of major gridlines containing my two pipes. (Screenshot 15)
 Screenshot 15
Then I'm going to select my cylinder I created earlier and move it into a position we can start vertex editing from. (Screenshot 16)
 Screenshot 16
Go into vertex editing mode and start manipulating the points. (Screenshot 17)
 Screenshot 17
I'm not going to number the points in this case, because by now, if you've been following these tutorials, you should have a solid understanding of where we will move the points to, I'm just going to show visually in the series of small screenshots below how I go about joining our two 45degree pipes with the cylinder. (Screenshot 18 ) Note: The point that is blue is the one I've moved in the steps below.
 Screenshot 18
At this point you can see I've joined our 45degree pipes together, but now need to get the shape right by moving our remaining points. The key to this is straightforward - we're working with a 45degree bend, so lets move them into 45degree angles between the other points and themselves. (Screenshot 19)
 Screenshot 19
There we have our connection - the key to working with 45degree angles is similar to that of 90degrees - lining the vertex points up on the grid working with the angle you are trying to create.
 Rendered
Finish of by aligning your textures. A good trick here is to select all of your pipes and align there textures all at once.
Download the completed pipe.
You may be wondering why I just didn't do an arbitrary rotation of 45degrees on the straight bit of pipe. I didn't, because I wanted to show the power and simplicity of vertex editing with meshes. You could just as easily first rotate your pipe and then vertex edit - but just rotating it and trying to join it would be impossible/messy without vertex editing and you'd end up with the same amount of steps to edit anyway.
In our next tutorial on pipes, we'll work with odd angles and curves and create ourselves some crazy curvy cables that you see all over Doom3.
Random Tip 1: When working with finer grid sizes, if your vertex points go off the grid for whatever reason, hit the CTRL+G key and they'll align to the grid - watch out when you do this, make sure your grid is set right to ensure your points don't overlap each other.
Random Tip 2: You can move multiple vertex points at once by first making sure you have no vertex points selected and secondly, by drawing out a box around the points you want.
For more information on patch mesh editing, look on the forum for other patch mesh tutorials by myself and others.
UPDATED: New section added - addition of 45degree pipe joining two 45degree elbow pipes
BNA!@Posted: Thu Aug 26, 2004 6:17 pm : Nice one - should help a few people to get started with patches, thanks matt!
bb_matt@Posted: Sat Aug 28, 2004 10:44 am : Thanks BNA.
They may not come in handy right away, as most newbies are experimenting with the cool stuff first, but hopefully will be useful over time.
I've updated this tutorial - added how to connect a 45degree pipe between two 45degree elbow pipes.
I was going to leave that to the next tutorial, but I figured it would be best to wrap this one up properly.
MNeMiC@Posted: Sat Aug 28, 2004 10:57 am : totally hawsome, if its not too much post a picture of the final product rendered of this tutorial =D
bb_matt@Posted: Sat Aug 28, 2004 11:10 am : Cheers - added a render view.
I'm thinking what I may do when I've completed a set of text/screenshot tutorials is to do a video tutorial covering everything again - I'll have to see.
Alternatively, I may use flash to show vertex manipulation that create more complex shapes.
KungFuGuy@Posted: Wed Dec 15, 2004 11:57 pm : bb_matt wrote:
In our next tutorial on pipes, we'll work with odd angles and curves and create ourselves some crazy curvy cables that you see all over Doom3.
Still waiting . . .

Method@Posted: Thu Dec 16, 2004 1:05 am : This is the tutorial which shows how to create wires:
http://www.gamedesign.net/book/view/688
Method
Dogstar@Posted: Tue Nov 16, 2010 12:42 pm :
bb_matt@Posted: Thu Aug 26, 2004 1:01 pm : UPDATED: New section added - addition of 45degree pipe joining two 45degree elbow pipes
In this, the second part of the pipes set of tutorials, I'm going to show you how to create a 45degree bend.
In the first part, we created a 90degree bend, if you haven't gone through that yet and are unfamiliar with the concepts, I suggest you read it first, because we'll be using similar concepts in this tutorial.
Patch Mesh Tutorial 3 | pipes 1, 90° bend
The first thing we are going to do is to load up a 90degree bend - if you don't have one handy,
download this map, or quickly create yourself a 64 unit diameter pipe at 90degrees as indicated in the screenshot below (Screenshot 1) - make it in the XZ Front view for the purpose of this tutorial.
 Screenshot 1
We're going to use this as our template because quite simply, it's the most logical method of creating a 45degree bend that is accurate and efficient - once you are used to creating them, you won't need a template.
Now, select your 90degree pipe and clone it (Screenshot 2)
 Screenshot 2
Then, in your XZ Front view, drag your duplicated 90degree pipe and move it directly over the original one. (Screenshot 3)
 Screenshot 3
Keep it selected and go into vertex editing mode (Keyboard shortcut V) (Screenshot 4)
 Screenshot 4
Now if you take a look at our 90degree pipe, it's very easy to see at which point it's at a 45degree angle - the middle part. What we need to do is to manipulate our vertex points to align over that middle part.
I'm going to number our points as per the first pipe tutorial from 1 to 9 (Screenshot 5)
 Screenshot 5
What we need to do, is to move our points 1, 2 & 3 into the positions I've indicated with circles (Screenshot 6), but first, we need to move points 4,5 & 6 out of the way by moving them down.
We are not going to position them exactly just yet - I want to get 1,2 & 3 in the right position first.
 Screenshot 6
My grid is set at 16x16 - I'm going to need a smaller grid size than that, so I'm going to bring it down to 8x8.
I'm going to recap on vertex moving from the previous tutorial for the sake of clarity.
Recap : Before we start to drag the points, I'll explain basically how dragging works. If there are vertex points below the one you are working with, as is the case here, when you first move your mouse over, click and start dragging, all the points under it will move at the same time. If you stop dragging and release the mouse button and then click and move the vertex point again, you will be moving a single vertex point and you will see one below it left "behind"
This will be very useful as you get better at manipulating meshes, but for now, it's just irritating. If this happens while you are dragging, just Undo (CTRL+Z), and toggle out and then back into vertex editing mode (V) and try again.
Lets move our points 4, 5 & 6 out of the way - moving them all down by four 8x8 grid units should be fine for our purposes, as I've done in the screenshot below (Screenshot 7)
You'll see the outline of our original 90degree pipe below - we need that for reference.
 Screenshot 7
Now we'll start by moving point 1 into position. (Screenshot 8 )
 Screenshot 8
It looks totally horrible - but don't worry, we're not done and you have to get used to seeing odd shapes when your manipulating meshes - just keep your eye on the end product and work out the best way to move your points. The real trick is not to confuse yourself with the 2D/3D views and work in one view at a time. Even though it looks like we're moving only one vertex point at a time in the 2D view we are working in, as I mentioned in the Recap above, we are actually moving the ones below as well - this simplifies things a lot. when you get more proficient, you'll be moving single points to create all sorts of cool shapes.
Lets carry on by moving points 2 & 3 into the position indicated below. (Screenshot 9)
 Screenshot 9
Observe closely where I've moved them too - see how they line up midway down our template 90degree pipe ? - they align perfectly with the middle.
Now it's time to go back to our vertex points 4, 5 & 6 and get this pipe into the right shape.
If your remember in our 90degree pipe tutorial, I mentioned how the vertex points form a 90degree angle when you trace a line inbetween the points - for example, points 7,4 & 1
Well, the same concept applies in this case, except of course, we want to form a 45degree angle.
Point 6 is already in the correct position in my case (Screenshot 9), so I'm going to move points 4 and 5 into position as per the screenshot below (Screenshot 10)
 Screenshot 10
There we go - a 45degree pipe. Now you can quite easily see the 45degree angle if you draw imaginary lines from vertex points 7,4 and 1, 8,5 & 2 and 9,6 & 3
At this point I'll say that getting odd angles, like 55 or 72 requires some guesswork and working on a much finer grid - you may be tempted, if you want to create odd angles, to work of the grid - DONT. You can use your 90degree bend as a template and just use a bit of eye judgement to create different angles.
Our final product - I've moved our new 45degree pipe to one side of our 90degree one.
To wrap up, naturalise the texture (CTRL+N or SHIFT+S to bring up the patch inspector and click NATURAL) (Screenshot 11)
 Screenshot 11
Creating pipe pieces that fit onto the flat end of our pipe is easy, simply create a new cylinder with the same diameter, your desired height and move it into place. You can clone your cylinders (SPACE) and use the axis rotate buttons to change thier orientation and fit other bits of pipe onto it - very easy !
However, attaching a cylinder to the 45degree bend requires a bit more work - you can simple rotate a cylinder by 45 degrees - but watch out for your Vertex point positions, as you'll notice, it won't fit properly and your vertex points will be off the grid.
I'm now going to touch on how to effectively attach a straight pipe to the 45degree bend.
First of all, discard your 90degree bend for now, or move it out of the way.
Then, in the XY Top view, create a standard cylinder, 64x64 (the same diameter as our 45degree pipe) - don't worry about it's height for now. (Screenshot 12)
 Screenshot 12
Then select and duplicate our 45degree pipe (SPACE BAR) and in the XZ Front view, move it up above our original 45degree bend. (Screenshot 13)
 Screenshot 13
What we are going to do now is to manipulate our duplicated 45degree pipe so that we can use our straight bit of pipe to attach the two of them. I want to get our 45degree angle on the opposite side to what it currently is in the XZ Front view, and to do that, I'm going to flip it vertically and then horizontally.
Select your 45degree pipe and in your axis manipulate buttons on the button bar, click Z-Axis Flip and after that, X-Axis Flip (Screenshot 14)
 Screenshot 14
Now, In the XZ Front view I'm going to put my 45degree pipe into the correct place to form a 45degree line between it and our other 45degree pipe. This is straight forward for 45degree pipes - simply work out an exact square around the two pipes. In this case, I've got 5x5 square of major gridlines containing my two pipes. (Screenshot 15)
 Screenshot 15
Then I'm going to select my cylinder I created earlier and move it into a position we can start vertex editing from. (Screenshot 16)
 Screenshot 16
Go into vertex editing mode and start manipulating the points. (Screenshot 17)
 Screenshot 17
I'm not going to number the points in this case, because by now, if you've been following these tutorials, you should have a solid understanding of where we will move the points to, I'm just going to show visually in the series of small screenshots below how I go about joining our two 45degree pipes with the cylinder. (Screenshot 18 ) Note: The point that is blue is the one I've moved in the steps below.
 Screenshot 18
At this point you can see I've joined our 45degree pipes together, but now need to get the shape right by moving our remaining points. The key to this is straightforward - we're working with a 45degree bend, so lets move them into 45degree angles between the other points and themselves. (Screenshot 19)
 Screenshot 19
There we have our connection - the key to working with 45degree angles is similar to that of 90degrees - lining the vertex points up on the grid working with the angle you are trying to create.
 Rendered
Finish of by aligning your textures. A good trick here is to select all of your pipes and align there textures all at once.
Download the completed pipe.
You may be wondering why I just didn't do an arbitrary rotation of 45degrees on the straight bit of pipe. I didn't, because I wanted to show the power and simplicity of vertex editing with meshes. You could just as easily first rotate your pipe and then vertex edit - but just rotating it and trying to join it would be impossible/messy without vertex editing and you'd end up with the same amount of steps to edit anyway.
In our next tutorial on pipes, we'll work with odd angles and curves and create ourselves some crazy curvy cables that you see all over Doom3.
Random Tip 1: When working with finer grid sizes, if your vertex points go off the grid for whatever reason, hit the CTRL+G key and they'll align to the grid - watch out when you do this, make sure your grid is set right to ensure your points don't overlap each other.
Random Tip 2: You can move multiple vertex points at once by first making sure you have no vertex points selected and secondly, by drawing out a box around the points you want.
For more information on patch mesh editing, look on the forum for other patch mesh tutorials by myself and others.
UPDATED: New section added - addition of 45degree pipe joining two 45degree elbow pipes
BNA!@Posted: Thu Aug 26, 2004 5:17 pm : Nice one - should help a few people to get started with patches, thanks matt!
bb_matt@Posted: Sat Aug 28, 2004 9:44 am : Thanks BNA.
They may not come in handy right away, as most newbies are experimenting with the cool stuff first, but hopefully will be useful over time.
I've updated this tutorial - added how to connect a 45degree pipe between two 45degree elbow pipes.
I was going to leave that to the next tutorial, but I figured it would be best to wrap this one up properly.
MNeMiC@Posted: Sat Aug 28, 2004 9:57 am : totally hawsome, if its not too much post a picture of the final product rendered of this tutorial =D
bb_matt@Posted: Sat Aug 28, 2004 10:10 am : Cheers - added a render view.
I'm thinking what I may do when I've completed a set of text/screenshot tutorials is to do a video tutorial covering everything again - I'll have to see.
Alternatively, I may use flash to show vertex manipulation that create more complex shapes.
KungFuGuy@Posted: Wed Dec 15, 2004 10:57 pm : bb_matt wrote:
In our next tutorial on pipes, we'll work with odd angles and curves and create ourselves some crazy curvy cables that you see all over Doom3.
Still waiting . . .

Method@Posted: Thu Dec 16, 2004 12:05 am : This is the tutorial which shows how to create wires:
http://www.gamedesign.net/book/view/688
Method
Dogstar@Posted: Tue Nov 16, 2010 11:42 am :