BNA!@Posted: Wed Feb 05, 2003 4:56 pm : This is a post most half way experienced 3D modelling tool users will shake their head about.
It's targeted to people new to modelling who need a high resolution model to generate a smooth bumpmap from.
Let's start with a very simple panel I made in Lightwave:
It's a box 256m * 512m beveled out a bit and with smoothed edges.
Then I did cut it into segements to maintain 3 & 4 point polygons to be able to switch to subdivision modelling mode later (tab key toggles between poly editing mode and subdivision mode)
I then beveled out the newly created segments to make the surface a bit more interesting (would you like to read a small beginner tut to see me splitting up a flat plane into two triangles?...)
My subdivsion level (set in general preferences is very high for this project: 12)
The result of the amazing 264 poly panel looks something like this:

Now I hit the magic tab key in modeller an turn on subdivision mode:

Notice any difference? Sure you do

All and everything is nicely smoothed out, while the polycount still stays at 264...
Just in case you're wondering why I did cut the model up and smoothed the edges: Turning on subdivision mode with only a cube in vew will turn it almost into a sphere. So cutting the model up will reduce the smoothing effect of 90 degrees angled surfaces by creating smaller angles to interpolate.
Just maka a cube, hit tab and go to Subdivide: faceted - you'll see what I mean (subdivide metaform will increase the effect of smoothness when freezing the subdivision model later)
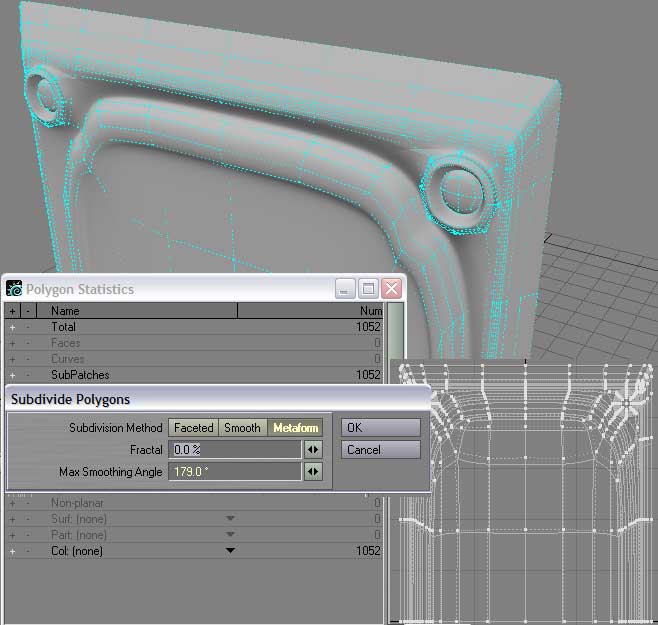
So while we're talking about subdivide metaform, let's see what it does to our panel:

See the difference? No? Well there is none really, besides the fact that the polycount has quadrupled.
Why am I doing this obviously stupid move?
I'm trying to create a mesh as unoptimized as possible as a base for a normal map. The less faceted the model is, the smoother my normal map will turn out.
If you want to hand the model over to Lightwave Layout for rendering purposes you could've stopped reading after "hit tab key".
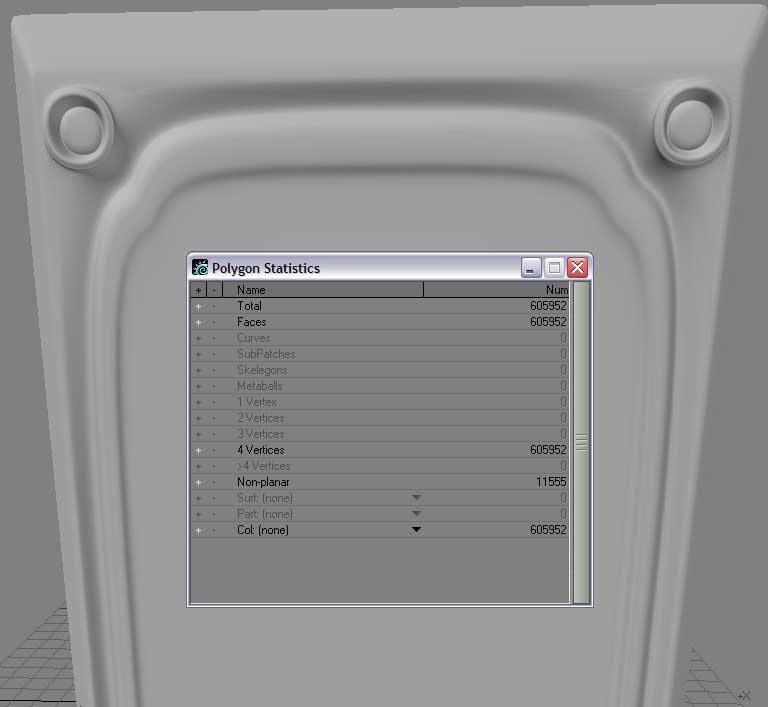
Now we'll apply subdivide metaform one more time (again without any noteable visual impact) and then, after saving the model to hdd, we attempt to run a little stress test for our cute little pc: We will freeze the smooth subdivison model to a polygon model by hitting "ctrl+d".
Depending on your cpu speed and ram, you can now either make a cup of coffe, call microsoft tech center or wait a little till the smooth mesh got subdivied to a high resolution polycount model.
Assuming everything went well, you'll see something similar like this on your screen:

See the difference?
The blueish subdivision control cage is gone, the model is still smooth and the poly count has jumped to over 600k.
Now we hit the save button again and push the "triple" button.
This will convert any polygons with more than 3 vertex points into triangles, the kind of polygon shape every gaming engine loves!
This will also eliminate any nonplanar polygons (since a triangle can't be nonplanar:) )
This again will increase your polycount to another new record like displayed below:

1.2 million polies! 100k more and you have the same resolution Epic announced during a GeforceFX event to use for their new UnrealX engine when creating normal maps for their player models.
And we waste it for only a simple panel meant to get displayed on only two triangles ingame - now does that mean we're cooler than game developers?
In a common sense of biased uneducated webforum discussions: Yes.
In any other other sense of an educated mind: No.
Keep in mind that realtime rendering is all smoke and mirrors.
By exctracting a normal map from a 3D object we simply create an illusion, the illusion of geometry nicely lit in your game engine of choice.
The only greater illusion you can create with a 3D program and capeable gaming engines is by joining the PR team to grease the hype machine...
To show you that you actually did some ressource intensive operations:

So keeping two of these models in memory will eat up nice 670megs of RAM (multiply this with 15 and you will have the amount of memory needed to play with 30 high resolution player models on screen - remember this info and use it whenever a lamer keeps claiming that the new xyz engine will display such an amount of player models onscreen, hence he usually "0wnz j00", but most likely he doesn't even know that his 32bit pc can only address about 4gigs of RAM, which would enable him to load max. 12 models into memory...)
Excuse me the stupid notes above
Oh, before I forget it - this is our new lovely normal map:

kat@Posted: Wed Feb 05, 2003 5:25 pm : hmmm, v interesing as always... I'll have to try GMax in SUBdiv mode..!
sic1@Posted: Sat Feb 08, 2003 9:05 am : Cheers BNA, you've done it again
I will have to try that too haha....
I just built a new computer... but I still think it would melt under the load of 1.2 million polys... oh my

BNA!@Posted: Sat Feb 08, 2003 11:56 am : sic1 wrote:
Cheers BNA, you've done it again
Yes I know these damn spelling errors ...
At least my tutorials are always entertaining
And hey - send us a picture of your freshly melted pc heated up by 1.2 million polygons.
By the way, you should try to load this model into Doom
ssj3alan@Posted: Sat Feb 08, 2003 8:53 pm : Where do you apply the bumpmap after you generate it? Do you apply it to another low-poly panel model or do you apply it to a brush in DoomED?
BNA!@Posted: Sat Feb 08, 2003 9:13 pm : You can use these normalmaps to create your own materials.
No low poly target model is needed.
ssj3alan@Posted: Sun Feb 09, 2003 3:41 am : So now you just make a texture as the shape of the bumpmap and then just make that the diffuse map right.
BNA!@Posted: Sun Feb 09, 2003 7:40 am : ssj3alan wrote:
So now you just make a texture as the shape of the bumpmap and then just make that the diffuse map right.
Yes,
please read the texture creation tutorials here:
http://www.doom3world.org/phpbb2/viewtopic.php?t=482
ssj3alan@Posted: Sun Feb 09, 2003 7:41 pm : Yeah I know about the tutorial. I was just confused about why you were making the bumpmap from the geometry, I thought you make the texture first then the bumpmap but then I remembered that you only do that when you don't have a 3d program ala the Photoshop way. Thanks BNA
Dan martin@Posted: Fri Feb 14, 2003 3:58 am : Nice little tut BNA I love LIghtwave's modeling tool set I beleve as far as modeling goes nothing touches Lightwave (although Maya is getting better)
Sorry for the "newbee" question but how high would you go (poly count wise) on a mesh when you are going to use it for a normal map?. Sorry I
just gota know! It's just as D3 will be using bump/normal mapping to such a large extent that I might need a little more info on this.
Dan (the question dude)
BNA!@Posted: Fri Feb 14, 2003 6:36 am : Dan martin wrote:
Sorry for the "newbee" question but how high would you go (poly count wise) on a mesh when you are going to use it for a normal map?. Sorry I
just gota know! It's just as D3 will be using bump/normal mapping to such a large extent that I might need a little more info on this.
I'd say go as high as your pc can take it.
The finer your high poly geometry is, the less faceted is it.
You'll surely bump into some limits someday of Doom's normal map rendering tools (don't know where they are), but as long as storage / ram isn't a concern for you - ramp it up!
But be warned:
All this renderbumpflat stuff for panels renders very fast, while the renderbump process for 3D models is dog slow and can take a few hours.
Lutex@Posted: Mon Feb 24, 2003 12:38 am : HI,
nice little tutrial BNA!, but i dont get the last step. how do you get the actual normal map (the last pic in ur tut) from thew 3d model?
BNA!@Posted: Mon Feb 24, 2003 8:31 am : Lutex wrote:
HI,
nice little tutrial BNA!, but i dont get the last step. how do you get the actual normal map (the last pic in ur tut) from thew 3d model?
Thanks - read this and you're all set:
[url=http://www.doom3world.org/phpbb2/viewtopic.php?t=563]Tutorial: Renderbump flat - Part1
[/url]
Lutex@Posted: Tue Feb 25, 2003 1:13 am : ok, i get some kind of normal map when using the renderbumpflat command, but it seems my model is turned upside down or something...do i have to flip my ase model around a certain axis to be in the correct position to use this command?
also the model size (lets say 2048*1024) has to have the same proportions as the output texture (in this case for example 256*128), right?
damn, i bought max almost 2 weeks ago and now it appears to me lightwave is the better prog for doom3 modelling...or is an *.ase file as "acceptable" as *.lwo?
Lutex
mac@Posted: Tue Feb 25, 2003 4:01 am : i think the next thing on youre tutorial list should be to show how to control the subd levels to maintain different "smoothness" in different areas so people can mix smooth and "edgy" areas.. keep up youre good work bernie
BNA!@Posted: Tue Feb 25, 2003 9:28 am : Lutex wrote:
ok, i get some kind of normal map when using the renderbumpflat command, but it seems my model is turned upside down or something...do i have to flip my ase model around a certain axis to be in the correct position to use this command?
Yes, make sure the model is facing towards the negative Z axis.
Quote:
also the model size (lets say 2048*1024) has to have the same proportions as the output texture (in this case for example 256*128), right?
No, not really.
It however is recommended to model in the correct proportions.
The size of the image output is controlled by the "- size" switch in Doom.
Generally speaking I try to model in the map grid (where 1 grid unit (grid size

in Doom is 8 metres in Lightwave).
I do this just in case I want to convert any of the flat panels into UV mapped models later, or if I want to reuse parts of the geometry on high poly models.
I also keep my work separated.
One panel is always spread over many layers. When I start to put one together for rendering, I mark the corresponding layers, copy and paste them into a new object, subdivide and triple them.
This way I always keep the original object as an editable file for later use.
I can't stress modularity enough - it's so much work to put good looking things together that I like the idea of having a working library of 3D objects when I get a good idea for a new model.
Quote:
damn, i bought max almost 2 weeks ago and now it appears to me lightwave is the better prog for doom3 modelling...or is an *.ase file as "acceptable" as *.lwo?
Yes, I think .ase is just as good as .lwo
Just make sure that all points are merged and the object is properly split into triangles.
Since Lightwave comes at the price of one or two plugins for MAX, you should consider a copy of it when your bankaccount is healty again.
Lightwave licences are also transferrable, so you can make a good deal when searching e-bay (got my copy this way).
NEWTEK is in no way picky when you register an already registered copy - just send them the transferr letter via fax / email and they send you the key.
BNA!@Posted: Tue Feb 25, 2003 9:30 am : mac wrote:
i think the next thing on youre tutorial list should be to show how to control the subd levels to maintain different "smoothness" in different areas so people can mix smooth and "edgy" areas.. keep up youre good work bernie
Thanks mac!
Good suggestion - I'll take a look into that matter.
BNA!@Posted: Wed Feb 05, 2003 5:56 pm : This is a post most half way experienced 3D modelling tool users will shake their head about.
It's targeted to people new to modelling who need a high resolution model to generate a smooth bumpmap from.
Let's start with a very simple panel I made in Lightwave:
It's a box 256m * 512m beveled out a bit and with smoothed edges.
Then I did cut it into segements to maintain 3 & 4 point polygons to be able to switch to subdivision modelling mode later (tab key toggles between poly editing mode and subdivision mode)
I then beveled out the newly created segments to make the surface a bit more interesting (would you like to read a small beginner tut to see me splitting up a flat plane into two triangles?...)
My subdivsion level (set in general preferences is very high for this project: 12)
The result of the amazing 264 poly panel looks something like this:

Now I hit the magic tab key in modeller an turn on subdivision mode:

Notice any difference? Sure you do

All and everything is nicely smoothed out, while the polycount still stays at 264...
Just in case you're wondering why I did cut the model up and smoothed the edges: Turning on subdivision mode with only a cube in vew will turn it almost into a sphere. So cutting the model up will reduce the smoothing effect of 90 degrees angled surfaces by creating smaller angles to interpolate.
Just maka a cube, hit tab and go to Subdivide: faceted - you'll see what I mean (subdivide metaform will increase the effect of smoothness when freezing the subdivision model later)
So while we're talking about subdivide metaform, let's see what it does to our panel:
See the difference? No? Well there is none really, besides the fact that the polycount has quadrupled.
Why am I doing this obviously stupid move?
I'm trying to create a mesh as unoptimized as possible as a base for a normal map. The less faceted the model is, the smoother my normal map will turn out.
If you want to hand the model over to Lightwave Layout for rendering purposes you could've stopped reading after "hit tab key".
Now we'll apply subdivide metaform one more time (again without any noteable visual impact) and then, after saving the model to hdd, we attempt to run a little stress test for our cute little pc: We will freeze the smooth subdivison model to a polygon model by hitting "ctrl+d".
Depending on your cpu speed and ram, you can now either make a cup of coffe, call microsoft tech center or wait a little till the smooth mesh got subdivied to a high resolution polycount model.
Assuming everything went well, you'll see something similar like this on your screen:

See the difference?
The blueish subdivision control cage is gone, the model is still smooth and the poly count has jumped to over 600k.
Now we hit the save button again and push the "triple" button.
This will convert any polygons with more than 3 vertex points into triangles, the kind of polygon shape every gaming engine loves!
This will also eliminate any nonplanar polygons (since a triangle can't be nonplanar:) )
This again will increase your polycount to another new record like displayed below:

1.2 million polies! 100k more and you have the same resolution Epic announced during a GeforceFX event to use for their new UnrealX engine when creating normal maps for their player models.
And we waste it for only a simple panel meant to get displayed on only two triangles ingame - now does that mean we're cooler than game developers?
In a common sense of biased uneducated webforum discussions: Yes.
In any other other sense of an educated mind: No.
Keep in mind that realtime rendering is all smoke and mirrors.
By exctracting a normal map from a 3D object we simply create an illusion, the illusion of geometry nicely lit in your game engine of choice.
The only greater illusion you can create with a 3D program and capeable gaming engines is by joining the PR team to grease the hype machine...
To show you that you actually did some ressource intensive operations:

So keeping two of these models in memory will eat up nice 670megs of RAM (multiply this with 15 and you will have the amount of memory needed to play with 30 high resolution player models on screen - remember this info and use it whenever a lamer keeps claiming that the new xyz engine will display such an amount of player models onscreen, hence he usually "0wnz j00", but most likely he doesn't even know that his 32bit pc can only address about 4gigs of RAM, which would enable him to load max. 12 models into memory...)
Excuse me the stupid notes above
Oh, before I forget it - this is our new lovely normal map:

kat@Posted: Wed Feb 05, 2003 6:25 pm : hmmm, v interesing as always... I'll have to try GMax in SUBdiv mode..!
sic1@Posted: Sat Feb 08, 2003 10:05 am : Cheers BNA, you've done it again
I will have to try that too haha....
I just built a new computer... but I still think it would melt under the load of 1.2 million polys... oh my

BNA!@Posted: Sat Feb 08, 2003 12:56 pm : sic1 wrote:
Cheers BNA, you've done it again
Yes I know these damn spelling errors ...
At least my tutorials are always entertaining
And hey - send us a picture of your freshly melted pc heated up by 1.2 million polygons.
By the way, you should try to load this model into Doom
ssj3alan@Posted: Sat Feb 08, 2003 9:53 pm : Where do you apply the bumpmap after you generate it? Do you apply it to another low-poly panel model or do you apply it to a brush in DoomED?
BNA!@Posted: Sat Feb 08, 2003 10:13 pm : You can use these normalmaps to create your own materials.
No low poly target model is needed.
ssj3alan@Posted: Sun Feb 09, 2003 4:41 am : So now you just make a texture as the shape of the bumpmap and then just make that the diffuse map right.
BNA!@Posted: Sun Feb 09, 2003 8:40 am : ssj3alan wrote:
So now you just make a texture as the shape of the bumpmap and then just make that the diffuse map right.
Yes,
please read the texture creation tutorials here:
http://www.doom3world.org/phpbb2/viewtopic.php?t=482
ssj3alan@Posted: Sun Feb 09, 2003 8:41 pm : Yeah I know about the tutorial. I was just confused about why you were making the bumpmap from the geometry, I thought you make the texture first then the bumpmap but then I remembered that you only do that when you don't have a 3d program ala the Photoshop way. Thanks BNA
Dan martin@Posted: Fri Feb 14, 2003 4:58 am : Nice little tut BNA I love LIghtwave's modeling tool set I beleve as far as modeling goes nothing touches Lightwave (although Maya is getting better)
Sorry for the "newbee" question but how high would you go (poly count wise) on a mesh when you are going to use it for a normal map?. Sorry I
just gota know! It's just as D3 will be using bump/normal mapping to such a large extent that I might need a little more info on this.
Dan (the question dude)
BNA!@Posted: Fri Feb 14, 2003 7:36 am : Dan martin wrote:
Sorry for the "newbee" question but how high would you go (poly count wise) on a mesh when you are going to use it for a normal map?. Sorry I
just gota know! It's just as D3 will be using bump/normal mapping to such a large extent that I might need a little more info on this.
I'd say go as high as your pc can take it.
The finer your high poly geometry is, the less faceted is it.
You'll surely bump into some limits someday of Doom's normal map rendering tools (don't know where they are), but as long as storage / ram isn't a concern for you - ramp it up!
But be warned:
All this renderbumpflat stuff for panels renders very fast, while the renderbump process for 3D models is dog slow and can take a few hours.
Lutex@Posted: Mon Feb 24, 2003 1:38 am : HI,
nice little tutrial BNA!, but i dont get the last step. how do you get the actual normal map (the last pic in ur tut) from thew 3d model?
BNA!@Posted: Mon Feb 24, 2003 9:31 am : Lutex wrote:
HI,
nice little tutrial BNA!, but i dont get the last step. how do you get the actual normal map (the last pic in ur tut) from thew 3d model?
Thanks - read this and you're all set:
[url=http://www.doom3world.org/phpbb2/viewtopic.php?t=563]Tutorial: Renderbump flat - Part1
[/url]
Lutex@Posted: Tue Feb 25, 2003 2:13 am : ok, i get some kind of normal map when using the renderbumpflat command, but it seems my model is turned upside down or something...do i have to flip my ase model around a certain axis to be in the correct position to use this command?
also the model size (lets say 2048*1024) has to have the same proportions as the output texture (in this case for example 256*128), right?
damn, i bought max almost 2 weeks ago and now it appears to me lightwave is the better prog for doom3 modelling...or is an *.ase file as "acceptable" as *.lwo?
Lutex
mac@Posted: Tue Feb 25, 2003 5:01 am : i think the next thing on youre tutorial list should be to show how to control the subd levels to maintain different "smoothness" in different areas so people can mix smooth and "edgy" areas.. keep up youre good work bernie
BNA!@Posted: Tue Feb 25, 2003 10:28 am : Lutex wrote:
ok, i get some kind of normal map when using the renderbumpflat command, but it seems my model is turned upside down or something...do i have to flip my ase model around a certain axis to be in the correct position to use this command?
Yes, make sure the model is facing towards the negative Z axis.
Quote:
also the model size (lets say 2048*1024) has to have the same proportions as the output texture (in this case for example 256*128), right?
No, not really.
It however is recommended to model in the correct proportions.
The size of the image output is controlled by the "- size" switch in Doom.
Generally speaking I try to model in the map grid (where 1 grid unit (grid size

in Doom is 8 metres in Lightwave).
I do this just in case I want to convert any of the flat panels into UV mapped models later, or if I want to reuse parts of the geometry on high poly models.
I also keep my work separated.
One panel is always spread over many layers. When I start to put one together for rendering, I mark the corresponding layers, copy and paste them into a new object, subdivide and triple them.
This way I always keep the original object as an editable file for later use.
I can't stress modularity enough - it's so much work to put good looking things together that I like the idea of having a working library of 3D objects when I get a good idea for a new model.
Quote:
damn, i bought max almost 2 weeks ago and now it appears to me lightwave is the better prog for doom3 modelling...or is an *.ase file as "acceptable" as *.lwo?
Yes, I think .ase is just as good as .lwo
Just make sure that all points are merged and the object is properly split into triangles.
Since Lightwave comes at the price of one or two plugins for MAX, you should consider a copy of it when your bankaccount is healty again.
Lightwave licences are also transferrable, so you can make a good deal when searching e-bay (got my copy this way).
NEWTEK is in no way picky when you register an already registered copy - just send them the transferr letter via fax / email and they send you the key.
BNA!@Posted: Tue Feb 25, 2003 10:30 am : mac wrote:
i think the next thing on youre tutorial list should be to show how to control the subd levels to maintain different "smoothness" in different areas so people can mix smooth and "edgy" areas.. keep up youre good work bernie
Thanks mac!
Good suggestion - I'll take a look into that matter.
BNA!@Posted: Wed Feb 05, 2003 5:56 pm : This is a post most half way experienced 3D modelling tool users will shake their head about.
It's targeted to people new to modelling who need a high resolution model to generate a smooth bumpmap from.
Let's start with a very simple panel I made in Lightwave:
It's a box 256m * 512m beveled out a bit and with smoothed edges.
Then I did cut it into segements to maintain 3 & 4 point polygons to be able to switch to subdivision modelling mode later (tab key toggles between poly editing mode and subdivision mode)
I then beveled out the newly created segments to make the surface a bit more interesting (would you like to read a small beginner tut to see me splitting up a flat plane into two triangles?...)
My subdivsion level (set in general preferences is very high for this project: 12)
The result of the amazing 264 poly panel looks something like this:
Now I hit the magic tab key in modeller an turn on subdivision mode:
Notice any difference? Sure you do
All and everything is nicely smoothed out, while the polycount still stays at 264...
Just in case you're wondering why I did cut the model up and smoothed the edges: Turning on subdivision mode with only a cube in vew will turn it almost into a sphere. So cutting the model up will reduce the smoothing effect of 90 degrees angled surfaces by creating smaller angles to interpolate.
Just maka a cube, hit tab and go to Subdivide: faceted - you'll see what I mean (subdivide metaform will increase the effect of smoothness when freezing the subdivision model later)
So while we're talking about subdivide metaform, let's see what it does to our panel:
See the difference? No? Well there is none really, besides the fact that the polycount has quadrupled.
Why am I doing this obviously stupid move?
I'm trying to create a mesh as unoptimized as possible as a base for a normal map. The less faceted the model is, the smoother my normal map will turn out.
If you want to hand the model over to Lightwave Layout for rendering purposes you could've stopped reading after "hit tab key".
Now we'll apply subdivide metaform one more time (again without any noteable visual impact) and then, after saving the model to hdd, we attempt to run a little stress test for our cute little pc: We will freeze the smooth subdivison model to a polygon model by hitting "ctrl+d".
Depending on your cpu speed and ram, you can now either make a cup of coffe, call microsoft tech center or wait a little till the smooth mesh got subdivied to a high resolution polycount model.
Assuming everything went well, you'll see something similar like this on your screen:
See the difference?
The blueish subdivision control cage is gone, the model is still smooth and the poly count has jumped to over 600k.
Now we hit the save button again and push the "triple" button.
This will convert any polygons with more than 3 vertex points into triangles, the kind of polygon shape every gaming engine loves!
This will also eliminate any nonplanar polygons (since a triangle can't be nonplanar:) )
This again will increase your polycount to another new record like displayed below:
1.2 million polies! 100k more and you have the same resolution Epic announced during a GeforceFX event to use for their new UnrealX engine when creating normal maps for their player models.
And we waste it for only a simple panel meant to get displayed on only two triangles ingame - now does that mean we're cooler than game developers?
In a common sense of biased uneducated webforum discussions: Yes.
In any other other sense of an educated mind: No.
Keep in mind that realtime rendering is all smoke and mirrors.
By exctracting a normal map from a 3D object we simply create an illusion, the illusion of geometry nicely lit in your game engine of choice.
The only greater illusion you can create with a 3D program and capeable gaming engines is by joining the PR team to grease the hype machine...
To show you that you actually did some ressource intensive operations:
So keeping two of these models in memory will eat up nice 670megs of RAM (multiply this with 15 and you will have the amount of memory needed to play with 30 high resolution player models on screen - remember this info and use it whenever a lamer keeps claiming that the new xyz engine will display such an amount of player models onscreen, hence he usually "0wnz j00", but most likely he doesn't even know that his 32bit pc can only address about 4gigs of RAM, which would enable him to load max. 12 models into memory...)
Excuse me the stupid notes above
Oh, before I forget it - this is our new lovely normal map:
kat@Posted: Wed Feb 05, 2003 6:25 pm : hmmm, v interesing as always... I'll have to try GMax in SUBdiv mode..!
sic1@Posted: Sat Feb 08, 2003 10:05 am : Cheers BNA, you've done it again
I will have to try that too haha....
I just built a new computer... but I still think it would melt under the load of 1.2 million polys... oh my
BNA!@Posted: Sat Feb 08, 2003 12:56 pm : sic1 wrote:
Cheers BNA, you've done it again
Yes I know these damn spelling errors ...
At least my tutorials are always entertaining
And hey - send us a picture of your freshly melted pc heated up by 1.2 million polygons.
By the way, you should try to load this model into Doom
ssj3alan@Posted: Sat Feb 08, 2003 9:53 pm : Where do you apply the bumpmap after you generate it? Do you apply it to another low-poly panel model or do you apply it to a brush in DoomED?
BNA!@Posted: Sat Feb 08, 2003 10:13 pm : You can use these normalmaps to create your own materials.
No low poly target model is needed.
ssj3alan@Posted: Sun Feb 09, 2003 4:41 am : So now you just make a texture as the shape of the bumpmap and then just make that the diffuse map right.
BNA!@Posted: Sun Feb 09, 2003 8:40 am : ssj3alan wrote:
So now you just make a texture as the shape of the bumpmap and then just make that the diffuse map right.
Yes,
please read the texture creation tutorials here:
http://www.doom3world.org/phpbb2/viewtopic.php?t=482
ssj3alan@Posted: Sun Feb 09, 2003 8:41 pm : Yeah I know about the tutorial. I was just confused about why you were making the bumpmap from the geometry, I thought you make the texture first then the bumpmap but then I remembered that you only do that when you don't have a 3d program ala the Photoshop way. Thanks BNA
Dan martin@Posted: Fri Feb 14, 2003 4:58 am : Nice little tut BNA I love LIghtwave's modeling tool set I beleve as far as modeling goes nothing touches Lightwave (although Maya is getting better)
Sorry for the "newbee" question but how high would you go (poly count wise) on a mesh when you are going to use it for a normal map?. Sorry I
just gota know! It's just as D3 will be using bump/normal mapping to such a large extent that I might need a little more info on this.
Dan (the question dude)
BNA!@Posted: Fri Feb 14, 2003 7:36 am : Dan martin wrote:
Sorry for the "newbee" question but how high would you go (poly count wise) on a mesh when you are going to use it for a normal map?. Sorry I
just gota know! It's just as D3 will be using bump/normal mapping to such a large extent that I might need a little more info on this.
I'd say go as high as your pc can take it.
The finer your high poly geometry is, the less faceted is it.
You'll surely bump into some limits someday of Doom's normal map rendering tools (don't know where they are), but as long as storage / ram isn't a concern for you - ramp it up!
But be warned:
All this renderbumpflat stuff for panels renders very fast, while the renderbump process for 3D models is dog slow and can take a few hours.
Lutex@Posted: Mon Feb 24, 2003 1:38 am : HI,
nice little tutrial BNA!, but i dont get the last step. how do you get the actual normal map (the last pic in ur tut) from thew 3d model?
BNA!@Posted: Mon Feb 24, 2003 9:31 am : Lutex wrote:
HI,
nice little tutrial BNA!, but i dont get the last step. how do you get the actual normal map (the last pic in ur tut) from thew 3d model?
Thanks - read this and you're all set:
[url=http://www.doom3world.org/phpbb2/viewtopic.php?t=563]Tutorial: Renderbump flat - Part1
[/url]
Lutex@Posted: Tue Feb 25, 2003 2:13 am : ok, i get some kind of normal map when using the renderbumpflat command, but it seems my model is turned upside down or something...do i have to flip my ase model around a certain axis to be in the correct position to use this command?
also the model size (lets say 2048*1024) has to have the same proportions as the output texture (in this case for example 256*128), right?
damn, i bought max almost 2 weeks ago and now it appears to me lightwave is the better prog for doom3 modelling...or is an *.ase file as "acceptable" as *.lwo?
Lutex
mac@Posted: Tue Feb 25, 2003 5:01 am : i think the next thing on youre tutorial list should be to show how to control the subd levels to maintain different "smoothness" in different areas so people can mix smooth and "edgy" areas.. keep up youre good work bernie
BNA!@Posted: Tue Feb 25, 2003 10:28 am : Lutex wrote:
ok, i get some kind of normal map when using the renderbumpflat command, but it seems my model is turned upside down or something...do i have to flip my ase model around a certain axis to be in the correct position to use this command?
Yes, make sure the model is facing towards the negative Z axis.
Quote:
also the model size (lets say 2048*1024) has to have the same proportions as the output texture (in this case for example 256*128), right?
No, not really.
It however is recommended to model in the correct proportions.
The size of the image output is controlled by the "- size" switch in Doom.
Generally speaking I try to model in the map grid (where 1 grid unit (grid size
in Doom is 8 metres in Lightwave).
I do this just in case I want to convert any of the flat panels into UV mapped models later, or if I want to reuse parts of the geometry on high poly models.
I also keep my work separated.
One panel is always spread over many layers. When I start to put one together for rendering, I mark the corresponding layers, copy and paste them into a new object, subdivide and triple them.
This way I always keep the original object as an editable file for later use.
I can't stress modularity enough - it's so much work to put good looking things together that I like the idea of having a working library of 3D objects when I get a good idea for a new model.
Quote:
damn, i bought max almost 2 weeks ago and now it appears to me lightwave is the better prog for doom3 modelling...or is an *.ase file as "acceptable" as *.lwo?
Yes, I think .ase is just as good as .lwo
Just make sure that all points are merged and the object is properly split into triangles.
Since Lightwave comes at the price of one or two plugins for MAX, you should consider a copy of it when your bankaccount is healty again.
Lightwave licences are also transferrable, so you can make a good deal when searching e-bay (got my copy this way).
NEWTEK is in no way picky when you register an already registered copy - just send them the transferr letter via fax / email and they send you the key.
BNA!@Posted: Tue Feb 25, 2003 10:30 am : mac wrote:
i think the next thing on youre tutorial list should be to show how to control the subd levels to maintain different "smoothness" in different areas so people can mix smooth and "edgy" areas.. keep up youre good work bernie
Thanks mac!
Good suggestion - I'll take a look into that matter.
BNA!@Posted: Wed Feb 05, 2003 4:56 pm : This is a post most half way experienced 3D modelling tool users will shake their head about.
It's targeted to people new to modelling who need a high resolution model to generate a smooth bumpmap from.
Let's start with a very simple panel I made in Lightwave:
It's a box 256m * 512m beveled out a bit and with smoothed edges.
Then I did cut it into segements to maintain 3 & 4 point polygons to be able to switch to subdivision modelling mode later (tab key toggles between poly editing mode and subdivision mode)
I then beveled out the newly created segments to make the surface a bit more interesting (would you like to read a small beginner tut to see me splitting up a flat plane into two triangles?...)
My subdivsion level (set in general preferences is very high for this project: 12)
The result of the amazing 264 poly panel looks something like this:

Now I hit the magic tab key in modeller an turn on subdivision mode:

Notice any difference? Sure you do

All and everything is nicely smoothed out, while the polycount still stays at 264...
Just in case you're wondering why I did cut the model up and smoothed the edges: Turning on subdivision mode with only a cube in vew will turn it almost into a sphere. So cutting the model up will reduce the smoothing effect of 90 degrees angled surfaces by creating smaller angles to interpolate.
Just maka a cube, hit tab and go to Subdivide: faceted - you'll see what I mean (subdivide metaform will increase the effect of smoothness when freezing the subdivision model later)
So while we're talking about subdivide metaform, let's see what it does to our panel:

See the difference? No? Well there is none really, besides the fact that the polycount has quadrupled.
Why am I doing this obviously stupid move?
I'm trying to create a mesh as unoptimized as possible as a base for a normal map. The less faceted the model is, the smoother my normal map will turn out.
If you want to hand the model over to Lightwave Layout for rendering purposes you could've stopped reading after "hit tab key".
Now we'll apply subdivide metaform one more time (again without any noteable visual impact) and then, after saving the model to hdd, we attempt to run a little stress test for our cute little pc: We will freeze the smooth subdivison model to a polygon model by hitting "ctrl+d".
Depending on your cpu speed and ram, you can now either make a cup of coffe, call microsoft tech center or wait a little till the smooth mesh got subdivied to a high resolution polycount model.
Assuming everything went well, you'll see something similar like this on your screen:
See the difference?
The blueish subdivision control cage is gone, the model is still smooth and the poly count has jumped to over 600k.
Now we hit the save button again and push the "triple" button.
This will convert any polygons with more than 3 vertex points into triangles, the kind of polygon shape every gaming engine loves!
This will also eliminate any nonplanar polygons (since a triangle can't be nonplanar:) )
This again will increase your polycount to another new record like displayed below:

1.2 million polies! 100k more and you have the same resolution Epic announced during a GeforceFX event to use for their new UnrealX engine when creating normal maps for their player models.
And we waste it for only a simple panel meant to get displayed on only two triangles ingame - now does that mean we're cooler than game developers?
In a common sense of biased uneducated webforum discussions: Yes.
In any other other sense of an educated mind: No.
Keep in mind that realtime rendering is all smoke and mirrors.
By exctracting a normal map from a 3D object we simply create an illusion, the illusion of geometry nicely lit in your game engine of choice.
The only greater illusion you can create with a 3D program and capeable gaming engines is by joining the PR team to grease the hype machine...
To show you that you actually did some ressource intensive operations:

So keeping two of these models in memory will eat up nice 670megs of RAM (multiply this with 15 and you will have the amount of memory needed to play with 30 high resolution player models on screen - remember this info and use it whenever a lamer keeps claiming that the new xyz engine will display such an amount of player models onscreen, hence he usually "0wnz j00", but most likely he doesn't even know that his 32bit pc can only address about 4gigs of RAM, which would enable him to load max. 12 models into memory...)
Excuse me the stupid notes above
Oh, before I forget it - this is our new lovely normal map:

kat@Posted: Wed Feb 05, 2003 5:25 pm : hmmm, v interesing as always... I'll have to try GMax in SUBdiv mode..!
sic1@Posted: Sat Feb 08, 2003 9:05 am : Cheers BNA, you've done it again
I will have to try that too haha....
I just built a new computer... but I still think it would melt under the load of 1.2 million polys... oh my

BNA!@Posted: Sat Feb 08, 2003 11:56 am : sic1 wrote:
Cheers BNA, you've done it again
Yes I know these damn spelling errors ...
At least my tutorials are always entertaining
And hey - send us a picture of your freshly melted pc heated up by 1.2 million polygons.
By the way, you should try to load this model into Doom
ssj3alan@Posted: Sat Feb 08, 2003 8:53 pm : Where do you apply the bumpmap after you generate it? Do you apply it to another low-poly panel model or do you apply it to a brush in DoomED?
BNA!@Posted: Sat Feb 08, 2003 9:13 pm : You can use these normalmaps to create your own materials.
No low poly target model is needed.
ssj3alan@Posted: Sun Feb 09, 2003 3:41 am : So now you just make a texture as the shape of the bumpmap and then just make that the diffuse map right.
BNA!@Posted: Sun Feb 09, 2003 7:40 am : ssj3alan wrote:
So now you just make a texture as the shape of the bumpmap and then just make that the diffuse map right.
Yes,
please read the texture creation tutorials here:
http://www.doom3world.org/phpbb2/viewtopic.php?t=482
ssj3alan@Posted: Sun Feb 09, 2003 7:41 pm : Yeah I know about the tutorial. I was just confused about why you were making the bumpmap from the geometry, I thought you make the texture first then the bumpmap but then I remembered that you only do that when you don't have a 3d program ala the Photoshop way. Thanks BNA
Dan martin@Posted: Fri Feb 14, 2003 3:58 am : Nice little tut BNA I love LIghtwave's modeling tool set I beleve as far as modeling goes nothing touches Lightwave (although Maya is getting better)
Sorry for the "newbee" question but how high would you go (poly count wise) on a mesh when you are going to use it for a normal map?. Sorry I
just gota know! It's just as D3 will be using bump/normal mapping to such a large extent that I might need a little more info on this.
Dan (the question dude)
BNA!@Posted: Fri Feb 14, 2003 6:36 am : Dan martin wrote:
Sorry for the "newbee" question but how high would you go (poly count wise) on a mesh when you are going to use it for a normal map?. Sorry I
just gota know! It's just as D3 will be using bump/normal mapping to such a large extent that I might need a little more info on this.
I'd say go as high as your pc can take it.
The finer your high poly geometry is, the less faceted is it.
You'll surely bump into some limits someday of Doom's normal map rendering tools (don't know where they are), but as long as storage / ram isn't a concern for you - ramp it up!
But be warned:
All this renderbumpflat stuff for panels renders very fast, while the renderbump process for 3D models is dog slow and can take a few hours.
Lutex@Posted: Mon Feb 24, 2003 12:38 am : HI,
nice little tutrial BNA!, but i dont get the last step. how do you get the actual normal map (the last pic in ur tut) from thew 3d model?
BNA!@Posted: Mon Feb 24, 2003 8:31 am : Lutex wrote:
HI,
nice little tutrial BNA!, but i dont get the last step. how do you get the actual normal map (the last pic in ur tut) from thew 3d model?
Thanks - read this and you're all set:
[url=http://www.doom3world.org/phpbb2/viewtopic.php?t=563]Tutorial: Renderbump flat - Part1
[/url]
Lutex@Posted: Tue Feb 25, 2003 1:13 am : ok, i get some kind of normal map when using the renderbumpflat command, but it seems my model is turned upside down or something...do i have to flip my ase model around a certain axis to be in the correct position to use this command?
also the model size (lets say 2048*1024) has to have the same proportions as the output texture (in this case for example 256*128), right?
damn, i bought max almost 2 weeks ago and now it appears to me lightwave is the better prog for doom3 modelling...or is an *.ase file as "acceptable" as *.lwo?
Lutex
mac@Posted: Tue Feb 25, 2003 4:01 am : i think the next thing on youre tutorial list should be to show how to control the subd levels to maintain different "smoothness" in different areas so people can mix smooth and "edgy" areas.. keep up youre good work bernie
BNA!@Posted: Tue Feb 25, 2003 9:28 am : Lutex wrote:
ok, i get some kind of normal map when using the renderbumpflat command, but it seems my model is turned upside down or something...do i have to flip my ase model around a certain axis to be in the correct position to use this command?
Yes, make sure the model is facing towards the negative Z axis.
Quote:
also the model size (lets say 2048*1024) has to have the same proportions as the output texture (in this case for example 256*128), right?
No, not really.
It however is recommended to model in the correct proportions.
The size of the image output is controlled by the "- size" switch in Doom.
Generally speaking I try to model in the map grid (where 1 grid unit (grid size

in Doom is 8 metres in Lightwave).
I do this just in case I want to convert any of the flat panels into UV mapped models later, or if I want to reuse parts of the geometry on high poly models.
I also keep my work separated.
One panel is always spread over many layers. When I start to put one together for rendering, I mark the corresponding layers, copy and paste them into a new object, subdivide and triple them.
This way I always keep the original object as an editable file for later use.
I can't stress modularity enough - it's so much work to put good looking things together that I like the idea of having a working library of 3D objects when I get a good idea for a new model.
Quote:
damn, i bought max almost 2 weeks ago and now it appears to me lightwave is the better prog for doom3 modelling...or is an *.ase file as "acceptable" as *.lwo?
Yes, I think .ase is just as good as .lwo
Just make sure that all points are merged and the object is properly split into triangles.
Since Lightwave comes at the price of one or two plugins for MAX, you should consider a copy of it when your bankaccount is healty again.
Lightwave licences are also transferrable, so you can make a good deal when searching e-bay (got my copy this way).
NEWTEK is in no way picky when you register an already registered copy - just send them the transferr letter via fax / email and they send you the key.
BNA!@Posted: Tue Feb 25, 2003 9:30 am : mac wrote:
i think the next thing on youre tutorial list should be to show how to control the subd levels to maintain different "smoothness" in different areas so people can mix smooth and "edgy" areas.. keep up youre good work bernie
Thanks mac!
Good suggestion - I'll take a look into that matter.
BNA!@Posted: Wed Feb 05, 2003 4:56 pm : This is a post most half way experienced 3D modelling tool users will shake their head about.
It's targeted to people new to modelling who need a high resolution model to generate a smooth bumpmap from.
Let's start with a very simple panel I made in Lightwave:
It's a box 256m * 512m beveled out a bit and with smoothed edges.
Then I did cut it into segements to maintain 3 & 4 point polygons to be able to switch to subdivision modelling mode later (tab key toggles between poly editing mode and subdivision mode)
I then beveled out the newly created segments to make the surface a bit more interesting (would you like to read a small beginner tut to see me splitting up a flat plane into two triangles?...)
My subdivsion level (set in general preferences is very high for this project: 12)
The result of the amazing 264 poly panel looks something like this:
Now I hit the magic tab key in modeller an turn on subdivision mode:
Notice any difference? Sure you do

All and everything is nicely smoothed out, while the polycount still stays at 264...
Just in case you're wondering why I did cut the model up and smoothed the edges: Turning on subdivision mode with only a cube in vew will turn it almost into a sphere. So cutting the model up will reduce the smoothing effect of 90 degrees angled surfaces by creating smaller angles to interpolate.
Just maka a cube, hit tab and go to Subdivide: faceted - you'll see what I mean (subdivide metaform will increase the effect of smoothness when freezing the subdivision model later)
So while we're talking about subdivide metaform, let's see what it does to our panel:
See the difference? No? Well there is none really, besides the fact that the polycount has quadrupled.
Why am I doing this obviously stupid move?
I'm trying to create a mesh as unoptimized as possible as a base for a normal map. The less faceted the model is, the smoother my normal map will turn out.
If you want to hand the model over to Lightwave Layout for rendering purposes you could've stopped reading after "hit tab key".
Now we'll apply subdivide metaform one more time (again without any noteable visual impact) and then, after saving the model to hdd, we attempt to run a little stress test for our cute little pc: We will freeze the smooth subdivison model to a polygon model by hitting "ctrl+d".
Depending on your cpu speed and ram, you can now either make a cup of coffe, call microsoft tech center or wait a little till the smooth mesh got subdivied to a high resolution polycount model.
Assuming everything went well, you'll see something similar like this on your screen:
See the difference?
The blueish subdivision control cage is gone, the model is still smooth and the poly count has jumped to over 600k.
Now we hit the save button again and push the "triple" button.
This will convert any polygons with more than 3 vertex points into triangles, the kind of polygon shape every gaming engine loves!
This will also eliminate any nonplanar polygons (since a triangle can't be nonplanar:) )
This again will increase your polycount to another new record like displayed below:
1.2 million polies! 100k more and you have the same resolution Epic announced during a GeforceFX event to use for their new UnrealX engine when creating normal maps for their player models.
And we waste it for only a simple panel meant to get displayed on only two triangles ingame - now does that mean we're cooler than game developers?
In a common sense of biased uneducated webforum discussions: Yes.
In any other other sense of an educated mind: No.
Keep in mind that realtime rendering is all smoke and mirrors.
By exctracting a normal map from a 3D object we simply create an illusion, the illusion of geometry nicely lit in your game engine of choice.
The only greater illusion you can create with a 3D program and capeable gaming engines is by joining the PR team to grease the hype machine...
To show you that you actually did some ressource intensive operations:
So keeping two of these models in memory will eat up nice 670megs of RAM (multiply this with 15 and you will have the amount of memory needed to play with 30 high resolution player models on screen - remember this info and use it whenever a lamer keeps claiming that the new xyz engine will display such an amount of player models onscreen, hence he usually "0wnz j00", but most likely he doesn't even know that his 32bit pc can only address about 4gigs of RAM, which would enable him to load max. 12 models into memory...)
Excuse me the stupid notes above
Oh, before I forget it - this is our new lovely normal map:
kat@Posted: Wed Feb 05, 2003 5:25 pm : hmmm, v interesing as always... I'll have to try GMax in SUBdiv mode..!
sic1@Posted: Sat Feb 08, 2003 9:05 am : Cheers BNA, you've done it again
I will have to try that too haha....
I just built a new computer... but I still think it would melt under the load of 1.2 million polys... oh my

BNA!@Posted: Sat Feb 08, 2003 11:56 am : sic1 wrote:
Cheers BNA, you've done it again
Yes I know these damn spelling errors ...
At least my tutorials are always entertaining
And hey - send us a picture of your freshly melted pc heated up by 1.2 million polygons.
By the way, you should try to load this model into Doom
ssj3alan@Posted: Sat Feb 08, 2003 8:53 pm : Where do you apply the bumpmap after you generate it? Do you apply it to another low-poly panel model or do you apply it to a brush in DoomED?
BNA!@Posted: Sat Feb 08, 2003 9:13 pm : You can use these normalmaps to create your own materials.
No low poly target model is needed.
ssj3alan@Posted: Sun Feb 09, 2003 3:41 am : So now you just make a texture as the shape of the bumpmap and then just make that the diffuse map right.
BNA!@Posted: Sun Feb 09, 2003 7:40 am : ssj3alan wrote:
So now you just make a texture as the shape of the bumpmap and then just make that the diffuse map right.
Yes,
please read the texture creation tutorials here:
http://www.doom3world.org/phpbb2/viewtopic.php?t=482
ssj3alan@Posted: Sun Feb 09, 2003 7:41 pm : Yeah I know about the tutorial. I was just confused about why you were making the bumpmap from the geometry, I thought you make the texture first then the bumpmap but then I remembered that you only do that when you don't have a 3d program ala the Photoshop way. Thanks BNA
Dan martin@Posted: Fri Feb 14, 2003 3:58 am : Nice little tut BNA I love LIghtwave's modeling tool set I beleve as far as modeling goes nothing touches Lightwave (although Maya is getting better)
Sorry for the "newbee" question but how high would you go (poly count wise) on a mesh when you are going to use it for a normal map?. Sorry I
just gota know! It's just as D3 will be using bump/normal mapping to such a large extent that I might need a little more info on this.
Dan (the question dude)
BNA!@Posted: Fri Feb 14, 2003 6:36 am : Dan martin wrote:
Sorry for the "newbee" question but how high would you go (poly count wise) on a mesh when you are going to use it for a normal map?. Sorry I
just gota know! It's just as D3 will be using bump/normal mapping to such a large extent that I might need a little more info on this.
I'd say go as high as your pc can take it.
The finer your high poly geometry is, the less faceted is it.
You'll surely bump into some limits someday of Doom's normal map rendering tools (don't know where they are), but as long as storage / ram isn't a concern for you - ramp it up!
But be warned:
All this renderbumpflat stuff for panels renders very fast, while the renderbump process for 3D models is dog slow and can take a few hours.
Lutex@Posted: Mon Feb 24, 2003 12:38 am : HI,
nice little tutrial BNA!, but i dont get the last step. how do you get the actual normal map (the last pic in ur tut) from thew 3d model?
BNA!@Posted: Mon Feb 24, 2003 8:31 am : Lutex wrote:
HI,
nice little tutrial BNA!, but i dont get the last step. how do you get the actual normal map (the last pic in ur tut) from thew 3d model?
Thanks - read this and you're all set:
[url=http://www.doom3world.org/phpbb2/viewtopic.php?t=563]Tutorial: Renderbump flat - Part1
[/url]
Lutex@Posted: Tue Feb 25, 2003 1:13 am : ok, i get some kind of normal map when using the renderbumpflat command, but it seems my model is turned upside down or something...do i have to flip my ase model around a certain axis to be in the correct position to use this command?
also the model size (lets say 2048*1024) has to have the same proportions as the output texture (in this case for example 256*128), right?
damn, i bought max almost 2 weeks ago and now it appears to me lightwave is the better prog for doom3 modelling...or is an *.ase file as "acceptable" as *.lwo?
Lutex
mac@Posted: Tue Feb 25, 2003 4:01 am : i think the next thing on youre tutorial list should be to show how to control the subd levels to maintain different "smoothness" in different areas so people can mix smooth and "edgy" areas.. keep up youre good work bernie
BNA!@Posted: Tue Feb 25, 2003 9:28 am : Lutex wrote:
ok, i get some kind of normal map when using the renderbumpflat command, but it seems my model is turned upside down or something...do i have to flip my ase model around a certain axis to be in the correct position to use this command?
Yes, make sure the model is facing towards the negative Z axis.
Quote:
also the model size (lets say 2048*1024) has to have the same proportions as the output texture (in this case for example 256*128), right?
No, not really.
It however is recommended to model in the correct proportions.
The size of the image output is controlled by the "- size" switch in Doom.
Generally speaking I try to model in the map grid (where 1 grid unit (grid size

in Doom is 8 metres in Lightwave).
I do this just in case I want to convert any of the flat panels into UV mapped models later, or if I want to reuse parts of the geometry on high poly models.
I also keep my work separated.
One panel is always spread over many layers. When I start to put one together for rendering, I mark the corresponding layers, copy and paste them into a new object, subdivide and triple them.
This way I always keep the original object as an editable file for later use.
I can't stress modularity enough - it's so much work to put good looking things together that I like the idea of having a working library of 3D objects when I get a good idea for a new model.
Quote:
damn, i bought max almost 2 weeks ago and now it appears to me lightwave is the better prog for doom3 modelling...or is an *.ase file as "acceptable" as *.lwo?
Yes, I think .ase is just as good as .lwo
Just make sure that all points are merged and the object is properly split into triangles.
Since Lightwave comes at the price of one or two plugins for MAX, you should consider a copy of it when your bankaccount is healty again.
Lightwave licences are also transferrable, so you can make a good deal when searching e-bay (got my copy this way).
NEWTEK is in no way picky when you register an already registered copy - just send them the transferr letter via fax / email and they send you the key.
BNA!@Posted: Tue Feb 25, 2003 9:30 am : mac wrote:
i think the next thing on youre tutorial list should be to show how to control the subd levels to maintain different "smoothness" in different areas so people can mix smooth and "edgy" areas.. keep up youre good work bernie
Thanks mac!
Good suggestion - I'll take a look into that matter.
BNA!@Posted: Wed Feb 05, 2003 4:56 pm : This is a post most half way experienced 3D modelling tool users will shake their head about.
It's targeted to people new to modelling who need a high resolution model to generate a smooth bumpmap from.
Let's start with a very simple panel I made in Lightwave:
It's a box 256m * 512m beveled out a bit and with smoothed edges.
Then I did cut it into segements to maintain 3 & 4 point polygons to be able to switch to subdivision modelling mode later (tab key toggles between poly editing mode and subdivision mode)
I then beveled out the newly created segments to make the surface a bit more interesting (would you like to read a small beginner tut to see me splitting up a flat plane into two triangles?...)
My subdivsion level (set in general preferences is very high for this project: 12)
The result of the amazing 264 poly panel looks something like this:
Now I hit the magic tab key in modeller an turn on subdivision mode:
Notice any difference? Sure you do
All and everything is nicely smoothed out, while the polycount still stays at 264...
Just in case you're wondering why I did cut the model up and smoothed the edges: Turning on subdivision mode with only a cube in vew will turn it almost into a sphere. So cutting the model up will reduce the smoothing effect of 90 degrees angled surfaces by creating smaller angles to interpolate.
Just maka a cube, hit tab and go to Subdivide: faceted - you'll see what I mean (subdivide metaform will increase the effect of smoothness when freezing the subdivision model later)
So while we're talking about subdivide metaform, let's see what it does to our panel:
See the difference? No? Well there is none really, besides the fact that the polycount has quadrupled.
Why am I doing this obviously stupid move?
I'm trying to create a mesh as unoptimized as possible as a base for a normal map. The less faceted the model is, the smoother my normal map will turn out.
If you want to hand the model over to Lightwave Layout for rendering purposes you could've stopped reading after "hit tab key".
Now we'll apply subdivide metaform one more time (again without any noteable visual impact) and then, after saving the model to hdd, we attempt to run a little stress test for our cute little pc: We will freeze the smooth subdivison model to a polygon model by hitting "ctrl+d".
Depending on your cpu speed and ram, you can now either make a cup of coffe, call microsoft tech center or wait a little till the smooth mesh got subdivied to a high resolution polycount model.
Assuming everything went well, you'll see something similar like this on your screen:
See the difference?
The blueish subdivision control cage is gone, the model is still smooth and the poly count has jumped to over 600k.
Now we hit the save button again and push the "triple" button.
This will convert any polygons with more than 3 vertex points into triangles, the kind of polygon shape every gaming engine loves!
This will also eliminate any nonplanar polygons (since a triangle can't be nonplanar:) )
This again will increase your polycount to another new record like displayed below:
1.2 million polies! 100k more and you have the same resolution Epic announced during a GeforceFX event to use for their new UnrealX engine when creating normal maps for their player models.
And we waste it for only a simple panel meant to get displayed on only two triangles ingame - now does that mean we're cooler than game developers?
In a common sense of biased uneducated webforum discussions: Yes.
In any other other sense of an educated mind: No.
Keep in mind that realtime rendering is all smoke and mirrors.
By exctracting a normal map from a 3D object we simply create an illusion, the illusion of geometry nicely lit in your game engine of choice.
The only greater illusion you can create with a 3D program and capeable gaming engines is by joining the PR team to grease the hype machine...
To show you that you actually did some ressource intensive operations:
So keeping two of these models in memory will eat up nice 670megs of RAM (multiply this with 15 and you will have the amount of memory needed to play with 30 high resolution player models on screen - remember this info and use it whenever a lamer keeps claiming that the new xyz engine will display such an amount of player models onscreen, hence he usually "0wnz j00", but most likely he doesn't even know that his 32bit pc can only address about 4gigs of RAM, which would enable him to load max. 12 models into memory...)
Excuse me the stupid notes above
Oh, before I forget it - this is our new lovely normal map:
kat@Posted: Wed Feb 05, 2003 5:25 pm : hmmm, v interesing as always... I'll have to try GMax in SUBdiv mode..!
sic1@Posted: Sat Feb 08, 2003 9:05 am : Cheers BNA, you've done it again
I will have to try that too haha....
I just built a new computer... but I still think it would melt under the load of 1.2 million polys... oh my
BNA!@Posted: Sat Feb 08, 2003 11:56 am : sic1 wrote:
Cheers BNA, you've done it again
Yes I know these damn spelling errors ...
At least my tutorials are always entertaining
And hey - send us a picture of your freshly melted pc heated up by 1.2 million polygons.
By the way, you should try to load this model into Doom
ssj3alan@Posted: Sat Feb 08, 2003 8:53 pm : Where do you apply the bumpmap after you generate it? Do you apply it to another low-poly panel model or do you apply it to a brush in DoomED?
BNA!@Posted: Sat Feb 08, 2003 9:13 pm : You can use these normalmaps to create your own materials.
No low poly target model is needed.
ssj3alan@Posted: Sun Feb 09, 2003 3:41 am : So now you just make a texture as the shape of the bumpmap and then just make that the diffuse map right.
BNA!@Posted: Sun Feb 09, 2003 7:40 am : ssj3alan wrote:
So now you just make a texture as the shape of the bumpmap and then just make that the diffuse map right.
Yes,
please read the texture creation tutorials here:
http://www.doom3world.org/phpbb2/viewtopic.php?t=482
ssj3alan@Posted: Sun Feb 09, 2003 7:41 pm : Yeah I know about the tutorial. I was just confused about why you were making the bumpmap from the geometry, I thought you make the texture first then the bumpmap but then I remembered that you only do that when you don't have a 3d program ala the Photoshop way. Thanks BNA
Dan martin@Posted: Fri Feb 14, 2003 3:58 am : Nice little tut BNA I love LIghtwave's modeling tool set I beleve as far as modeling goes nothing touches Lightwave (although Maya is getting better)
Sorry for the "newbee" question but how high would you go (poly count wise) on a mesh when you are going to use it for a normal map?. Sorry I
just gota know! It's just as D3 will be using bump/normal mapping to such a large extent that I might need a little more info on this.
Dan (the question dude)
BNA!@Posted: Fri Feb 14, 2003 6:36 am : Dan martin wrote:
Sorry for the "newbee" question but how high would you go (poly count wise) on a mesh when you are going to use it for a normal map?. Sorry I
just gota know! It's just as D3 will be using bump/normal mapping to such a large extent that I might need a little more info on this.
I'd say go as high as your pc can take it.
The finer your high poly geometry is, the less faceted is it.
You'll surely bump into some limits someday of Doom's normal map rendering tools (don't know where they are), but as long as storage / ram isn't a concern for you - ramp it up!
But be warned:
All this renderbumpflat stuff for panels renders very fast, while the renderbump process for 3D models is dog slow and can take a few hours.
Lutex@Posted: Mon Feb 24, 2003 12:38 am : HI,
nice little tutrial BNA!, but i dont get the last step. how do you get the actual normal map (the last pic in ur tut) from thew 3d model?
BNA!@Posted: Mon Feb 24, 2003 8:31 am : Lutex wrote:
HI,
nice little tutrial BNA!, but i dont get the last step. how do you get the actual normal map (the last pic in ur tut) from thew 3d model?
Thanks - read this and you're all set:
[url=http://www.doom3world.org/phpbb2/viewtopic.php?t=563]Tutorial: Renderbump flat - Part1
[/url]
Lutex@Posted: Tue Feb 25, 2003 1:13 am : ok, i get some kind of normal map when using the renderbumpflat command, but it seems my model is turned upside down or something...do i have to flip my ase model around a certain axis to be in the correct position to use this command?
also the model size (lets say 2048*1024) has to have the same proportions as the output texture (in this case for example 256*128), right?
damn, i bought max almost 2 weeks ago and now it appears to me lightwave is the better prog for doom3 modelling...or is an *.ase file as "acceptable" as *.lwo?
Lutex
mac@Posted: Tue Feb 25, 2003 4:01 am : i think the next thing on youre tutorial list should be to show how to control the subd levels to maintain different "smoothness" in different areas so people can mix smooth and "edgy" areas.. keep up youre good work bernie
BNA!@Posted: Tue Feb 25, 2003 9:28 am : Lutex wrote:
ok, i get some kind of normal map when using the renderbumpflat command, but it seems my model is turned upside down or something...do i have to flip my ase model around a certain axis to be in the correct position to use this command?
Yes, make sure the model is facing towards the negative Z axis.
Quote:
also the model size (lets say 2048*1024) has to have the same proportions as the output texture (in this case for example 256*128), right?
No, not really.
It however is recommended to model in the correct proportions.
The size of the image output is controlled by the "- size" switch in Doom.
Generally speaking I try to model in the map grid (where 1 grid unit (grid size
in Doom is 8 metres in Lightwave).
I do this just in case I want to convert any of the flat panels into UV mapped models later, or if I want to reuse parts of the geometry on high poly models.
I also keep my work separated.
One panel is always spread over many layers. When I start to put one together for rendering, I mark the corresponding layers, copy and paste them into a new object, subdivide and triple them.
This way I always keep the original object as an editable file for later use.
I can't stress modularity enough - it's so much work to put good looking things together that I like the idea of having a working library of 3D objects when I get a good idea for a new model.
Quote:
damn, i bought max almost 2 weeks ago and now it appears to me lightwave is the better prog for doom3 modelling...or is an *.ase file as "acceptable" as *.lwo?
Yes, I think .ase is just as good as .lwo
Just make sure that all points are merged and the object is properly split into triangles.
Since Lightwave comes at the price of one or two plugins for MAX, you should consider a copy of it when your bankaccount is healty again.
Lightwave licences are also transferrable, so you can make a good deal when searching e-bay (got my copy this way).
NEWTEK is in no way picky when you register an already registered copy - just send them the transferr letter via fax / email and they send you the key.
BNA!@Posted: Tue Feb 25, 2003 9:30 am : mac wrote:
i think the next thing on youre tutorial list should be to show how to control the subd levels to maintain different "smoothness" in different areas so people can mix smooth and "edgy" areas.. keep up youre good work bernie
Thanks mac!
Good suggestion - I'll take a look into that matter.


 Staff - The world is yours, soon in 6 degrees of freedom!


 Staff - The world is yours, soon in 6 degrees of freedom!