This is a Follow-up on KolosoK's tutorial,
Projected Lights (With screenshots!) which you can find here :-
http://www.doom3world.org/phpbb2/viewtopic.php?t=6306
Projected Lights, Part II - Custom Lights
Here's a very quick rundown for a custom standard non-animated projected light texture. Please note, this is just one method of creating a projected light texture.
1. In photoshop, start a new document with a white background :-

In this case, I've created a 256x256 pixel doc.
2. From the Filters menu, select
Render -> Lighting Effects
You'll be presented with something like this :-

I'm not going to go into the details here - just fiddle around till you get something your happy with. This can take some time depending what you want - remember, this is also just one way of making textures for Doom3 light fx (it just happens to be pretty easy)
I've ended up with this :-

3. In your Doom3 base folder, create a folder called lights if it doesn't exist. Inside this folder, create a custom subfolder where you'll be saving your light textures. This is to ensure that you don't bork up the native Doom3 files when you release your map. It should be noted that there are other ways to do this - you can create an entire custom base folder and create a structure within that for storing your files, but I'm not going into that here.
In my case, I've created a folder
base/lights/bbd3dm1
Save your light texture as a 32 bit TGA file into your custom folder.
4. Now we need to create a material entry in a custom material file for our light, otherwise it won't show up in our Light Editor Texture menu.
I've culled some existing id code here for the most basic of projected lights, here it is :-
Code:
lights/triangle1
{
{
forceHighQuality
map lights/triangle1.tga
colored
zeroClamp
}
}
I'm not going into details as to what everything does, suffice to say, it'll work, but we need to edit that code and put it into our own material file.
Mine will end up looking like this :-
Code:
lights/bbd3dm1/bb_light1
{
{
forceHighQuality
map lights/bbd3dm1/bb_light1.tga
colored
zeroClamp
}
}
I'm going to save it in my already existing material file, bbd3dm1.mtr
Your material file should be placed into the base/materials folder.
Now we go into DoomEdit and check to see that our light appears !
I've opened a test level, created a light and gone into the Light Editor (Hit J on the keyboard) - I can see my new light texture in there :-

I can see it works when I render the view - here's a shot rendered with the 2D view visible :-

If you look through the id light texture TGA files, you'll see that your limited only by your imagination, take that one step further and look at the materials.mtr file and you enter a whole new dimension of possibilities - you can rotate, fade, change colours, scroll - the list goes on.
As usual, with Doom3, as of this date, the possibilities of just projected lights haven't been fully discovered.
Just for a bit of fun, here's the d3w.org logo, greyscaled and projected as a light :-
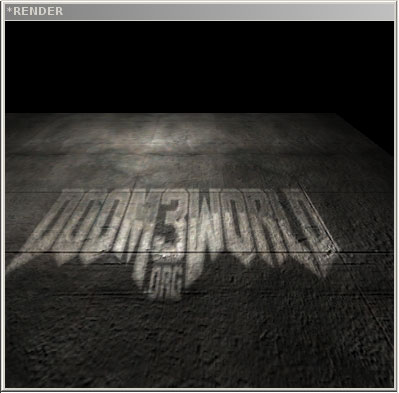
Basically, you can project any texture.
Rule of thumb, make sure that the background colour is black (RGB 0 0 0) - any other colour will show up as part of the projection.
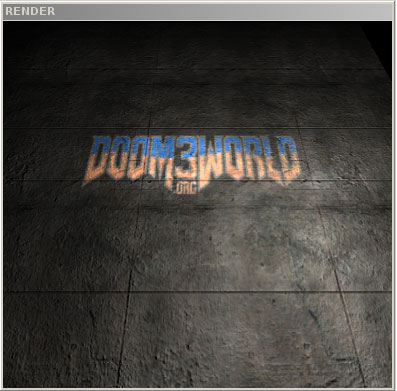
Here's a colour version of the above :-
thats pretty sweet, ive followed your tut and i cant seem to work, think i have to create the texture? like your doom3world? you type that in your new doc then filter lighting? (thats what i did) or do you have to make a seperate texture for that? I like that and would be perfect for my level im messin with.
QuiXilver wrote:
thats pretty sweet, ive followed your tut and i cant seem to work, think i have to create the texture? like your doom3world? you type that in your new doc then filter lighting? (thats what i did) or do you have to make a seperate texture for that? I like that and would be perfect for my level im messin with.
Yes, if you want custom projected lights, you create a custom texture.
The doom3world.org projected light is a 256x64 TGA file I made up - I just saved the logo at the top of the forum here ^ changed the canvas size and greyscaled.
So, here we go :-
1. Create your texture and save it to a custom folder in the base/lights folder
2. In a custom .mtr file, add in your code as I did above
3. Fire up DoomEdit, create a light, make it a projected light and give it your new texture.
It should be noted that the exact same conventions apply to creating custom textures, the only difference here is that you save your light texture in the lights folder as opposed to the textures folder.
I'm trying to keep this purposefully simple as there are so many variables that are beyond the scope of this tutorial.
If your light isn't showing up correctly, check all your paths and syntax of your code - it has to be exact.
Here's my code again with the custom bits indicated in red :-
lights/bbd3dm1/bb_light1
{
{
forceHighQuality
map lights/bbd3dm1/bb_light1.tga
colored
zeroClamp
}
}
So for a basic light, those are the only bits you need to change and they depend upon the custom folder you create in the lights folder and your texture name.
The first line of code
lights/bbd3dm1/bb_light1 can actually be a different name to your texture file if you want it to be. I could have
lights/bbd3dm1/bb_dw3logo and that's what name would appear in the light editor texture menu.
You can use any TGA texture you want for projected lights, it should be noted that the darker the colours, the less "light" will be shown. Black is not visible at all, so it's useful as a mask.
Take a look through the textures/lights folder at the tga files and also look at lights.mtr and fogs.mtr in the materials folder just to get an idea of what's possible.
Anyway, my colour doom3world.org projected logo is inverted

- heh - I was working quick and didn't want to fiddle around masking off areas to make them black, so I just inverted in photoshop and fiddled with filters.

I haven't messed with projected textures much - I hope you can use different blend modes? Being able to darken the scene with a GL_DST_COLOR GL_ZERO blend and a custom map would be very useful.
yeah - those are some things I want to look into as well - the material format is the same as textures, with some additional entries, so I guess you could experiment to see if blend functions will work.
Quote:
Being able to darken the scene...
you can with one of the light types/shaders, i think it was called 'filter'? it's at the top of the list with others like 'ambient' and 'glare'
im at work so i cant look for myself, but how was is done in the material file?
Quote:
you can with one of the light types/shaders, i think it was called 'filter'? it's at the top of the list with others like 'ambient' and 'glare'
Oh, that would be the blend mode I mentioned above. GL_DST_COLOR GL_ZERO is blend filter (ie multiply or burn), which is presumably what that light is using. I'll tkae a look at that light shader and see if there's any wierd syntax.
Code:
fogs/filter
{
blendLight
noShadows
lightFalloffImage lights/squarelight1a
{
blend GL_ZERO, GL_ONE_MINUS_SRC_COLOR // get dimmer as the textures get brighter
map lights/squarelight1
zeroclamp // make sure it doesn't bleed over the edges
colored // take rgba from entity shaderparms
}
}
Seems to work

It's commented also
bb_matt wrote:
QuiXilver wrote:
thats pretty sweet, ive followed your tut and i cant seem to work, think i have to create the texture? like your doom3world? you type that in your new doc then filter lighting? (thats what i did) or do you have to make a seperate texture for that? I like that and would be perfect for my level im messin with.
Yes, if you want custom projected lights, you create a custom texture.
The doom3world.org projected light is a 256x64 TGA file I made up - I just saved the logo at the top of the forum here ^ changed the canvas size and greyscaled.
So, here we go :-
1. Create your texture and save it to a custom folder in the base/lights folder
2. In a custom .mtr file, add in your code as I did above
3. Fire up DoomEdit, create a light, make it a projected light and give it your new texture.
It should be noted that the exact same conventions apply to creating custom textures, the only difference here is that you save your light texture in the lights folder as opposed to the textures folder.
I'm trying to keep this purposefully simple as there are so many variables that are beyond the scope of this tutorial.
If your light isn't showing up correctly, check all your paths and syntax of your code - it has to be exact.
Here's my code again with the custom bits indicated in red :-
lights/bbd3dm1/bb_light1
{
{
forceHighQuality
map lights/bbd3dm1/bb_light1.tga
colored
zeroClamp
}
} So for a basic light, those are the only bits you need to change and they depend upon the custom folder you create in the lights folder and your texture name.
The first line of code
lights/bbd3dm1/bb_light1 can actually be a different name to your texture file if you want it to be. I could have
lights/bbd3dm1/bb_dw3logo and that's what name would appear in the light editor texture menu.
You can use any TGA texture you want for projected lights, it should be noted that the darker the colours, the less "light" will be shown. Black is not visible at all, so it's useful as a mask.
Take a look through the textures/lights folder at the tga files and also look at lights.mtr and fogs.mtr in the materials folder just to get an idea of what's possible.
Anyway, my colour doom3world.org projected logo is inverted
- heh - I was working quick and didn't want to fiddle around masking off areas to make them black, so I just inverted in photoshop and fiddled with filters.
sweet thnx! when i get everything done (which will take a newbie like myself a while, but it will be worth it) ill post a screenie in the pimp area
show ya how well this works for my first map im makin.
sweet got that workin great and wanna look around the mtr files for stuff todo with the text, but im curious how did you add the color for the text? after i make the text in ps i greyscale and invert and i loose my color.
Im sorry if im pesting and if this should be in the texture thread, I did make a request for a tut but nothing yet and id really like to get this part down. thnx