Patch
A patch or patch mesh is a procedural surface defined by a number of control points which can be manipulated in three dimensions to form a multitude of simple or complex shapes. Curved patches are used to build pillars, domes, vaults, pipes, railings, columns or bevels, whilst more simple flat patches are used to apply decals.
Patches have two important properties when compared with brushes.
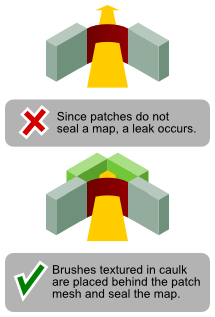
- Patches cannot be used to seal the void. If a patch is used on a wall, ceiling or floor, a brush with the caulk texture must be placed behind it to prevent leaks.
- Patches can only be viewed from one direction (unless the twoSided keyword is active in the material), so it is necessary to ensure they are placed the correct way round (inverting them if necessary with Ctrl-I ).
Creating a simple patch
A simple patch mesh is a basic rectangular patch with no initial curvature, and a user-selectable number of control points. Simple patch meshes can be used as-is to apply decals , or modified through vertex editing to produce common architectural shapes such as arched doorways and roofs.
- Select the appropriate view with Ctrl-Tab . The patch will be created facing the viewport, so if the patch is supposed to lie flat on the ground, make sure you create it in Top view.
- Click and drag to draw a brush. This will become the boundary of the patch (since patches are infinitely thin you do not need to worry about the third dimension of the brush).
- From the Patch menu choose Simple Patch Mesh…
- Select the desired number of control points (minimum 3) in each dimension, and click OK to create the patch.
Adjusting the control points
Select a patch and press V to enter vertex editing mode. In this mode you can move any or all of the control points in three dimensions to control the shape and curvature of the patch. You can select more than one control point by dragging a box around them with the mouse (unlike with brush vertex editing), or by shift-clicking on a control point which alternately selects the whole row or column.
Subdividing patches
Missing image: /w/images/8/8c/Patch_subdivision_sized.png Subdividing a patch
Subdividing a patch
As with all surfaces, patches must be converted to flat triangles before being rendered by the graphics card. Although this is performed automatically by Doom 3, the default number of triangles used is quite high. In many cases it is advisable to reduce the number of polygons used through the subdivide patch functionality.
- Select a patch with Shift-LMB
- Hit S to bring up the Surface Inspector.
- Enable the Subdivide patch checkbox, and use the sliders to choose the number of divisions to make in each direction.
As subdivided patches are still smooth shaded, it is often possible to subdivide them into 3 or 4 sections without losing visual quality. Subdivided patches can also exhibit less texture distortion than non-divided ones.
Thickening patches
A newly-created patch is infinitely thin. For architectural detail such as arches or beams, a patch needs to be made into a three-dimensional object which can be viewed from all directions. The thicken tool is used for this purpose.
Missing image: /w/images/8/84/Thickpatch.jpg Screenshots of a patch being thickened.
Screenshots of a patch being thickened.
- Create the first patch which will define the shape of the object. For an archway or curved beam, this might be the front face of the shape.
- With the patch selected, choose Thicken… from the Patch menu.
- Enter the distance in editor units that the patch should be extruded, and choose whether or not to create “Seams”. If seams are not created, only the front and back patches will be generated, otherwise a complete extrusion (front, back and side faces) will be performed.
- Choose OK to create the thickened patch
The thickened object is a func_static grouping of patches, that can be selected and manipulated as a single object. Individual patches within the object can be selected by cycling through them with the TAB key.