RBDoom3BFG Blender/GLTF2 Mapping Tutorial
- 1. ENGINE AND FOLDERS SETUP
- 2. BLENDER SET-UP
- 3. BASIC DOOM 3 ENTITIES KNOWLEDGE
- 4. BLENDER/GLTF FILE STRUCTURE
- 5. MINIMUM REQUIRED ENTITIES FOR A MAP
- 6. TEXTURES / MATERIALS
- 7. MAKING A MORE COMPLEX MAP AND USING VISPORTAL
- 8.WORLDSPAWN VS FUNC_STATIC
- 9. MOVABLES AND ENTITY ORIGINS
- 10. TRIGGERS
- 11. DEBUG OPTIONS
- 12. CONCLUSION
(Windows guide, I hope it helps also with Also OSs)
Note: Blender v3.x is used to create the GLTF2 file that the engine will use to load maps and models. Earlier versions of blender will not work since the GLTF exporter has changed/improved over time. Binary (.glb) and Ascii (.gltf) files are both supported. Other programs that can export to an GLTF2 file should work too, but have not been tested. IF you want to use another program, read this document carefully and make sure the other program allows for similar GLTF export options.
1. ENGINE AND FOLDERS SETUP
You should set up your game and it's folders as described on the Github page or Takeshi's tutorial :
https://github.com/RobertBeckebans/RBDOOM-3-BFG
Summary
- Create an empty RBDoom3BFG folder
- Copy All the game files from your steam or GOG Doom 3 : BFG Edition folder to your new folder
- Download the complete 1,3,0 package
- Extract to your RBDoom3BFG folder – Overwrite everything that is asks for
- Dowload the latest binaries from the #rbdoom3bfg lobby in the IdTech4 Discord Server ( https://discord.gg/53fBFBMS)
- Extract to your RBDoom3BFG folder – Overwrite everything that is asks for
- For convenience :
- Launch RBDoom3BFG.exe.
- Get into windowed mode
- Check if your key bindings are good
- type "bind g screenshot" in the console to have a convenient screehshot shortcut (the screenshots are stored in base/screenshots/ )
2. BLENDER SET-UP
- Download and install Blender – I use the latest version, 3.3. I haven't tested the workflow with earlier versions)
- Run Blender, Go to perferences → Add-ons
- search for ".gltf" in the search bar, the "Import-Export: glTF 2.0 format", activate it if it's not turned on.
- Go to file → export and check if the "glTF 2.0 ( .glb / gltf )"option shows up. Click it !
Let's save the export parameters preset now so we have it ready for later :
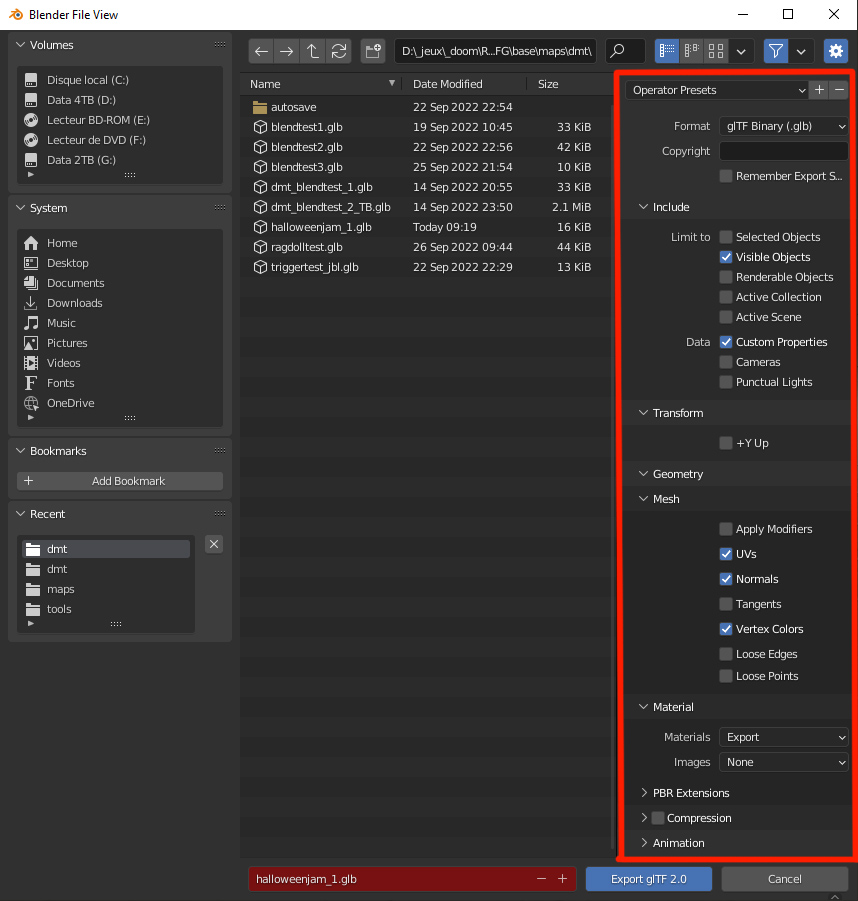
.GLB export setup Set the options as in the image above :
- Include :
- Limit to visible objects : I use this to keep some construction objects, or previous versions of objects
- Data : Custom Propreties : THIS ONE SHOULD BE ALWAYS TURNED ON or else RBDoom3BFG won't get any of the info it needs to run the level
- Transform : Tick "+Y Up"
- Geometry :
- Mesh : Uvs, Normals and Vertex Colors are ticked.
- Material : Set "Materials" to "Export" and "Images" to "none"
- PBR extensions and Compression : unticked
- Animation: Leave it as is : Animation On, Shape Keys On, Skinning On.
NOTE : These parameters might change with new updates of the engine. Let me know if it's not up to date !
- Include :
Save the preset : Click the "+" button on the top
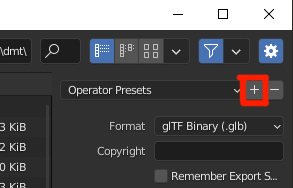
Preset save Name your preset "RBDoom3BFG" and save.
Saving a new "startup" file :
The unit system used in Doom 3 is used as is in the moment in Blender. But Blender uses metric by default, so we have to adjust some things (or else the viewport gets glitchy):
Viewport setup : With the "huge" distances we'll work with (compared to the Blender default), we have to adjust some things :
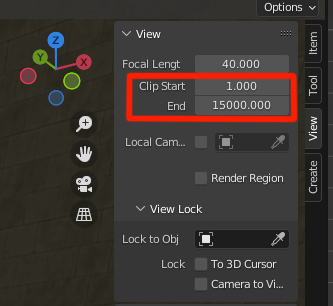
Setting correct View Clipping distances Type in the values above for "Clip Start" and "End". It should be enough for most cases,
Optional : Set up the unit system to "none" :
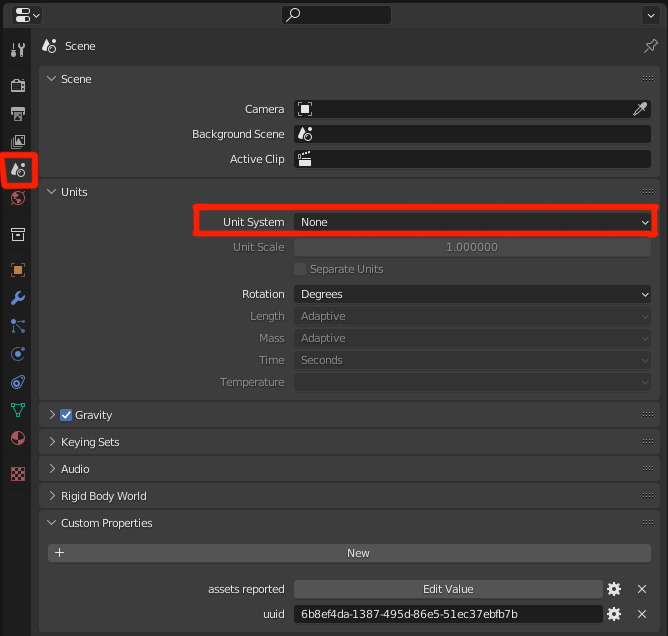
Setting Unit System to None
You can now save your blender file in the base/maps folder so you have it on hand. You can add to it what we will cover in chapter 4 and 5.
3. BASIC DOOM 3 ENTITIES KNOWLEDGE
In Doom 3 (and other idTech engines as far as I know), all the objects in the map file have at least one parameter for the engine to read and use expressed as the pair "Key + Value".
First, every Entity has a classname. A few examples :
- worldspawn : The root of the level geometry, static, Obligatory,
- info_player_start : The spawningpoint of the player when he enters the level
- light : So that we can see something in this goddamn research facility !
- Monsters
- Movers : Doors, elevators, machinery,... (the Doom 3 engine offers almost unlimited creativity with these compared to Quake 3 !)
Then, the other Key + value pairs are specific to each entity's type. For example :
- The direction in which the player is looking when he spawns
- You can set the color and power of the lights
- Specify the Health Points of a monster different from the default value
- etc
Here's a screenshot of the Entity properties panel in Trenchbroom :

In Blender, at the moment, you have to write all the keys + values as the object's Custom Parameters, which we will see right after.
4. BLENDER/GLTF FILE STRUCTURE
Maps, Models and Scenes
Blender can be used to create maps and models!
Mapping
When running "dmap myFirstGltfMap.glb" the engine will try and proces the scene named "Scene" by default. This is also the default scene name for blender when creating a new file. This can be changed to "MyMapScene" by setting the cvar : "gltf_MapSceneName MyMapScene".
Modeling
There are 2 ways to create models with Blender/GLTF for use in RBDoom3BFG
Using a unique .glb export per model
All meshes and their submeshes in the scene that was active while exporting will be used as a single model/mesh in game.
Using the same/one .glb to map and model.
(Advanced)
As mentioned above, a specific scene is used to create the map and can be changed. Similary the "models" scene will per default be used to lookup models if you want to store multiple models in the same glb. You can change this by setting the cvar : "gltf_ModelSceneName MyModelScene". When specifing the the model in a .def file or model property you have to explicitly specify the model you want to load like so:
"model" "maps/mymap.chair.glb"In the example above, the model tag will try and resolve the model chair from the models scene in the mymap.glb file. Same applies when specifing a mesh.
See Advanced Mapping and Modeling with Blender/GLTF for more info about using collections and animations.
Example map/scene setup
This step is not required, but I prefer to keep my file organized, so this is the organization I came up with. It's not carved in stone, anyone can come up with a way that better fits their needs.
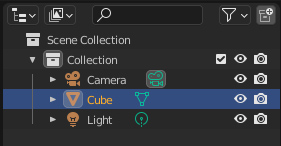
Here's the contents of the default Blender startup file :
And here's my proposition for a Doom 3 level :
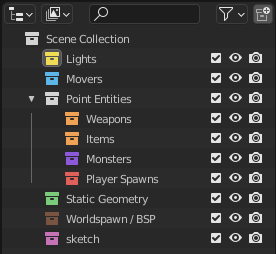
The collection of Point Entities is pretty bare bones compared to the total amount of different entity types available, so anyone making a more complex level will customize this to their needs.
NOTE: Currently, entities that reside in collections will not be picked up! only meshes/geometry can be nested!
5. MINIMUM REQUIRED ENTITIES FOR A MAP
Okay ! Let's make our first Box map !
(optional but recommended) reproduce the collection tree described in the previous chapter.
The Worldspawn Entity
The worldspawn entity isn't actually required, but It can store some options for the level, so I advice to always have one included in your level in case you would need them.
In Blender, this materializes as an "empty" object located at the origin coordinates.
- Press [shift + a] → Empty → Plain Axes.
- Name it worldspawn.
- You can move it in the "Worldspawn / BSP" collection in the Outliner tab.
- Make sure it's located at the origin coordinates :
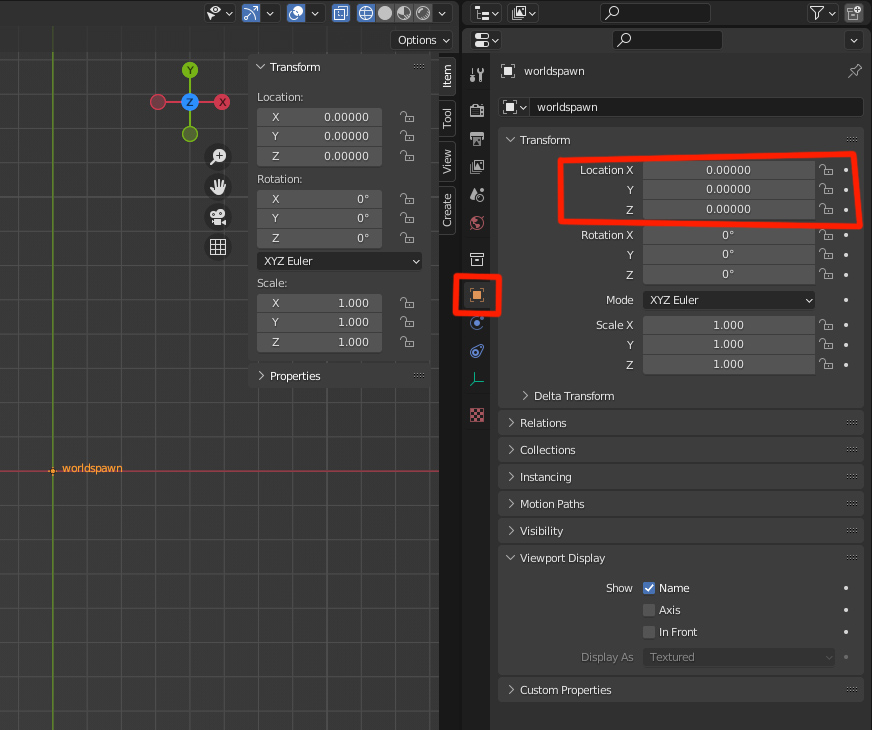
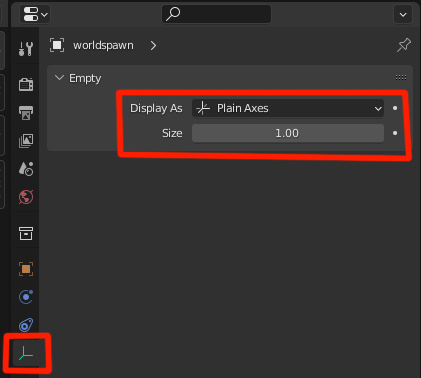
No need to give it a different viewport display, the default "plain axes" is fine, also with the default size of 1.
Then, The Custom Propreties have to be set up :
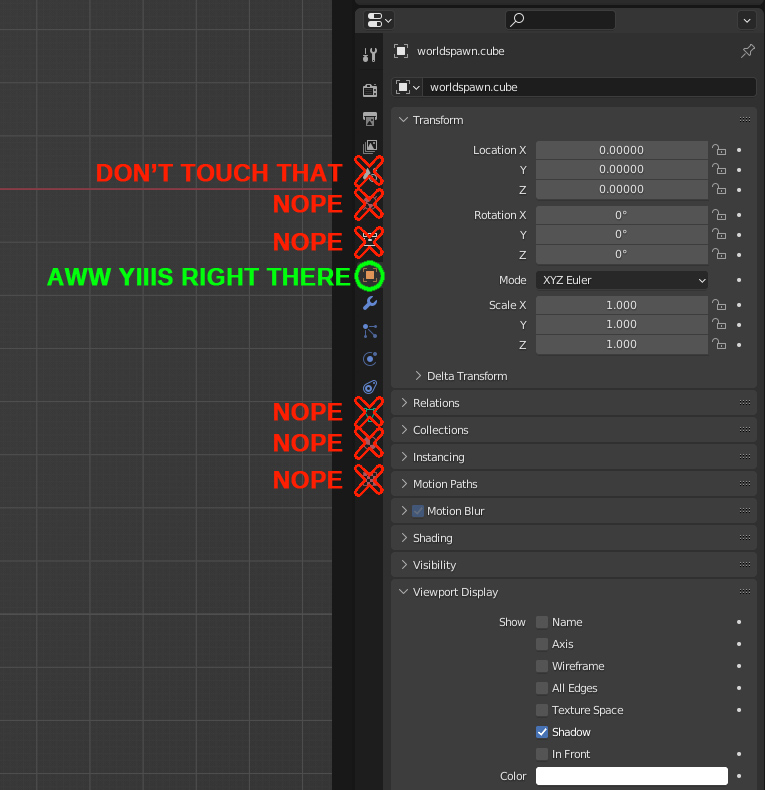
- Get back in the Object Properties panel (where we made sure the "empty" was at coordinates 0,0,0)
Click "new",
Click the little gear
set the type to "String",
Property Name to "classname"
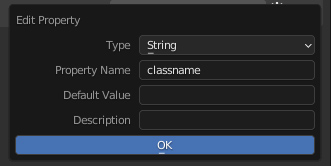
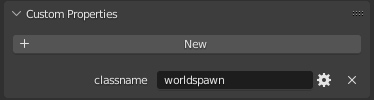
Then type "worldspawn" in the field next to "classname".
You should now have these info in :
The worldspawn entity can store othe info useful for your level, such as the path to background music, custom gravity ... You can check in TrenchBroom what's available.
The Worldspawn Geometry
Add a cube, with a size of 1024 for example.
Press [tab] to get into Edit mode, select all, and invert the normals ([alt + n] → Flip).
Let's ignore any kind of UV unwrapping for the moment.
Rename / add a new material, to an existing Doom 3 material, that is SOLID (if not, the map will leak and won't compile).
For example : textures/base_floor/a_sofloor3_d
Optional : Move all the geometry or the bottom face 512 units up (press [g] (grab) → press[z] (z axis) →type 512 + [enter].
(I like when the ground plane is at 0 ^^')
In the Outliner, move the "Cube" into the "Worldspawn / BSP" and rename it "worldspawn.cube"
No need to add custom propreties :
[The compiler will take any objects with the "worldspawn." or "BSP" prefix to make the level geometry structure]
The Player's spawning point
Create a new Empty object, display type "Cube"
Set the size to "64"
(For the moment, we use a cube for visual guide, but in game the player size is 32x32x64)
(optional but good to do for consistency) Rename the object to info_player_spawn_0
Add the custom propreties : Classname : info_player_start
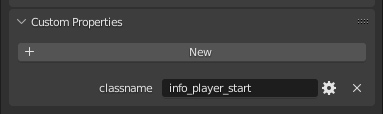
info_player_start Move it a bit further from the origin point, and 32 units above the ground, and anywhere inside the cube on the horizontal plane
Save your file ! (Gotcha ! I'm sure you forgot about that !)
The Light
Add a Light → Point object.
Add the Custom Properties Classname : light as described earlier
Add another Custom proprety :
- Type : String
- Name : light
value : 512
The default value of a light in Doom 3 is 300, if you don't specify the value in the entity, it will revert to that,
If you use the Material preview or the viewport Cycles renderer, you have to multiply the light value entered here by 750 to have an approximation of the light's radius in Blender. Yeah this gives absurdly high numbers, but it's because of how point lights work in Blender
Exporting and testing
Go to file → Export → glTF 2.0 ( .glb / gltf )
Save the ,glb file in base/maps
(I usually create another subfolder, all the compiling creates additional files and the main folder can easily get crowded)
Run RBDoom3BFG.exe
Open the console, type dmap myboxmap.glb (it should be almost instantaneous)
type map myboxmap.glb
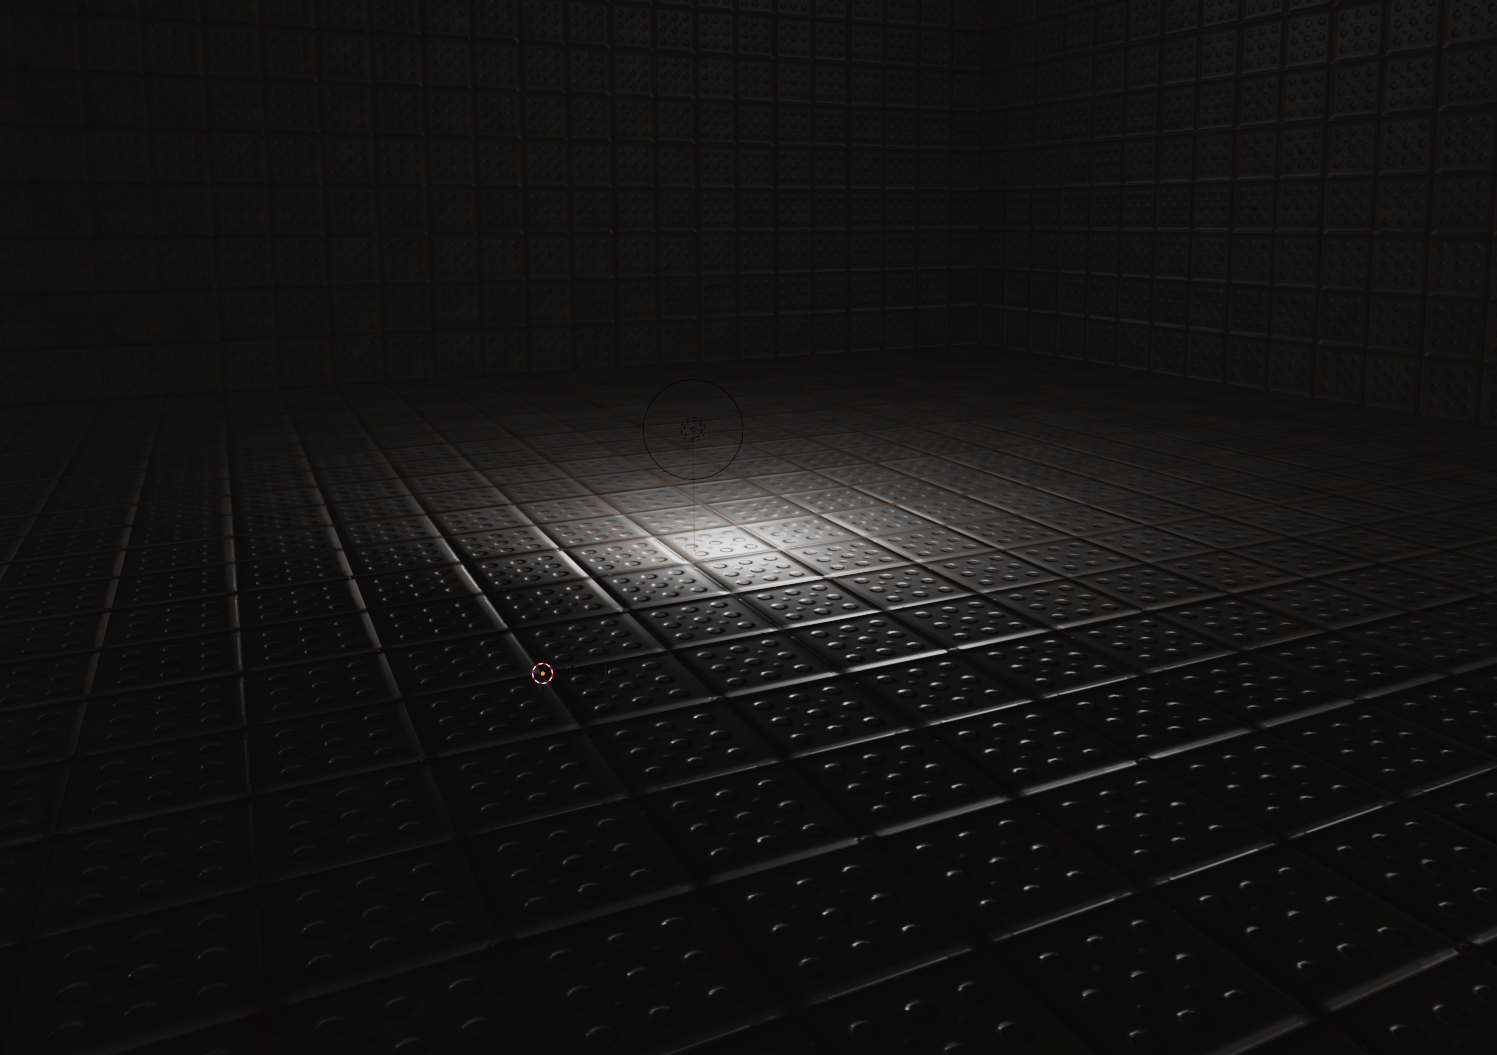
You should spawn and have a view that looks somewhat like that :
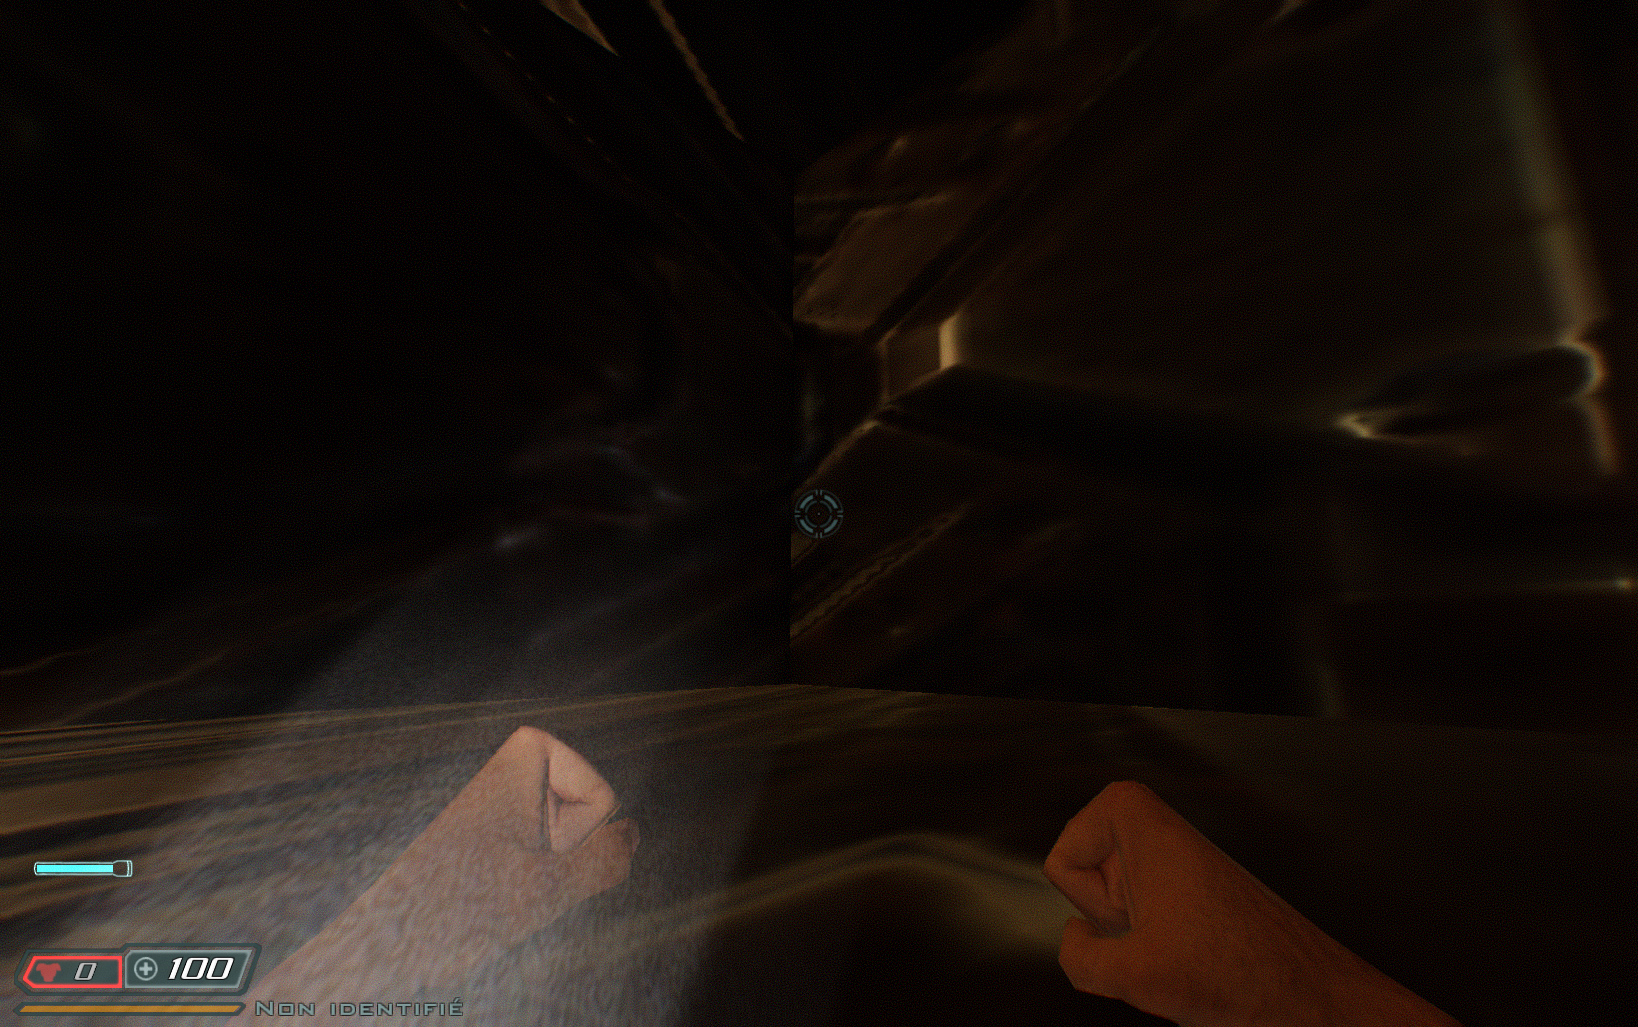
ingame test
Congratulations !
When in doubt, open the idTech4 wiki or Trenchbroom, look at the list of all available entities, and all the available key + value pairs you can use.
Common user errors :
Multiple times, the map wouldn't load, or my entities would not show up ingame after exporting the map.
The mistake was that I didn't enter the custom propreties in the right tab. IT HAS TO BE IN THE OBJECT TAB !
Also, watch out for typos !
Future plans
There are some plans by @SomaZ on the Discord Server to develop an Add-on that makes adding key + value pairs more convenient that inserting them manually in the Custom Propreties tab. Also update the light power value directly from what you enter for the entity. And a simple button to export the map without having to talke the long road through the menu and dialog. And possibly more features, but let's wait for a release to document everything.
6. TEXTURES / MATERIALS
I will make assumption you know how to set up materials in Doom 3 / RBDoom3BFG.
To assign a material to a mesh and have it display correctly ingame, it's really simple :
Create a new material in the corresponding tab while having your mesh object selected (worldspawn.cube in the previous chapter for example)
Rename it with the material's path and name in your Doom 3 folder. Example :
textures/base_floor/a_sofloor3_d (which I like a lot)
(Yes, it's as simple as that to have it working in game !
But since we didn't UV Unwrap our Cube, it looks like shit :
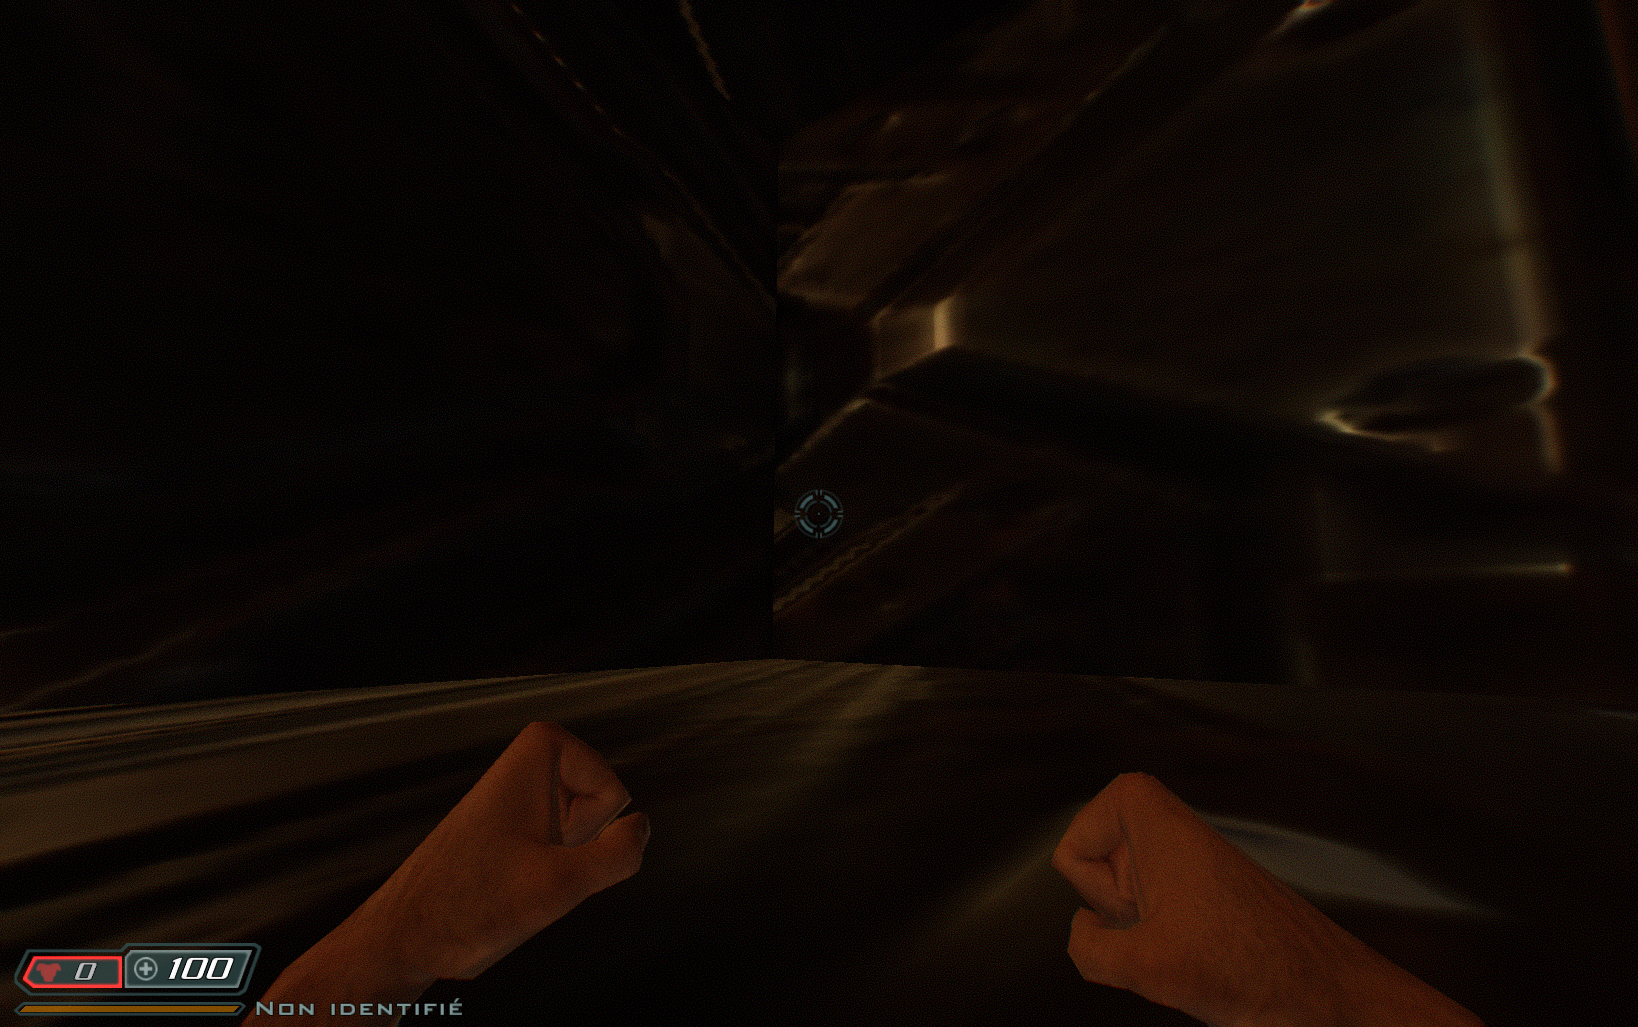
Let's fix that quickly.
Divide your workspace with with a 3D viewport, a UV Editor, and a Shader Editor.
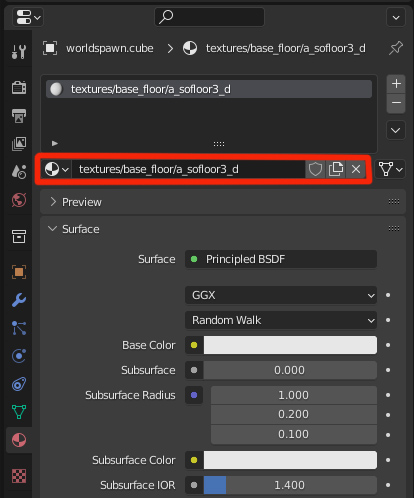
Select your textures/base_floor/a_sofloor3_d01f And set up a "dummy" material.
I use the word "dummy" because it's only for visualisation in Blender, this has no incidence in RBDoom3BFG, because it only relies on the material defined in the .mtr files.You can find the corresponding image files to any of the doom 3 textures you want in the following folder : /base/_tb/textures/*.
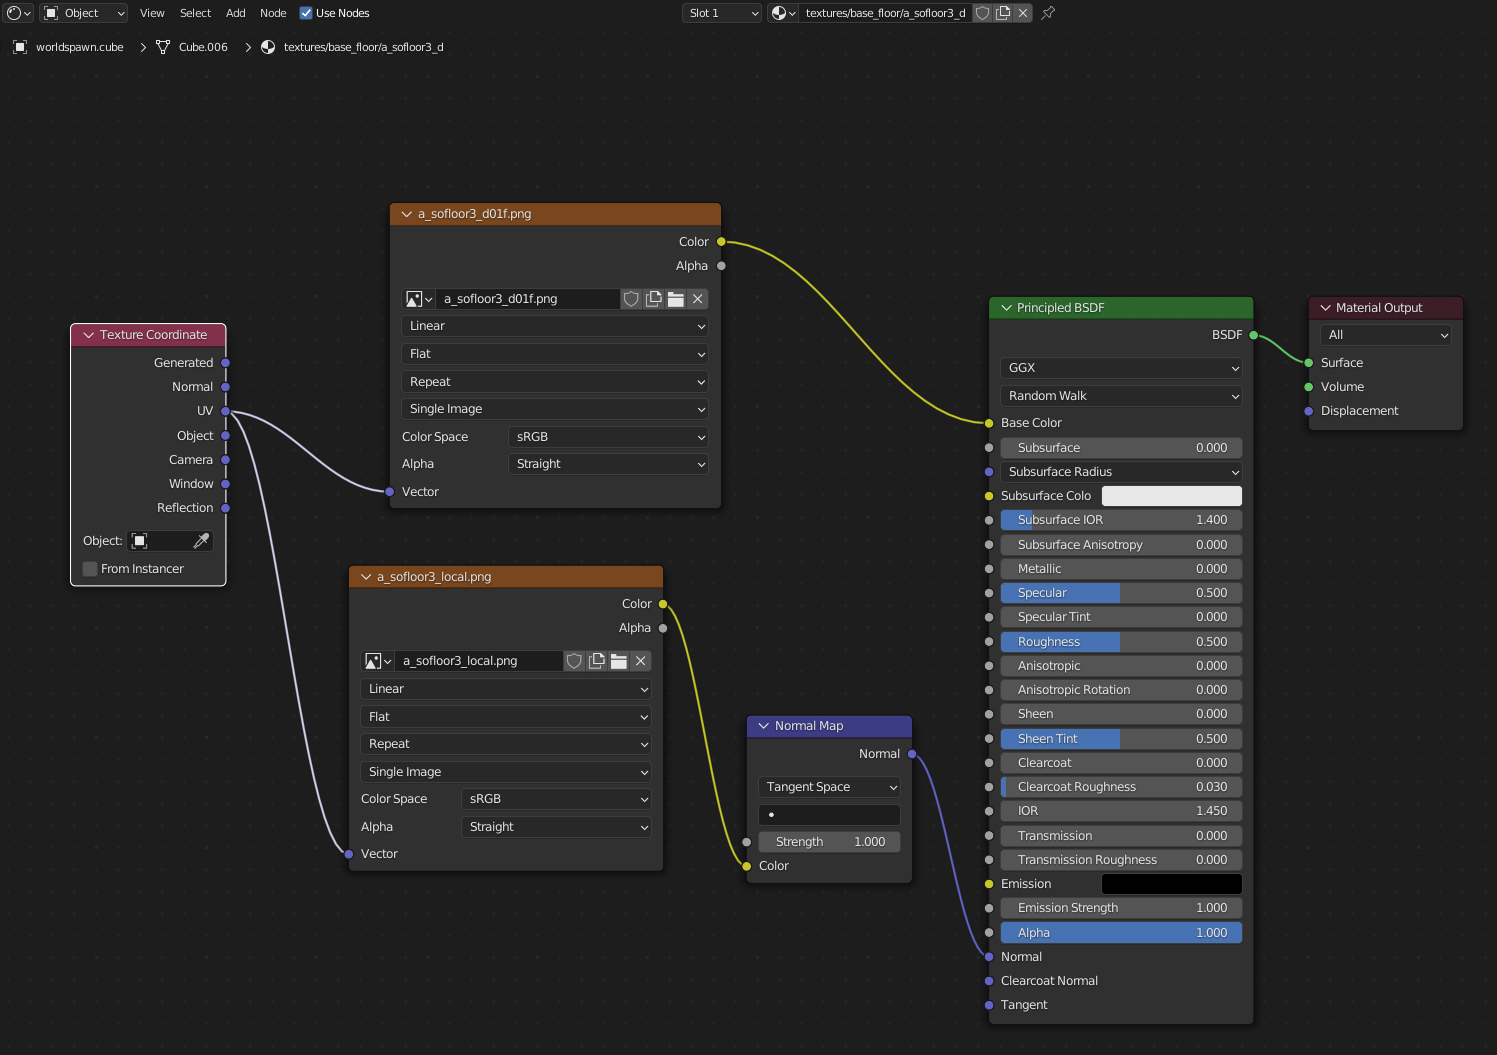
Material Setup If you want to use the original Doom 3 textures, you can also explore the texture browser in Trenchbroom to find one you like, and then type in the name in Blender + browse to get the corresponding image file. We might have a texture browser in the future, along with all the game entities, all conveniently using Blender's new Asset Browser. But it's not done at the time I'm writing this.
In the 3D viewport, press [tab] / go to Edit Mode, press [u], select Cube Projection, press Enter. In the UV Editor, you cans select all faces and scale them by 16 for example. It should start to look more natural in Blender :
Viewport Preview And Also in RBDoom3BFG after re-exporting and re-compinling the map :
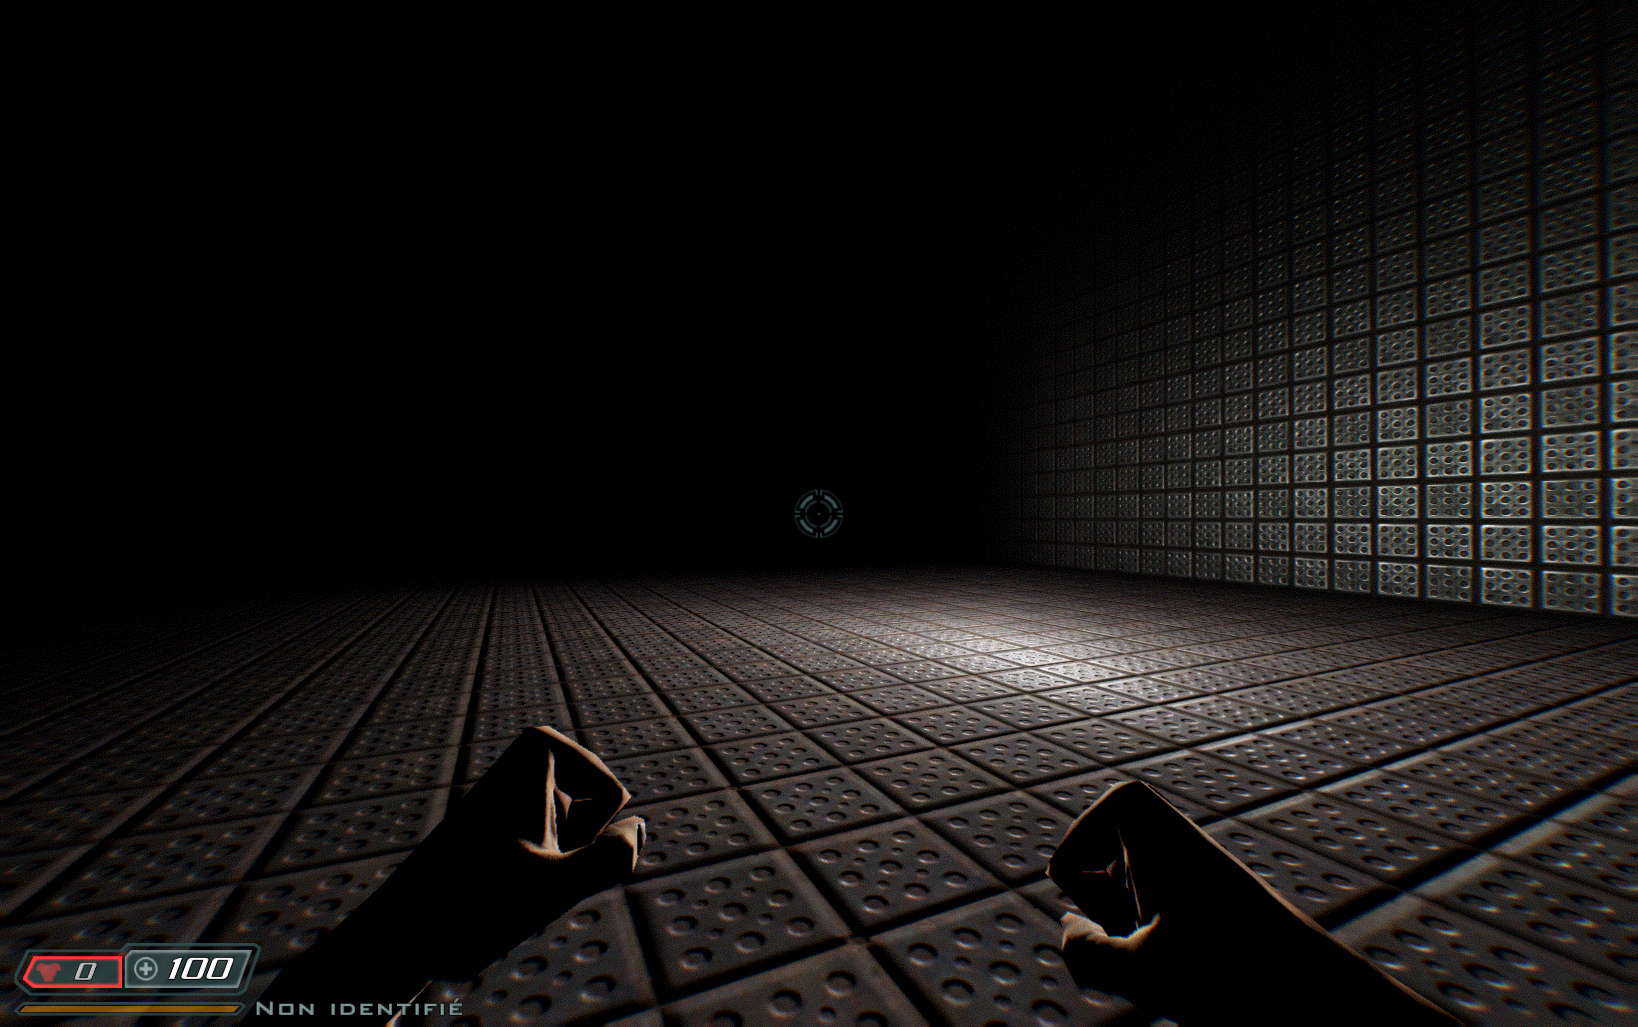
ingame View Warning : If there is a spelling error in the texture name you entered, the dmap compilation will say the map is leaking. Watch out !
7. MAKING A MORE COMPLEX MAP AND USING VISPORTAL
Okay, let's spice things a little. One of the most important features if idTech engines since Quake 1 is the ability to hide the parts of the level that aren't seen in a very efficient way. This is also achievable here without using a traditional level editor.
Make a quick layout with several rooms connected by corridors or simple doorways. You can start with the Cube we made earlier or start from a fresh piece of geometry. Make sure the geometry is "airtight" with no duplicate / overlapping vertices or holes, AND that your object is still named "worldspawn.something" (and in the "Worldspawn / BSP" collection").
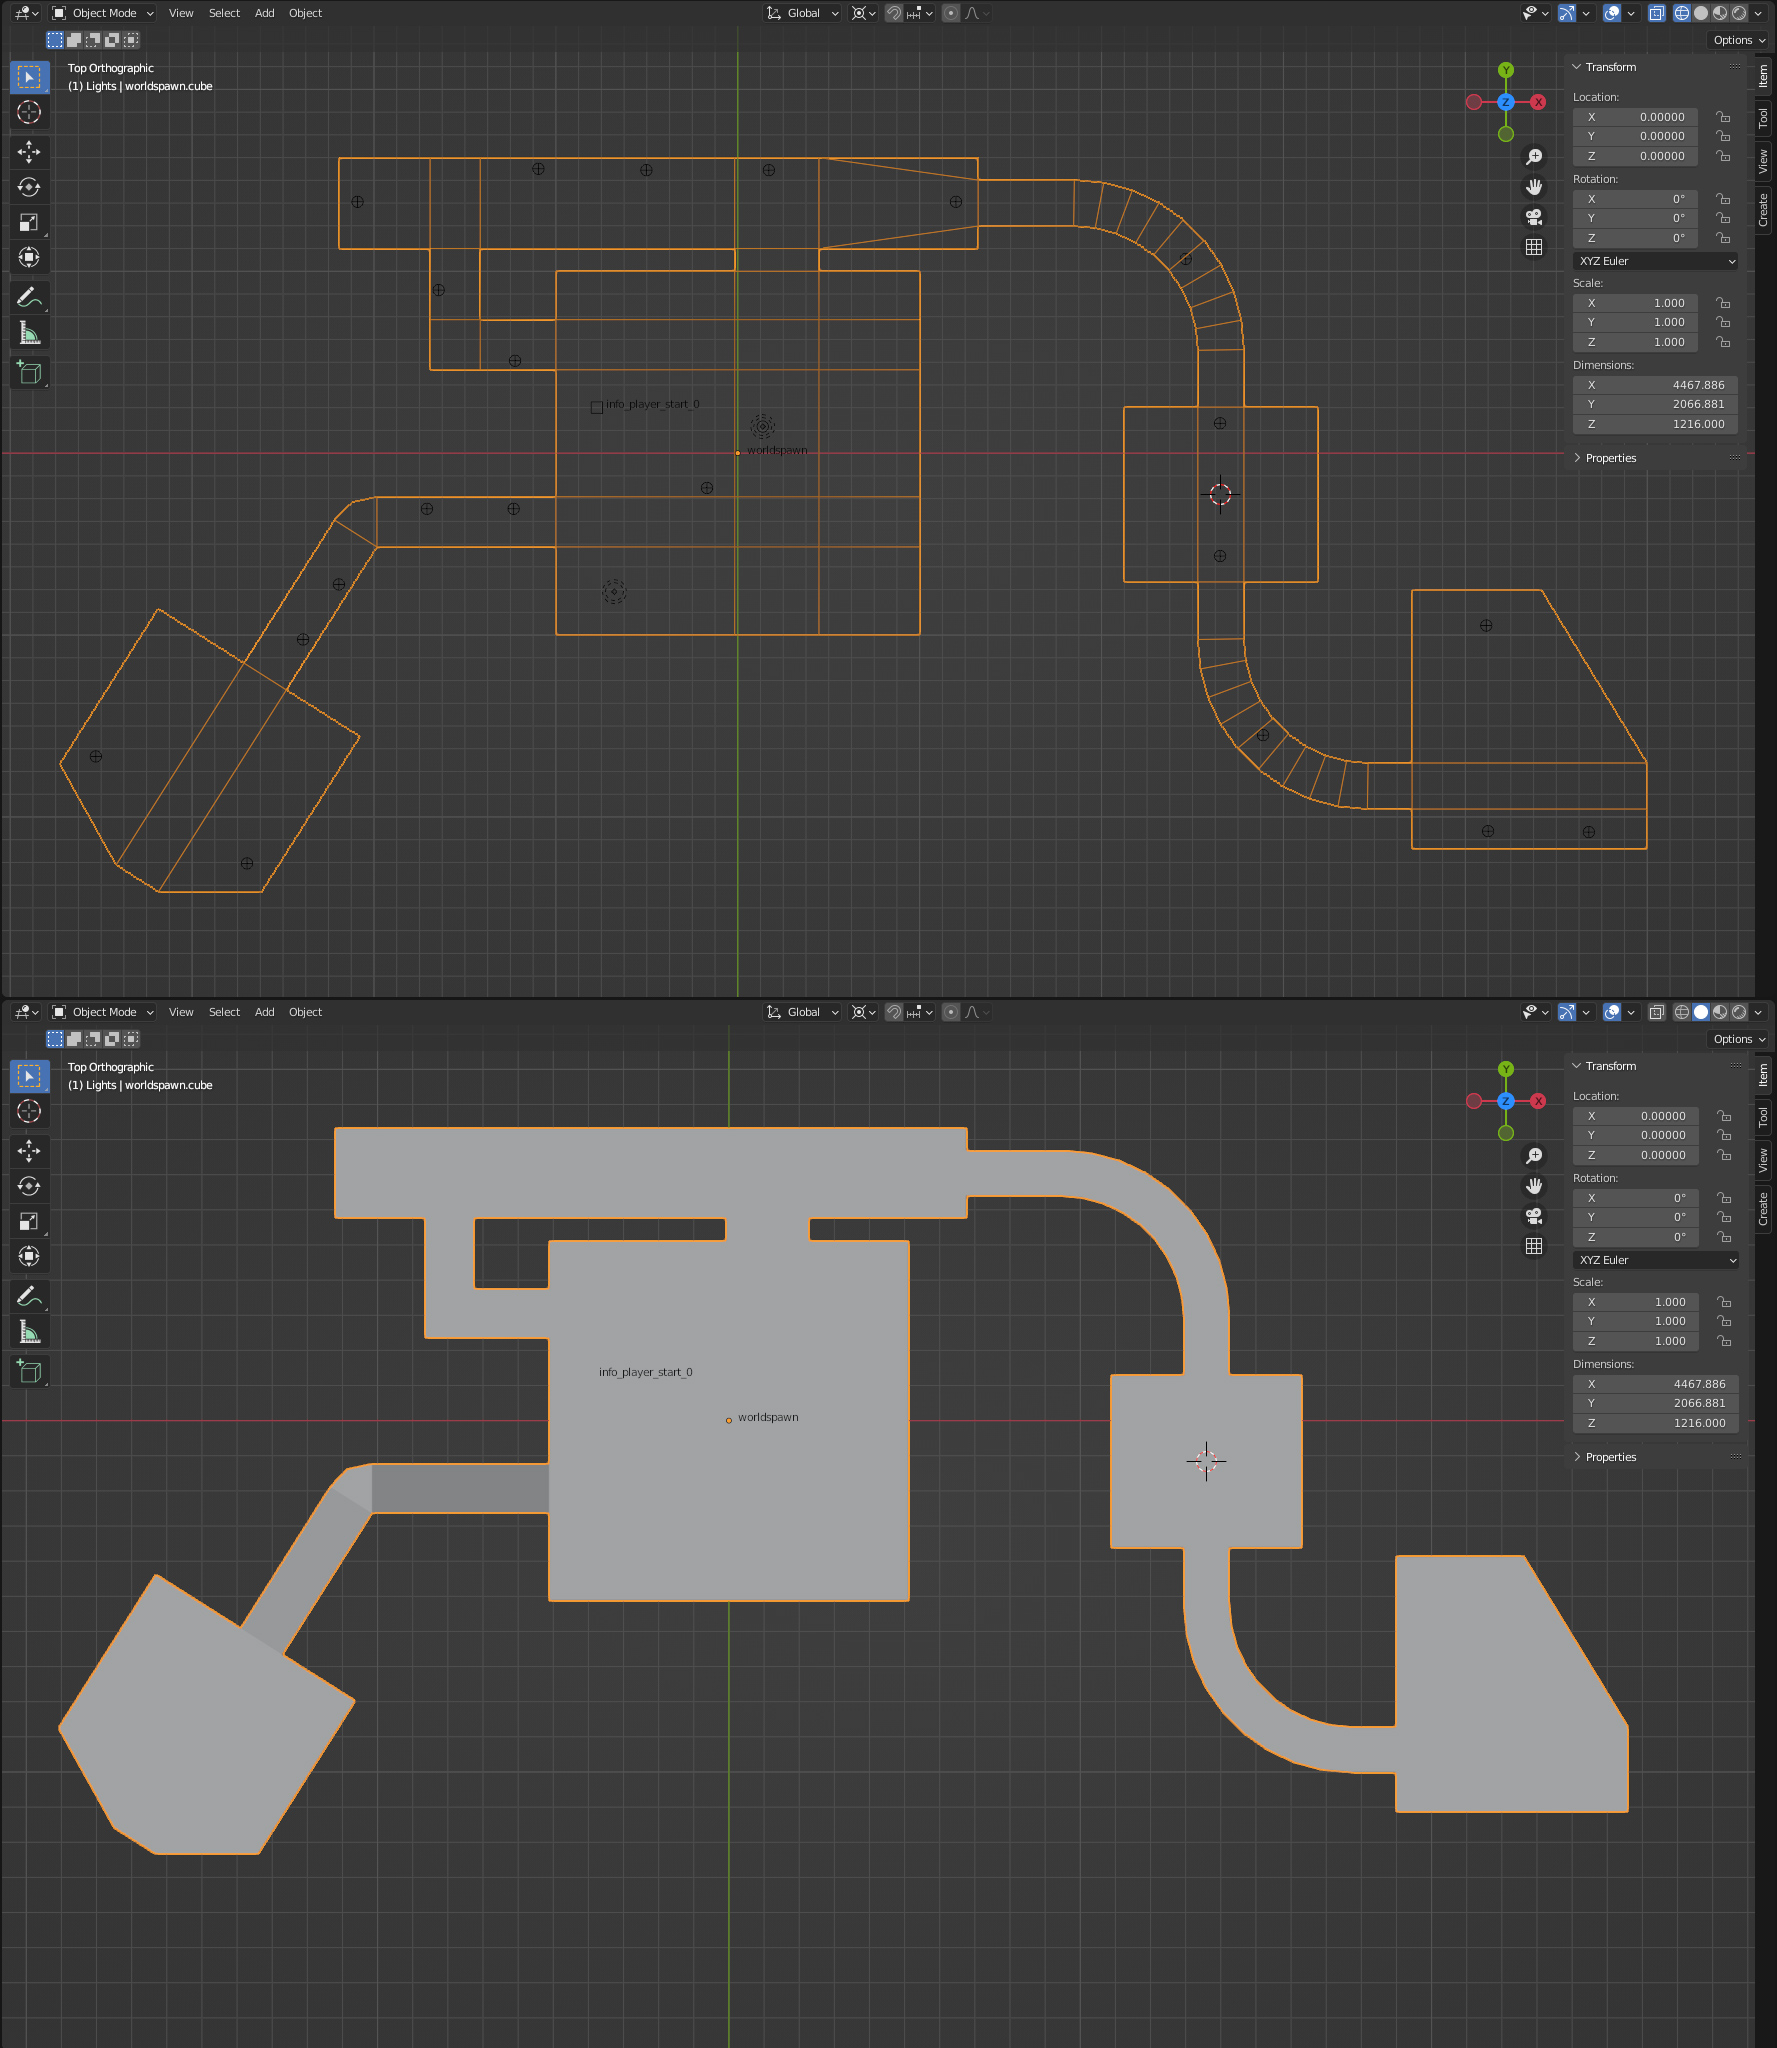
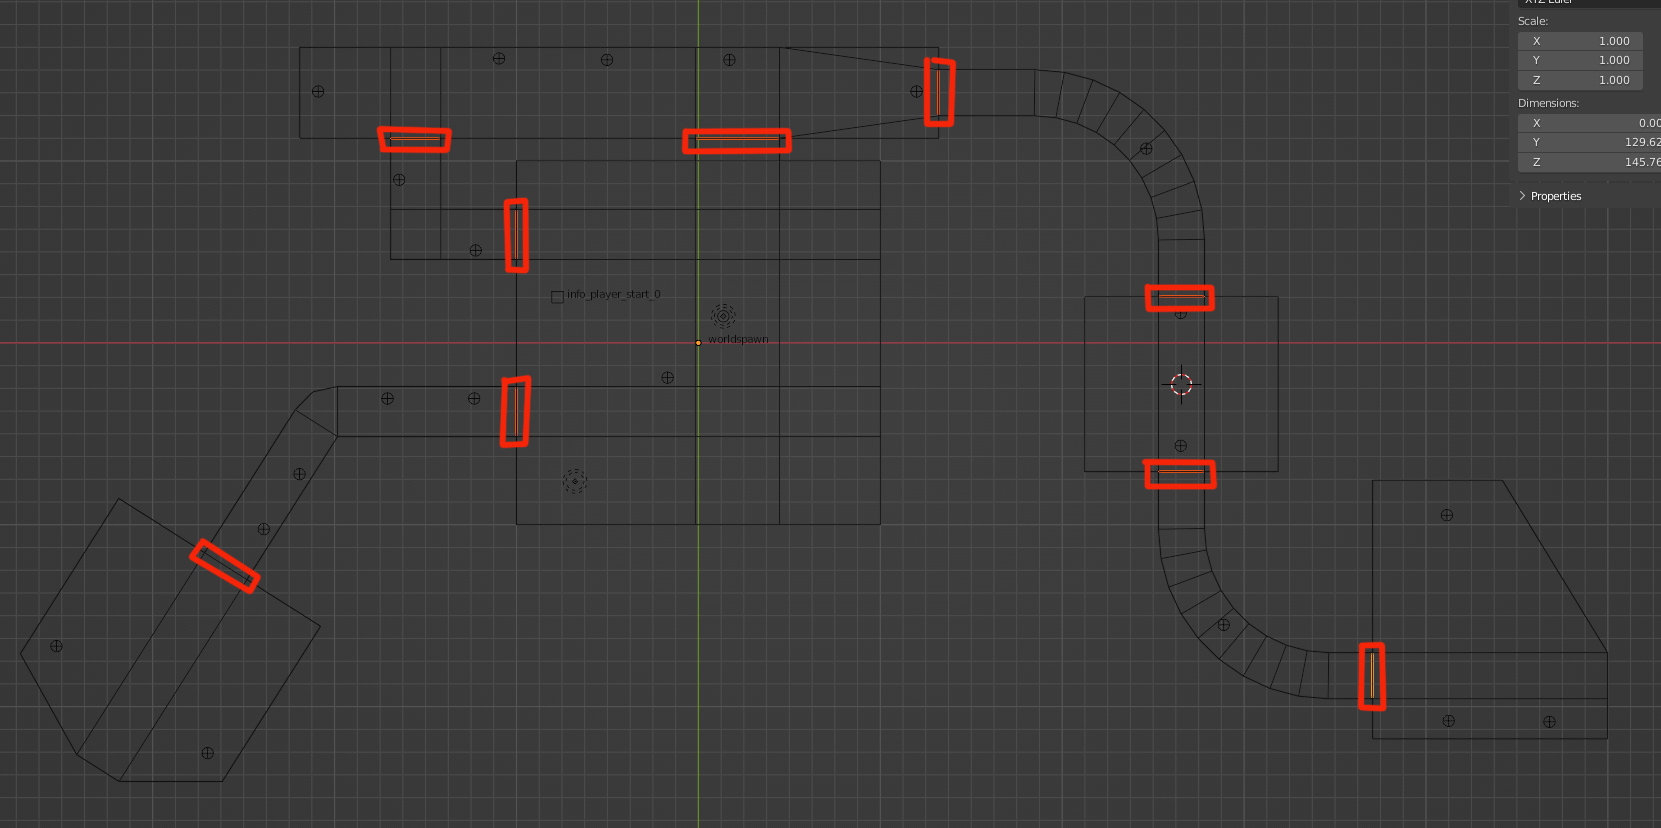
An example Level Layout In Edit mode :
- take the frame of the entrance of a corridor, and make a face out of it (press [f]).
- Press [p] to separate it from the mesh into a new object.
- Give it a new material called
"textures/editor/visportal".
→ No need to load a texture or UV unwrap this, just add a base color to the material (purple for example, to mimic the tone it has in Trenchbroom or Radiant) to make your work more readable in the 3D view.
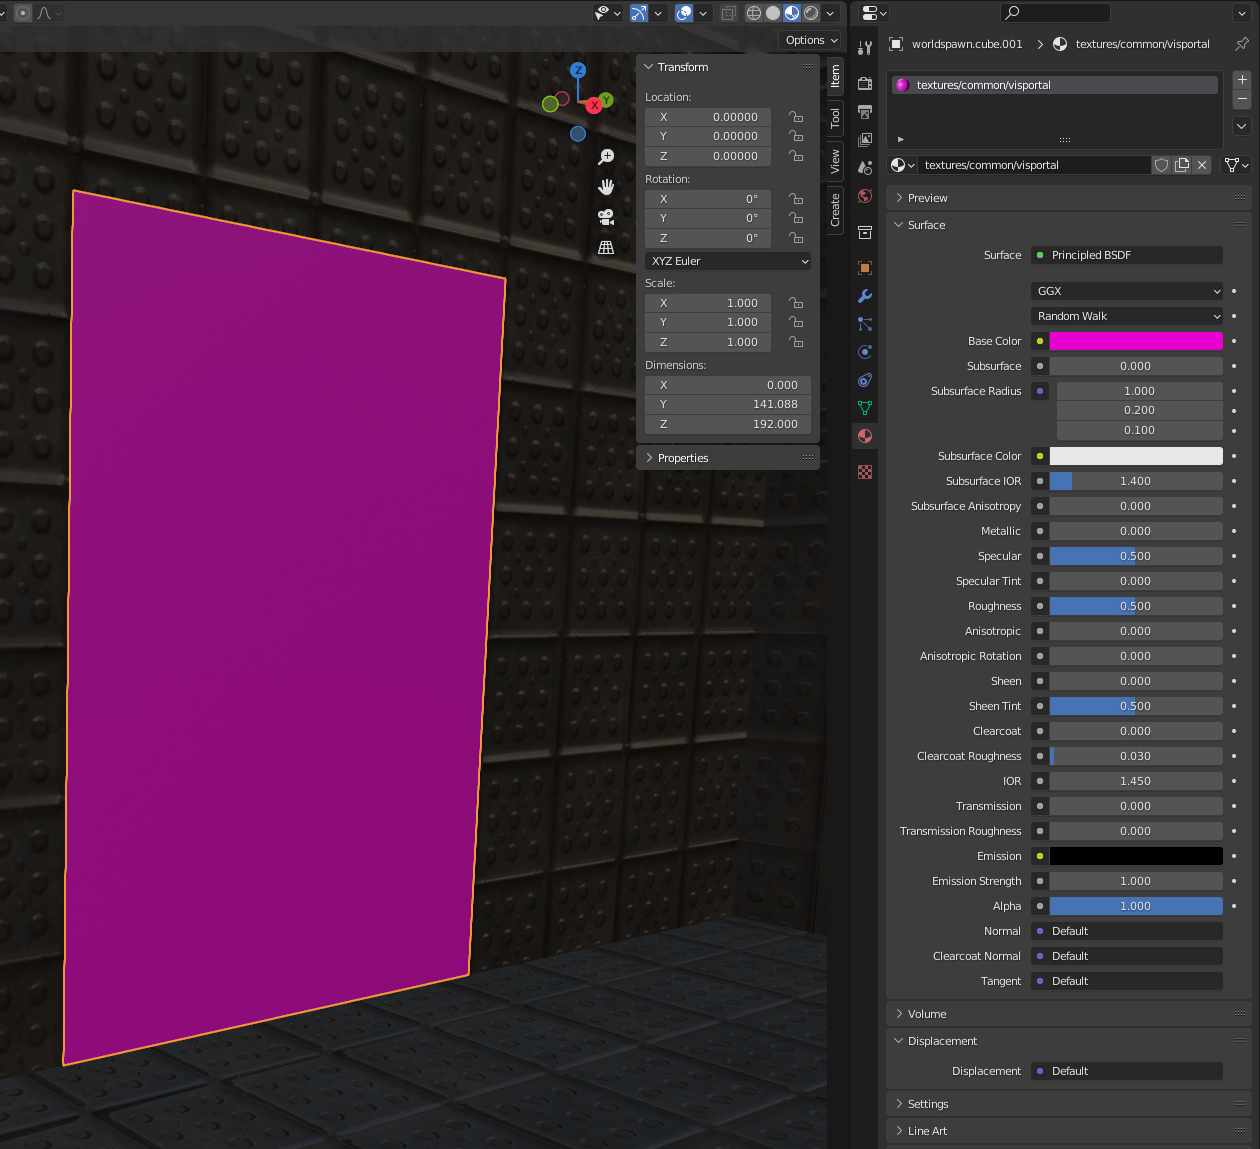
Visportal Material Setup Repeat previous point for all the corridor and room entrances
Visportal Placement Export and try it out !
After loading the map, type in the console :
- r_showPortals 1
- r_showTris 2
Pretty easy isn't it ?
8.WORLDSPAWN VS FUNC_STATIC
Okay, having some basic level geometry is nice, but what if I want some nicer, more complicated things ?
For this application, it is not needed – and not recommended – to use geometry as worldspawn.* objects, like we did previously. We will use an entity classname called func_static.
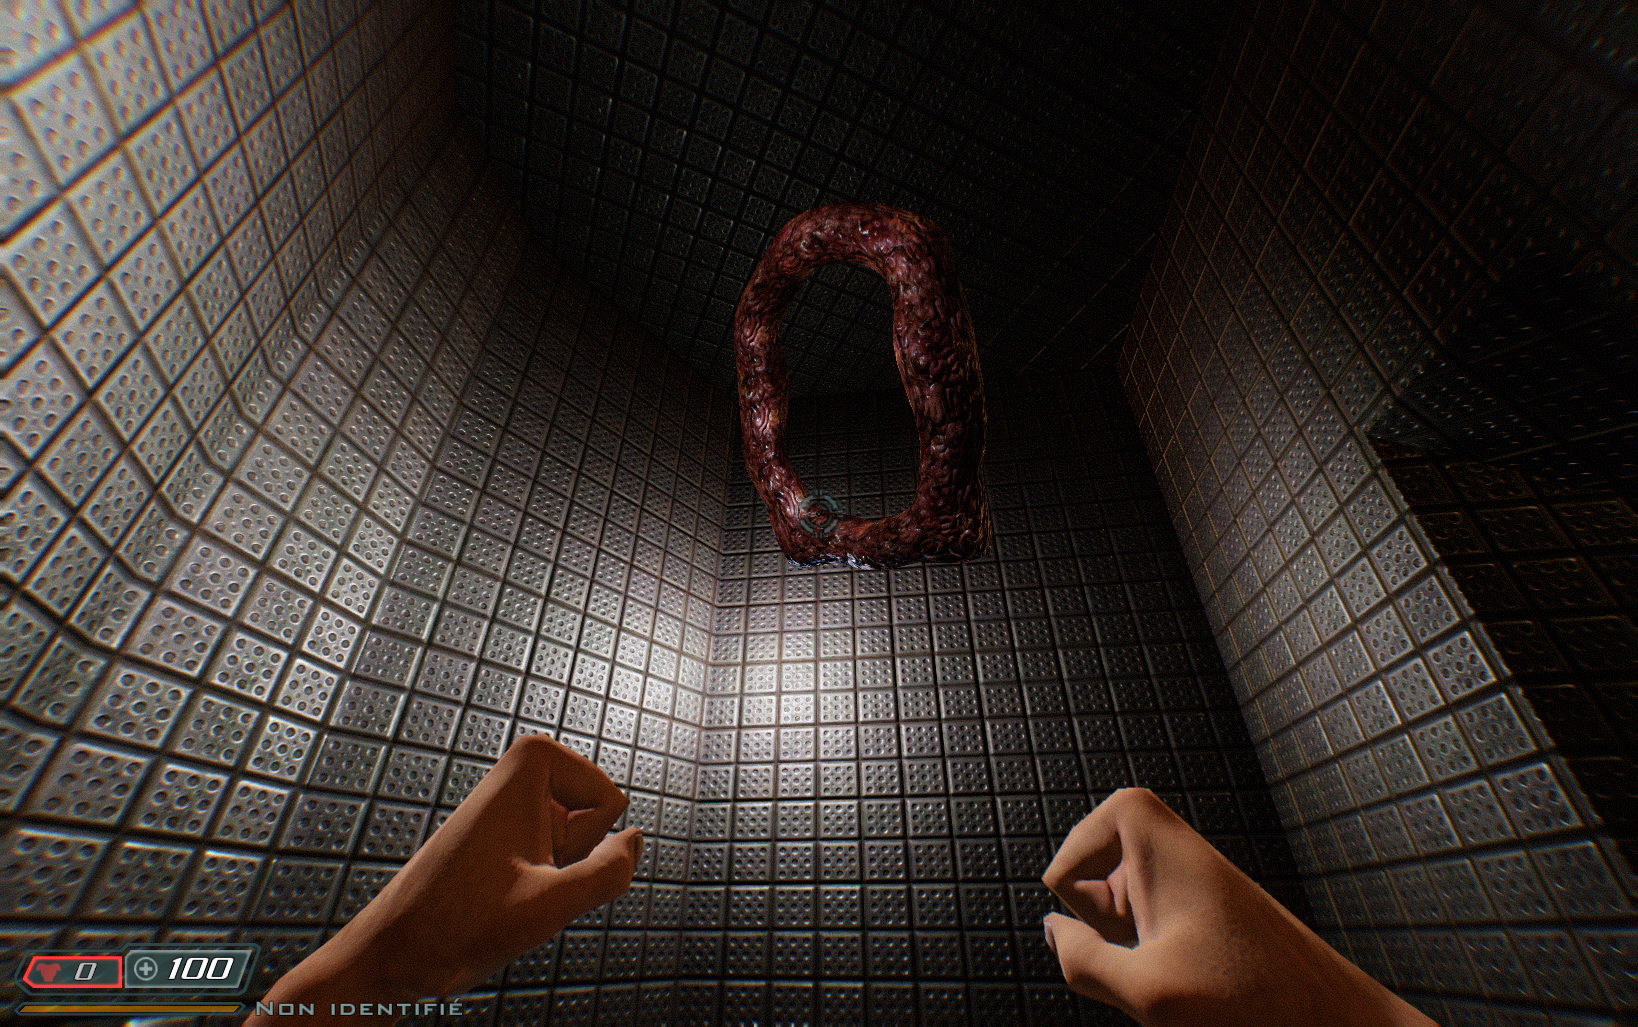
For this example, I'll add a Torus. You are free to insert any mesh you want, even a complete modeled and textured asset you prepared earlier. I'll modify it a bit to make it weird and quickly unwrap it (again, this is just to show an example, no time to make a nice intricate thing).
Give it a name (in the Object tab or in the Outliner) so you can distinguish it from everything else.
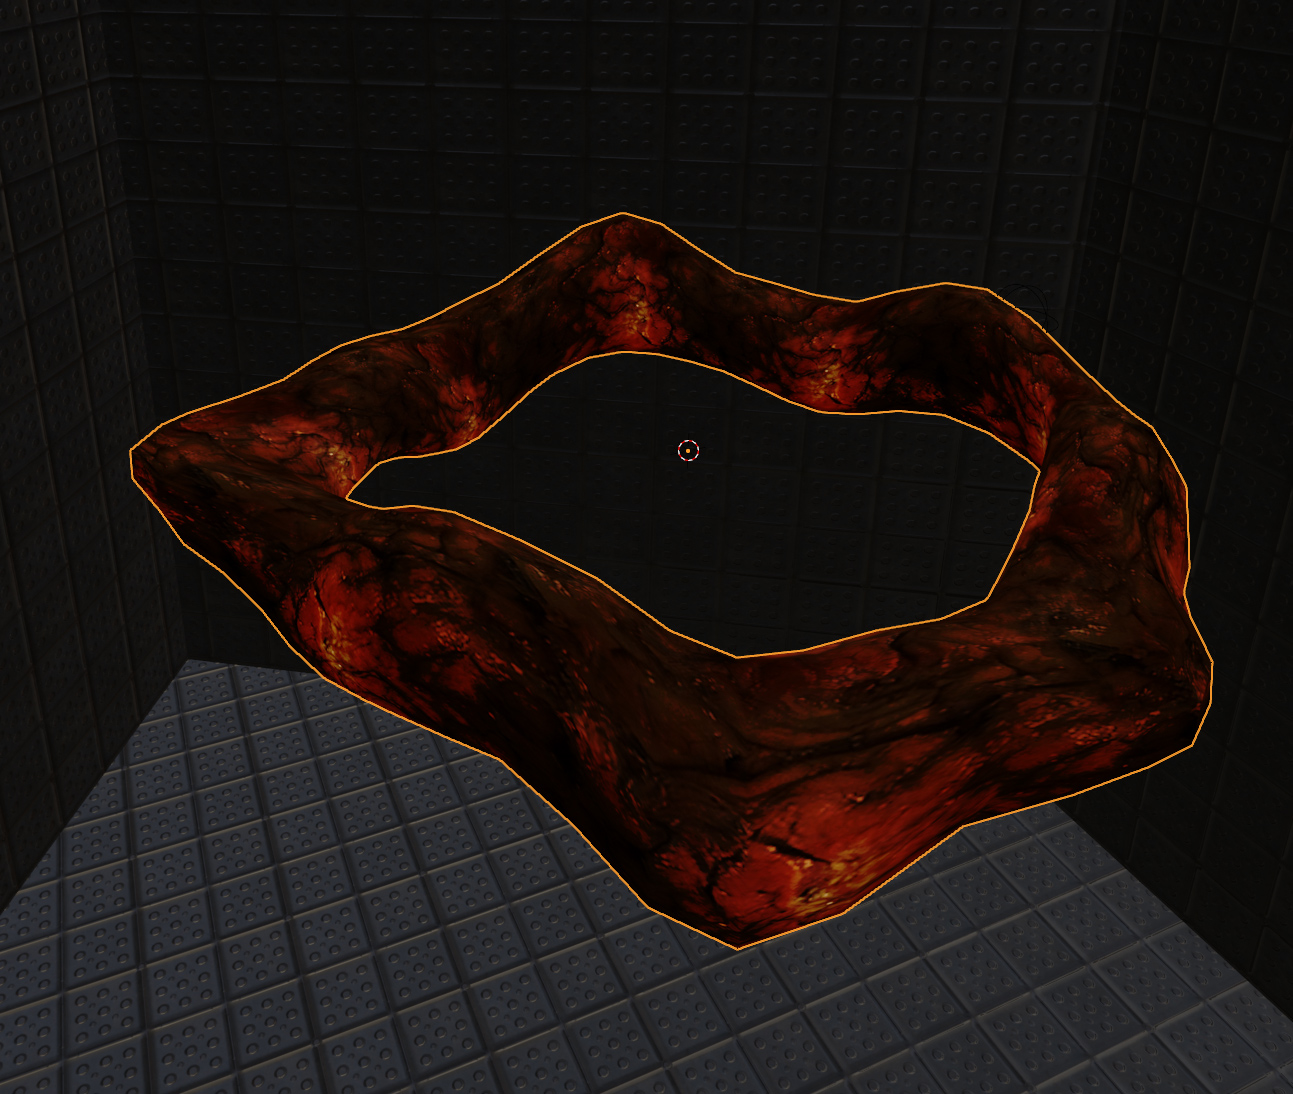
A Fleshy Torus <<The Great Bowel Ring>>
Move the object in the "Static Geometry" collection and add these in the custom propreties tab :
- "Classname : func_static"
- "model : yourobjectsname"
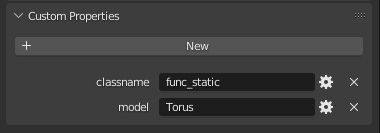
func_static Export, compile and run the map to check it out !
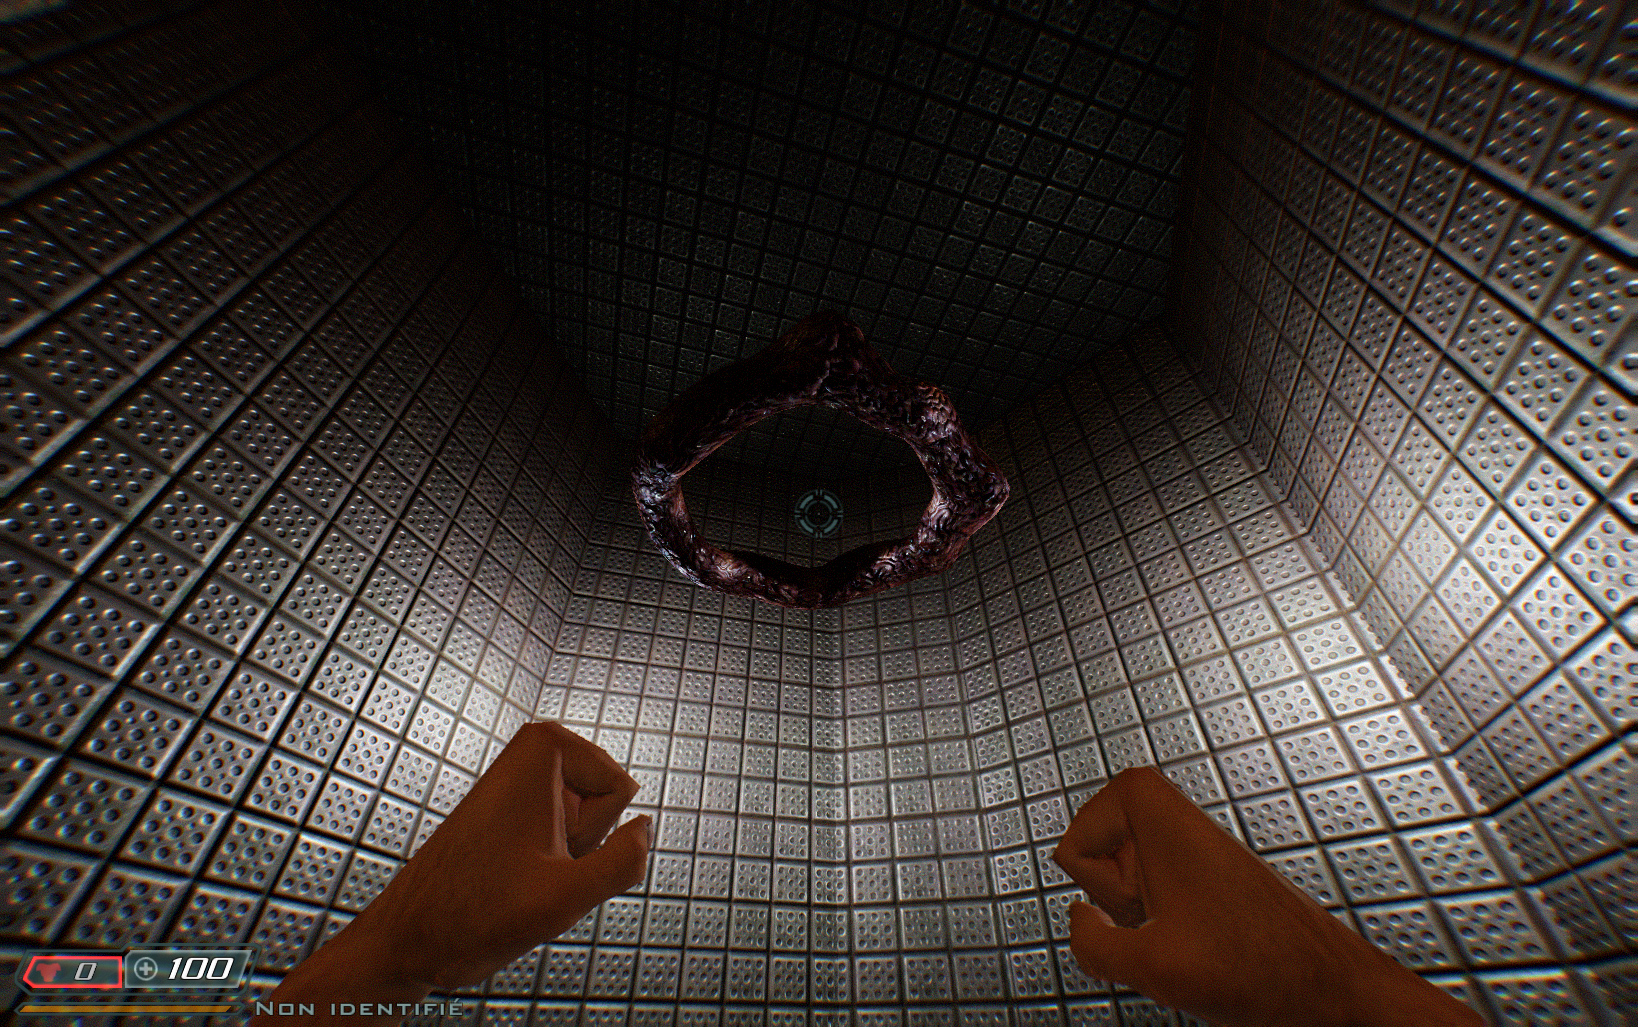
ingame View If you want to use an seperate model/mesh as func_static but you do not want the geomerty to be included in the worldspawn geomerty/bsp but as a seperate model, you can do so by using the inline : 0 property. This is usefull when you want to keep your dmap compile time low.
- "Classname : func_static"
- "model : myModel.glb
- "inline: 0
9. MOVABLES AND ENTITY ORIGINS
So, we have covered most of the things, this last one is almost a bonus, but it's just to make an intro on the most magical of subjects : Moving things ! Things that move !
For the example's sake, I'll be making some func_rotating, but in Doom 3, it's when using the func_mover that you can get the most freedom. But you control them using level scripts, so it's out of the scope of this document. Normally you should now have enough knowledge to explore further, I'm sure you can do it !
Let's stay with my fleshy torus here, and make it into a rotating flesh torus
Move the torus into the Movers Collection we had created earlier in chapter 4
In the Custom Properties tab :
Change Classname from func_static to func_rotating
The model string stays the same, as we didn't change the name of the object.
Add the following keys and value :
- x_axis : 1
- speed : 200
Save, export, compile and run. Your object should be turning around !
Final note : for all the moving mesh entities in Doom 3, the object's origin is used as the pivot point.
For objects that are only moved around, this is not too important, but at the moment where you want to turn it around, it's this origin point that will be used as the center. Define it correctly if you want it to move in the way you want !
10. TRIGGERS
Triggers are invisible volume entities that get activated when the player (or any other game entity) goes through them. When activated, in Doom 3, they are usually used to call script functions.
I won't add screenshots here as this process uses all of the techniques we've seen earlier.
To learn how to set triggers up, I'll be using a trigger_hurt, that simply hurts the player – The effect is clearly visible when activated, so you can see right away if you did it right or not.
Create a shallow platform with a different texture, as a func_static (as described earlier), anywhere on the ground of the map. This is to help visualize and move where it is to try it out,
On top of it, add a new object, a cube or a cylinder, at least 64 units high to match the height of the player. Call it "trigger_hurt_test" for example, and move it to the "triggers" collection (add it if you don't have it).
Create a new material for it, called "textures/common/trigger". Like for the visportal earlier, you can give it a custom color, in TrenchBroom and Radiant it's usually yellow. And no need to find a texture image for it.
In the Custom properties, add the following :
- Classname : trigger_hurt
- model : trigger_hurt_test
Save, export, compile and try it out ! When moving on the platform, PAIN should happen.
11. DEBUG OPTIONS
gltf_parseVerbose 1 | 0
This will print every property / gltf item to the console while the GLTF is parsed. In essence it shows you the .gltf content (which is also present in a glb, but then packed)
12. CONCLUSION
Congratulations if you made it through !
I hope this document was helpful for you, in the same way that I find it liberating to be able to use Blender as a level editor for RBDoom3BFG. Even before talking about making a standalone game, having the freedom to use a modern and feature packed tool like Blender t make maps is really exciting to me !
If you're new to level design for Doom 3, then most of the general tutorials you can find online can be applied in Blender
Credits : Tutorial written in october 2022 by D-Meat (dmeat.art@gmail.com - @D-Meat on the [idTech4 Discord Server](https://discord.gg/B4Hx8SSs))