How to add water
This article shows the various options to include water in a map. Water is a special effect composed of several functions: visually it should have some measure of transparency, refraction and reflection whilst it should also allow swimming through object buoyancy.
Modders should also bear in mind that not all water effects need be created equally: a very shallow water puddle with perhaps very dirty or polluted water doesn’t need transparency. By the same token it’s completely unnecessary to add water physics to it or other bodies of water the player is never supposed to enter in the first place.
Visuals
This section describes the various options to achieve the visual effect of water. Although not entirely realistic you should also include the noshadows keyword in your water materials.
Transparency
To achieve this in your water material you need only include the translucent keyword.
Reflection
There are two basic ways to achieve reflection. One is to use the mirror keyword; the other is to the mirrorRenderMap as a stage. For example:
{
    blend   blend
    mirrorRenderMap 512 256

    translate   0.5, 0.5
    scale       0.5, 0.5
}
Of note here are the two parameters of the mirrorRenderMap instruction: these determine the size of the texture rendered to; higher values means higher quality but less performance. Reflections should never be put in materials with the twosided keyword to avoid visual artefacts.
Fresnel effect
This effect was first deduced by Augustin-Jean Fresnel when studying how light changes at it traverses the boundary between different media like air and water. Put simply and where it interests us, the fresnel effect happens when light breaks the surface of the water and how it affects reflectivity; the angle of incidence of the eye towards the surface of the water will determine how this will reflect light (from the sky, buildings, monsters, etc.). If you are on top of the water looking down then there should be very little light reflected off the surface of the water. However, if you are looking at the water surface at an angle then the farther you look into the more visible the reflection will be.
You can add the fresnel effect to your water through a shader . Here’s an example of one written by inolen :
!!ARBvp1.0
OPTION ARB_position_invariant;

TEMP R1, R2, R3, R4;

SUB R1, program.env[5], vertex.position;
DP3 R2, R1, R1;
RSQ R2, R2.x;
MUL R1, R1, R2.x;

DP3 R2, R1, vertex.normal;
SUB R3, 1.0, R2;
MUL R4, R3, R3;
MUL R4, R4, R3;
MUL R4, R4, R3;
MUL R4, R4, R3;

SUB R3, 1.0, program.local[0];

MAD result.texcoord[2].x, R4, R3, program.local[0];

END

!!ARBfp1.0
OPTION ARB_precision_hint_fastest;

TEMP A, C;

MUL A, fragment.position, program.env[1];
TEX C, A, texture[0], 2D;
MOV result.color, C;

MOV result.color.a, fragment.texcoord[2].x;

END
You should save the above into a “fresnel.vfp” file and put it in the / glprogs folder. You can then call it in your material.
A complex water reflection
Using all the above you can create the following material:
textures/water/fresnel
{
    qer_editorimage textures/glass/glass1

    translucent
    noshadows

    {
        blend   blend
        mirrorRenderMap 512 256

        translate   0.5, 0.5
        scale       0.5, 0.5

        program fresnel.vfp
        vertexParm  0   .0200593122
        fragmentMap 0   _scratch
    }
}
Refraction
The surface of a water body also bends light that breaks through the surface from either direction. We can easily simulate this phenomenon with the “heathaze” . VFP shader. In practice however, it’s not very efficient to do this for a stale puddle. Also because the Doom 3 engine only allows one fragment/vertex program per material if you want to use this in conjunction with the “fresnel.vfp” shader above you will need to put the refraction into a separate material. Because of this we’re going to be using the following refraction material only when some measure of movement is desired in the water’s surface.
textures/water/refraction
{
    qer_editorimage textures/water/refraction.tga

    translucent
    noshadows
    twosided

    {
        program     heatHaze.vfp
        vertexParm  0   time * 0.1 , time * 0.1 // scroll
        vertexParm  1   0.5 //magnitude
        fragmentMap 0   _currentRender
        fragmentMap 1   textures/water/refraction_local.tga
    }
}
Note that this material doesn’t use any reflection and we want the refraction to be visible from outside the water looking in or when you’re underwater looking out so the inclusion of the twosided keyword. On the other hand, if the player is never supposed to be underwater you can drop it. Of special note here is the “refraction_local.tga”, a normal map you will have to create to simulate the wavelets and ripples in the water. “VertexParm 0” controls the direction and speed of the movement while “VertexParm 1” controls how pronounced the distortion will be.
Adding the visuals to the map
Add a patch to your map and give it your water material. If you’re using the fresnel shader you can subdivide it to achieve more accurate reflections at the expense of slightly slower performance. Either way the patch should be flat to avoid reflection visual artefacts; likewise the water surface should also not be broken by a visportal or any other material that uses the areaportal keyword.
If you want to use refraction add another patch and set it a few units above the patch with fresnel.
Interaction
Water is more than just pretty reflections however and when the player needs to enter a body of water then something else is required.
 Note: Doom 3
only:
Note: Doom 3
only:- While Doom 3 doesn’t include them from the box you can download this WaterPhysics mod that facilitates this functionality.
Volume
If a player enters a body of water then you should always have the refraction material described above with one change:
textures/water/refraction
{
    qer_editorimage textures/water/refraction.tga

    translucent
    noshadows
    twosided
    water

    {
        program     heatHaze.vfp
        vertexParm  0   time * 0.1 , time * 0.1 // scroll
        vertexParm  1   0.5 //magnitude
        fragmentMap 0   _currentRender
        fragmentMap 1   textures/water/refraction_local.tga
    }
}
Adding water bodies to the map
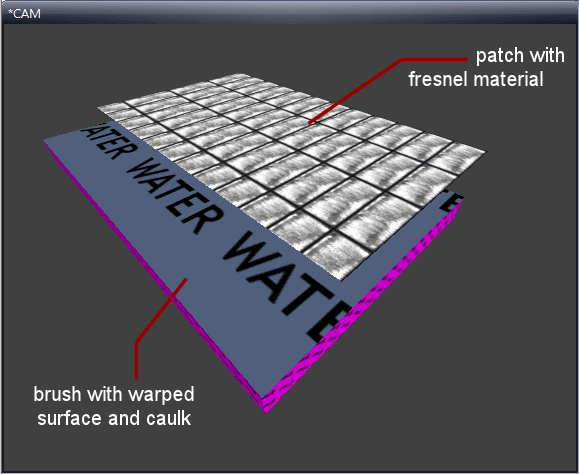
Start by creating a brush with the “caulk” material. Then for the top surface (or whatever surface stands for topmost if you are tinkering with gravity ) select the “refraction” material described above. With the brush selected, make it a func_liquid.
Visuals and interaction
To marry both the complex visuals and physics you then create a patch with the “fresnel” material. You should now have something like this:
You then resize the patch and/or brush so that both surfaces have the same area and move the patch until it is just below the surface which has the “refraction” material, like so:
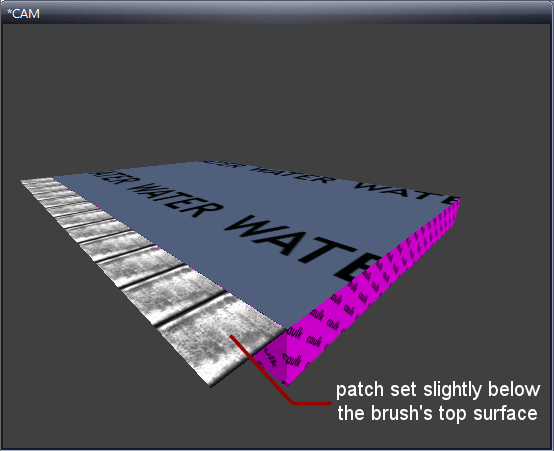
The patch depicted in the above image is slightly larger than the water_surface’s area for the purpose of this tutorial. You can then subdivide the patch as suggested in the “adding the visuals to the map” section. When this is done, select both components and make them into a func_liquid.